Direct answer: Foam rolling after Pilates is a low-cost, low-risk way to wind down for most healthy adults, and research suggests it may modestly reduce how sore you feel and briefly improve range of motion. The effects are small, not guaranteed, and not a substitute for rest, sleep, or good programming. A sensible routine takes about 8 to 12 minutes, uses light to moderate pressure, and avoids joints and the lower back.
This guide is for people who already take Mat Pilates or Reformer classes and want a straightforward, evidence-aware cooldown that doesn’t turn into a 45-minute side project. You’ll find what the research can and can’t say, who should skip rolling or check with a clinician first, how to choose a roller, a full-body sequence you can follow step by step, common mistakes, and how to fit it into a normal week. It is general fitness education, not individualized medical advice.
What Foam Rolling After Pilates Can and Cannot Do
Foam rolling sits in an awkward spot of the wellness world: enough research to take it seriously, not enough to justify the confident claims printed on some roller packaging. Before you spend a single minute on the floor, it helps to know what a reasonable expectation looks like. This guide is a research-based, expert-informed editorial built on published studies and health-organization guidance; we did not conduct hands-on testing of any roller.
What the research actually shows
The best available evidence comes from small studies, mostly in healthy, active adults, pooled together in systematic reviews. The findings are consistent in one way: the effects are modest, short-lived, and highly dependent on how each study was run.
Short-term comfort and range of motion
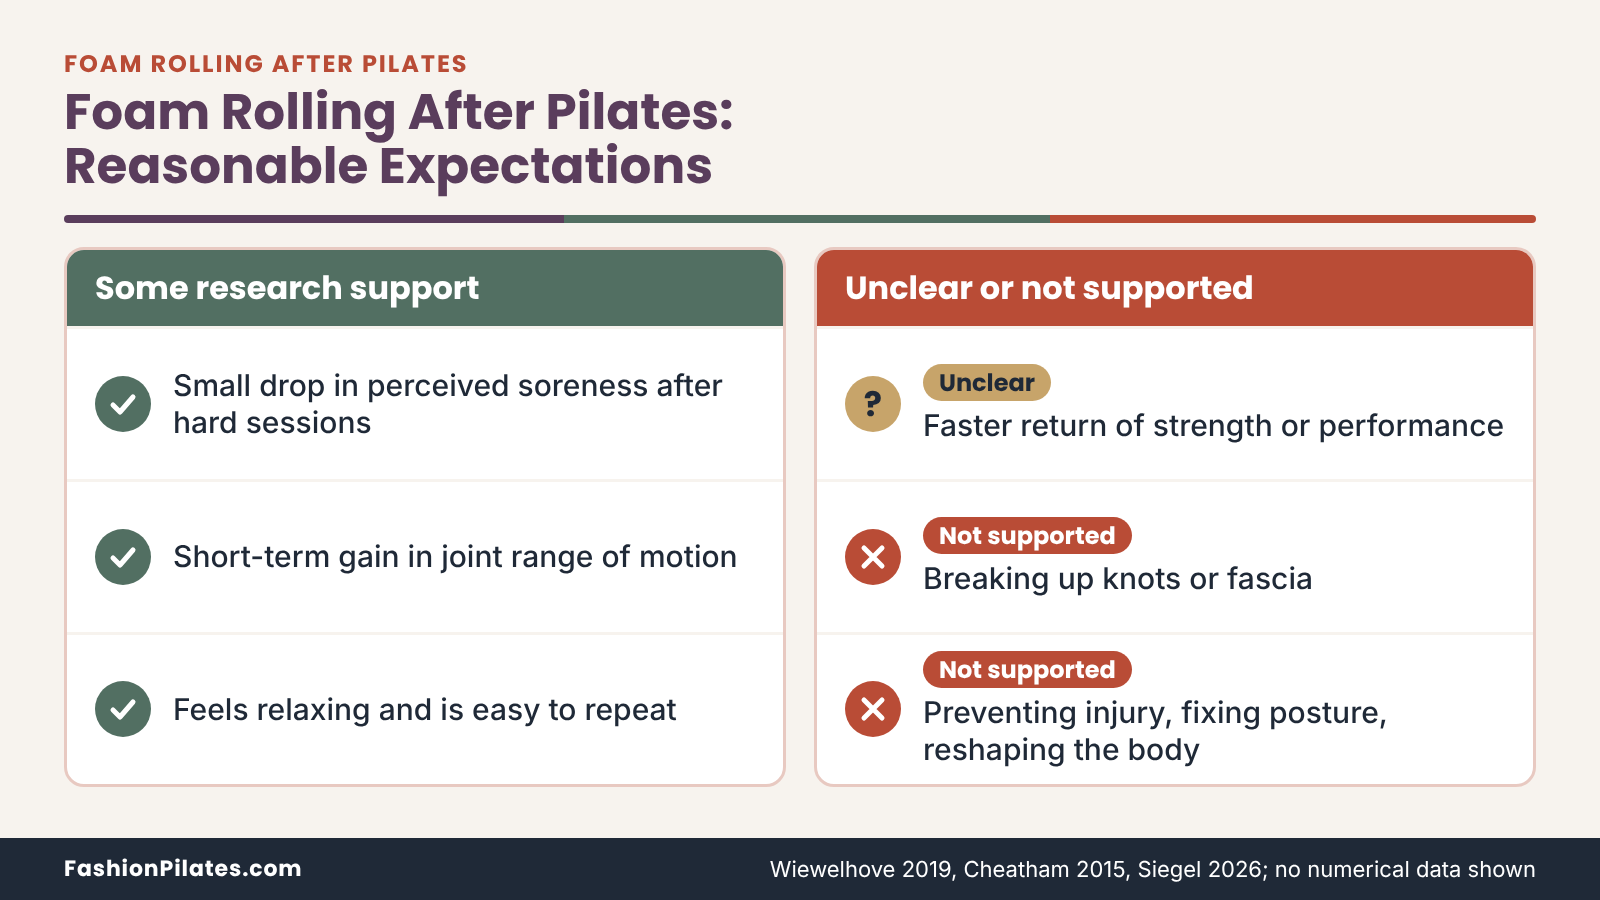
A 2015 systematic review of 14 studies by Cheatham and colleagues found that foam rolling and similar roller tools appear to have short-term effects on increasing joint range of motion without hurting muscle performance, and the authors noted there is still no consensus on the best rolling program. Range of motion simply means how far a joint can move, which is why a few minutes on the roller can make a forward fold or a deep lunge feel a little easier right afterward. Think of it as a temporary change in how a movement feels, not a permanent change in the tissue. The change tends to fade, which is why researchers treat rolling as something you do around a workout rather than a long-term flexibility plan.
Soreness after hard sessions
Delayed onset muscle soreness, usually shortened to DOMS, is the achy, tender feeling that tends to show up a day or two after unfamiliar or demanding exercise. A 2019 meta-analysis of 21 studies and 454 healthy, physically active participants by Wiewelhove and colleagues found that rolling after exercise was linked to a small reduction in perceived muscle soreness, about 6 percent on average in their pooled estimate. That is a real but modest difference, roughly the gap between noticing your hamstrings on the stairs and noticing them a little less. The same review reported only minor effects on how quickly strength or sprint performance bounced back.
What it does not do
The marketing around foam rollers often promises more than the research supports. A few popular claims deserve a calm, specific correction.
Fascia, knots, and the “breaking up” story
You will often hear that rolling breaks up knots or sticky fascia, the connective tissue that wraps muscles. A recent international survey and evidence review led by Siegel and colleagues examined what practitioners believe about foam rolling and concluded that support for performance gains, injury prevention, and fascial adhesion explanations remains limited, with safety data described as scarce. In plain English, the research does not show that a roller physically reshapes your tissue. The more cautious explanation is that pressure may change how tender or tight a muscle feels, possibly through the nervous system, and that is a different and more modest claim.
Injury prevention, posture, and body shape
No credible source supports the idea that rolling lowers your injury risk on its own, corrects posture, or reshapes how your body looks. The same survey and review found injury prevention evidence inconclusive, and Cleveland Clinic’s overview of foam rolling states there is no scientific evidence that it improves the appearance of cellulite. Rolling also does not replace the work Pilates itself does on strength and control. If you finish class feeling stiff, rolling can be one comfortable tool among several, but it should never be the thing you rely on to make training safe.
Before, After, or Not at All
Search results for this topic often assume rolling belongs at the end of a workout. The research is more mixed than that, and the timing question is worth a few minutes of thought because it changes what you should expect.
Timing: what the evidence leans toward
Both timing options have supporters. The deciding factor is what you want rolling to do for you on a given day.
Why some reviewers lean toward the warm-up
The Wiewelhove meta-analysis reached a notable conclusion: the evidence seemed to justify foam rolling as a warm-up activity more than as a recovery tool. Rolling before exercise showed small benefits for flexibility and sprint performance, while the effects after exercise were generally minor. For Pilates, that suggests a short roll on tight spots before class, such as calves or the upper back, may do more for how you move in class than rolling after. That doesn’t make the cooldown version pointless. It simply means the “recovery” label deserves modest expectations.
When rolling afterward still makes sense
There are good practical reasons to roll afterward. Your muscles are warm, you’ve already set aside time to slow down, and the pressure can feel soothing once the work is done. Cheatham’s review suggested rolling may help attenuate soreness after intense exercise, and studies of post-exercise rolling are where the soreness findings come from. If you’ve done a harder session than usual, tried a new class format, or increased your load, a short roll that evening or the next morning is a reasonable choice. Pick the time you will actually follow through on.
Matching rolling to the class you took
Not every Pilates class leaves you with the same kind of tired. A routine that suits one session may be wasted effort after another.
After a gentle or mobility-focused class
After a slower session built around mobility, breath, and control, you probably don’t need much. Two or three minutes on whichever areas feel tight, such as calves, upper back, or the sides of the hips, is plenty. Skipping rolling entirely is also completely fine, and walking around the block may do as much for how you feel. Roll because it helps you, not because a routine says you must. If you’d like a gentle class to pair with this, a beginner Mat Pilates workout is a sensible place to start.
After a strong core, reformer, or jump-board class
Challenging classes that load the legs, glutes, and shoulders for long stretches are where rolling is most tempting, and where it may be most useful for soreness you expect to arrive tomorrow. Reformer classes vary a lot by studio and instructor, and spring tension is not standardized across brands, so judge by how your body feels rather than by a label on the class. Use the full routine below (and see our reformer Pilates guide if the equipment is new to you), keep the pressure lighter than you think you need, and take extra care around any muscle that already feels tender or strained. If something feels sharp rather than achy, skip that spot.
Safety Check Before You Roll
For most healthy adults, gentle foam rolling carries a low risk. The catch is that “most healthy adults” leaves out a fair number of people, and the research on safety is thinner than the research on benefits. The sections below give you a practical screening step to do once, before the routine becomes a habit.
Who should skip rolling or ask first
No official guideline lists every situation, so the best evidence we have comes from expert consensus and from large health organizations. Treat it as a cautious starting point and not as a complete safety manual.
Conditions experts flag
In a 2021 international Delphi study, 37 mostly sports-science and clinical experts reached agreement that open wounds and bone fractures are contraindications, meaning rolling should not be done over them. The panel also flagged cautions for local tissue inflammation, deep vein thrombosis, bone infection, and a condition called myositis ossificans, where bone-like tissue forms in muscle after injury. The authors were clear that these ratings reflect expert perception and not measured medical risk. They did not address pressure thresholds or medications either, so a lack of mention is not the same as a green light.
Pregnancy, osteoporosis, surgery, and medications
Cleveland Clinic advises people with broken bones, torn muscles, or pregnancy to check with a doctor before foam rolling. Based on that same cautious logic, it is sensible to ask a clinician before rolling if you have osteoporosis or low bone density, recent surgery, a recent injury, nerve symptoms, or a history of blood clots. If you take blood thinners, ask your prescriber whether firm pressure on soft tissue is appropriate for you. Mayo Clinic’s osteoporosis guidance also recommends working with a clinician or experienced trainer on safe movement, which applies here, too.
| Situation | What to do | Why it matters |
|---|---|---|
| Open wound or suspected fracture | Do not roll the area; get it assessed | Experts in the 2021 Delphi study treated these as contraindications |
| Swollen, warm, painful calf or thigh | Do not roll; contact a clinician promptly | These can be signs of a blood clot, which needs medical assessment |
| Pregnant or recently postpartum | Ask your obstetric provider first | Cleveland Clinic advises pregnant people to check with a doctor |
| Osteoporosis or low bone density | Ask a clinician or physical therapist before pressing on the spine or ribs | Bone strength affects how much pressure is appropriate |
| Recent surgery or injury | Wait for clearance from your care team | Healing tissue and incisions need protection |
| Blood thinners or bleeding disorder | Ask your prescriber about pressure on soft tissue | The research has not addressed this; bruising is a practical concern |
Pressure, pain, and stop signs
Knowing how hard to press is as important as knowing who should roll. Most beginners err on the side of too much force, mistaking pain for progress.
A simple pressure scale
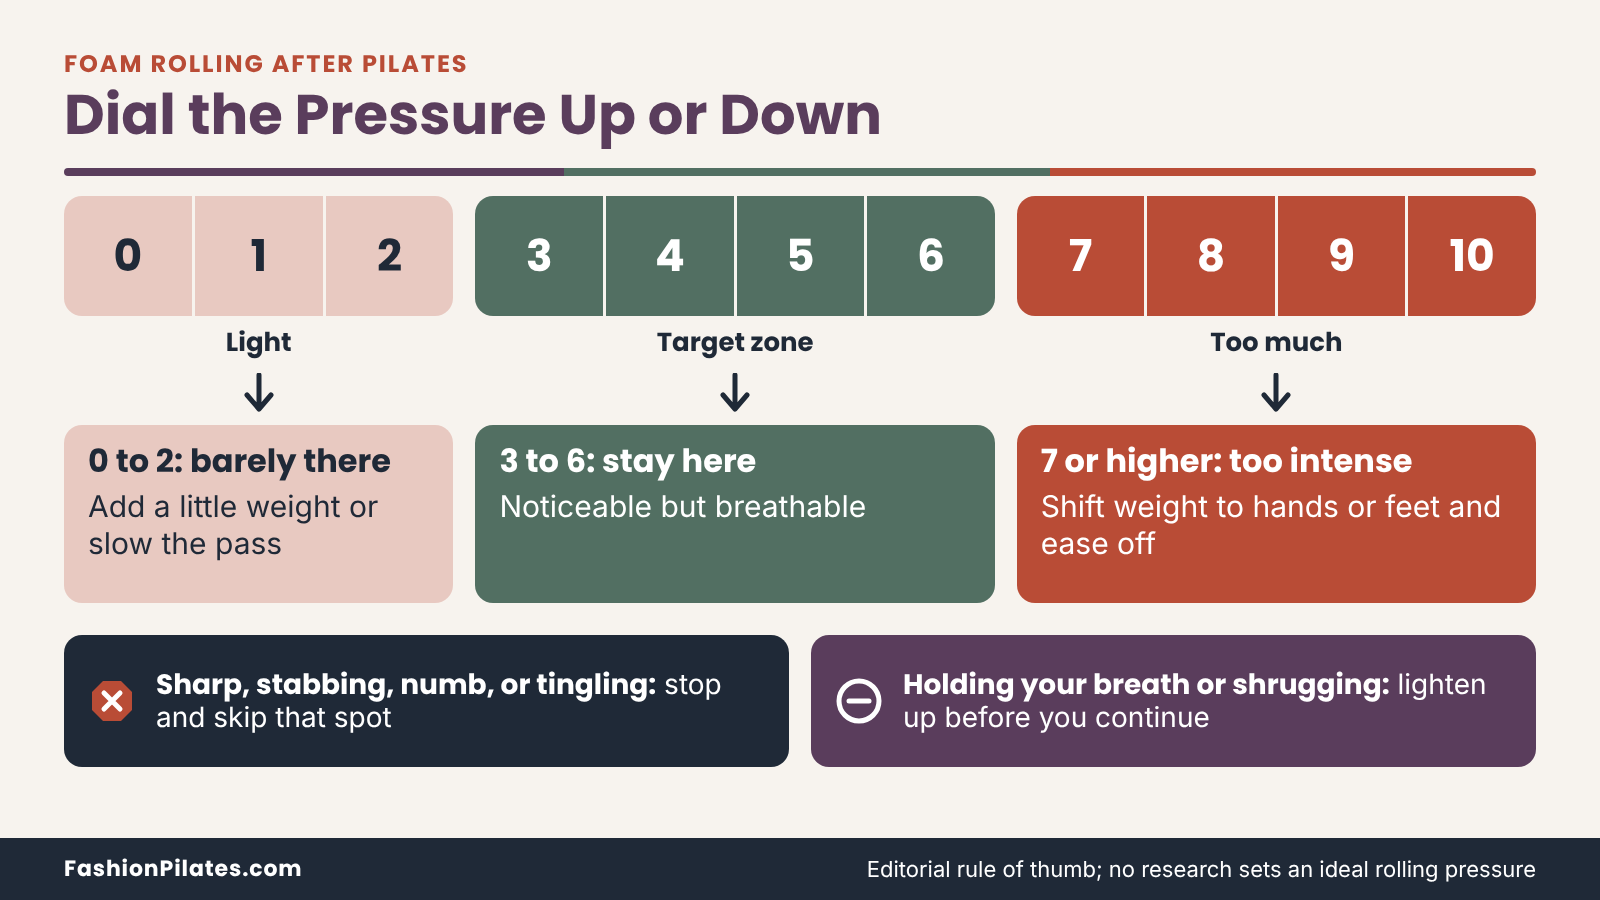
No study has set an ideal pressure, so this is an editorial rule of thumb and not a research threshold. Imagine a scale from 0 (no sensation) to 10 (can’t stand it) and stay between 3 and 6: noticeable and a bit intense, but you can still breathe slowly and keep your face relaxed. Cleveland Clinic similarly advises that you start light and avoid putting your whole body weight on the roller right away. If your shoulders creep up toward your ears or you start holding your breath, you’ve passed the useful range and should ease off. Lighter pressure is allowed to be boring.
Stop signs and blood clot warning signs
Stop rolling and ease off if you feel sharp or stabbing pain, numbness, tingling, pain that shoots down a limb, dizziness, or sudden bruising. Separately, the CDC notes that about half of people with deep vein thrombosis have no symptoms, and when symptoms do appear they can include swelling, pain or tenderness, warmth, and redness in the affected limb. If you notice those signs in a leg, do not roll or massage it, and see a doctor as soon as possible. Sudden breathing difficulty, chest pain, or fainting calls for immediate emergency care.
Choosing a Foam Roller
You do not need much equipment for this routine. A single standard roller covers every move here, and a more expensive option will not change what the research can promise. What matters is picking a size and firmness you can actually tolerate and store without resentment.
Size, density, and surface
Product pages describe rollers with a mix of marketing and measurements. Focus on the three features below and ignore the adjectives.
Length and diameter
Length decides what you can do with it. A longer roller, commonly around 36 inches (about 91 cm), lets you lie along it to support the spine and head, and it gives you a wider, steadier surface for hamstrings and glutes. A shorter roller, often around 12 to 18 inches (about 30 to 46 cm), travels more easily and fits in a gym bag, but it wobbles more under body weight and cannot support your whole back. Check the exact dimensions on the manufacturer’s page, since sizes vary by brand. For a first roller, longer is usually easier to control.
Density and texture
Density describes how much the roller compresses under you. Softer rollers feel forgiving and suit beginners or anyone who is sensitive to pressure, while firm rollers deliver more intensity for the same effort. Textured surfaces with ridges or bumps feel more intense still, and they can be too much for sensitive areas. A reasonable starting point is a medium-density, smooth roller, and many people find that is all they ever need. Since density labels are not standardized across brands, treat words like “soft” and “firm” as relative to the same brand’s lineup, and read the return policy before you commit.
Alternatives, travel, and care
The humble foam cylinder is not the only option, and for some areas it is not the best one. A bit of flexibility in your toolkit helps you roll more comfortably and consistently.
Balls, small rollers, and travel tools
Small massage balls, short rollers, and handheld sticks reach places a large roller cannot, such as the feet, the back of the shoulder, or the outer hip. They are also easier to pack, which matters when you take Pilates with you on the road. A tennis ball can do the same job as a pricier ball for light foot and shoulder work, which is a nice reminder that “wellness gear” rarely needs to cost more than a can of tennis balls. Vibrating rollers are also sold, but we have not verified evidence that they improve results, so view them as an optional extra.
| Type | Best for | Trade-offs |
|---|---|---|
| Long, smooth, medium-density roller | Beginners, full-body routines, supported upper back work | Takes more storage space than small tools |
| Short roller (about 12 to 18 inches) | Travel, calves, arms, and tight spaces | Less stable; cannot support a full back |
| Firm or textured roller | People who already tolerate pressure well | Easy to overdo; not ideal when sore or sensitive |
| Massage ball or small ball | Feet, glutes, shoulder blade, outer hip | Concentrates pressure; start gently |
| Vibrating roller | People who enjoy the sensation and want to try it | Higher cost; benefits beyond a standard roller are unverified here |
Care and floor setup
Wipe your roller with a damp cloth and mild soap, let it dry, and keep it away from heat and sharp objects, which can dent foam. Roll on a firm, flat surface, since a very thick or squishy mat can make the roller unstable. A regular Pilates mat gives enough padding for most people, and if you’re considering a new one, a guide to the best Pilates mat for home practice covers the thickness and grip trade-offs in detail. Check the manufacturer’s weight rating before you buy, since lower-priced rollers may not carry every user comfortably.
Technique Basics: Pressure, Pace, and Breath
Good rolling technique is mostly about restraint. If you’ve ever watched someone grimace their way across a roller as if the floor were personally responsible, you know the opposite approach. A few small decisions about setup, pace, and breathing make the routine comfortable enough to repeat.
Set up your space and your body
Spend thirty seconds on setup before you start. It saves you from wobbling, slipping, and cutting a move short because something feels unstable.
Surface, clothing, and what to have nearby
Choose a flat, firm area with enough room to extend your legs and lie down fully. Wear the same stretchy layers you wore to class, or something with a little grip, since slick leggings on a smooth roller can slide further than you intend. Keep a small towel, a water bottle, and a rolled hand towel nearby, which you will use as a pad for a few moves. If you are rolling right after a studio class, ask whether the studio has a quiet corner before you claim space in a walkway.
Body position and light bracing
Most rolling positions ask you to hold part of your weight on your hands, forearms, or feet. Set your shoulders down away from your ears and keep your ribs gently drawn in, a posture most Pilates students already know from the mat. That light abdominal support keeps your lower back from sagging and lets you control how much weight reaches the roller. If your wrists, shoulders, or neck complain in any position (a shoulder mobility Pilates routine can help build comfort there over time), switch to a forearm version, rest on your knees, or skip the move for the day.
How to roll: pace, pressure, and breath
The goal is steady, curious pressure. You are noticing, not wrestling.
Pace and time per area
Move slowly enough that you can notice what you feel along the muscle. Cleveland Clinic suggests about one to two minutes per muscle group, with whole sessions staying under about 10 minutes. The routine below stays inside that range, using shorter holds of 30 to 60 seconds per area. If you find a tender spot, pause on it for a few slow breaths or make smaller back-and-forth passes, then move on. More time on one spot is not better, and tenderness that grows rather than fades is a reason to back off.
Breathing while rolling
Pilates students are used to coordinating breath with movement, and the habit helps here. Breathe in through your nose, letting your ribs widen to the sides, and exhale slowly through your mouth or nose as you press into the more intense part of a pass. Holding your breath is the clearest signal that you’re pressing too hard. If your breathing turns short and tight, lighten up, change position, or rest for a few breaths before continuing.
The Simple Full-Body Routine
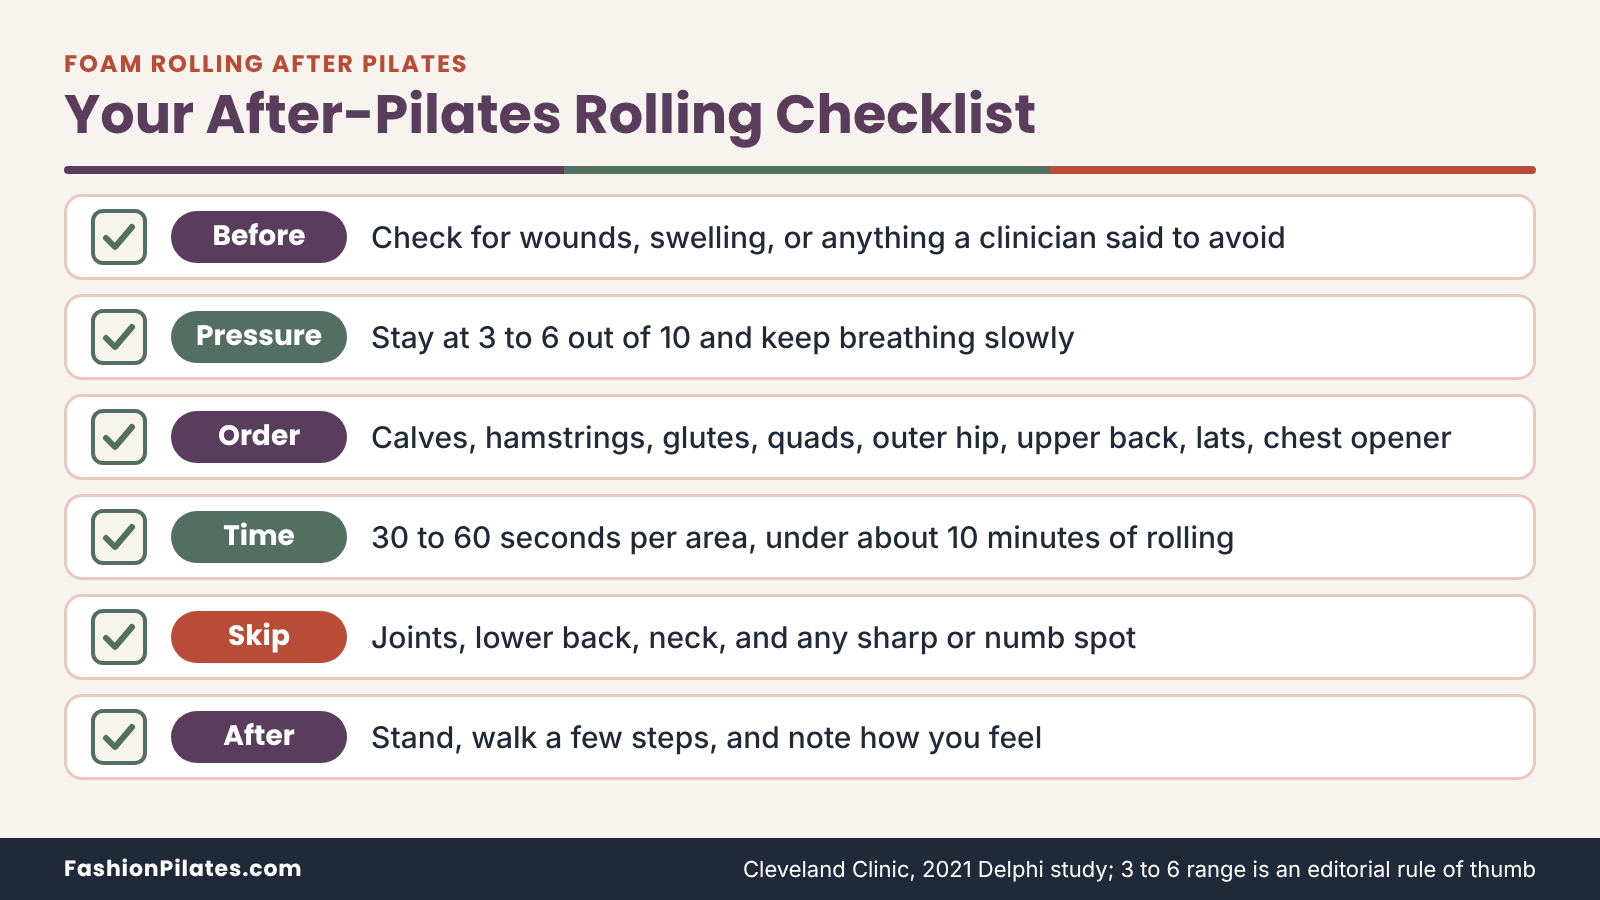
This sequence moves from the lower body to the upper body and finishes with a gentle chest opener. It is built for the end of a session when you’re warm and a bit tired, so each move is simple enough to do without much thought. Rolling time adds up to about 9 or 10 minutes, with a couple more for moving between positions. It is general fitness education, so adjust anything that doesn’t feel right, and skip any move that affects an area you’ve been told to protect.
The routine at a glance
Use the table to plan your session, then follow the detailed steps for each area in the sections that follow.
| Order | Area | Time | Pressure goal |
|---|---|---|---|
| 1 | Calves | 45 seconds per leg | Light to moderate |
| 2 | Back of thighs (hamstrings) | 45 seconds per leg | Light to moderate |
| 3 | Glutes | 40 seconds per side | Moderate |
| 4 | Front of thighs (quads) | 40 seconds per leg | Light to moderate |
| 5 | Outer hip and upper side of thigh | 30 seconds per side | Light |
| 6 | Upper back | 60 seconds | Light to moderate |
| 7 | Side of the back and under the arm (lats) | 30 seconds per side | Light |
| 8 | Supported chest opener | 45 to 60 seconds | No rolling; just resting |
Why this order works
The legs go first because they carry most of the big muscle mass and often feel the effort most after Pilates. The upper body follows, so you can end lying down on your back with your breathing slowing. Starting with large, forgiving areas also helps you gauge how much pressure feels right before you reach more sensitive spots. If you only have a few minutes, choose the three areas that feel tightest and skip the rest; nothing in the research says every area must be done every time.
Areas this routine skips on purpose
You won’t see the lower back, neck, knees, ankles, elbows, or the front of the hips on this list. Cleveland Clinic cautions against rolling joints such as ankles, knees, or elbows because of the risk of hyperextension. Avoiding the lower back and neck is a more cautious editorial choice and not a research finding: those regions are not protected by ribs the way the upper back is, and pressing hard there with a roller can tempt you to arch. If a specific area is bothering you for more than a few days, a clinician is a better next step than a bigger roller.
Lower-body moves
Take these moves slowly, keep your breathing steady, and stop if you feel sharp pain, numbness, or tingling.
Calves and hamstrings
For calves, sit with your legs extended and the roller under the lower calves, just above the ankles. Place your hands behind you and lift your hips slightly off the floor. Roll slowly up toward the bottom of the knee, stopping before the back of the knee joint, then return. For a bit more pressure, cross one ankle over the other. For hamstrings, sit with the roller under the back of your thighs and roll from just below the sit bones to a few inches above the knee, never onto the knee crease. Spend about 45 seconds per leg on each move.
- Start with the roller under your lower calves and your hands on the floor behind you.
- Lift your hips slightly and roll a few inches up and down, breathing slowly.
- Shift the roller higher to the back of your thighs and repeat the same slow passes.
- If your wrists are sore, place your forearms on the floor or use your hands behind a bent knee.
Glutes, quads, and outer hip
For the glutes, sit on the roller and cross your right ankle over your left knee. Lean slightly toward the right hip, supporting yourself with your hands, and roll in small movements through the meaty part of the buttock for about 40 seconds before switching. For the quads, lie face down with the roller under your thighs and your weight on your forearms. Roll from just above the kneecap toward the hip crease. Keep your ribs drawn in and your lower back still. For the outer hip, lie on your side with the roller just behind the bony point of the hip and make tiny movements with a light touch for 30 seconds per side, staying well above the knee.
- If the forearm plank position bothers your shoulders, skip the quads or use a short seated stretch instead.
- Never roll directly over the kneecap or the bony point of the hip.
- If you feel a pinch in the front of the hip while rolling the glutes, shorten the range or stop.
Upper-body and trunk moves
The upper body sequence is gentler and shorter. It is designed to follow the legs while your breath is already slowing down.
Upper back and lats
For the upper back, sit on the floor with the roller behind you at the base of your shoulder blades, then lie back with your knees bent and feet on the floor. Support your head with your hands, and cross your arms over your chest if you prefer. Keep your hips low or lightly lifted, whichever feels more stable, and roll a few inches up toward the shoulder blades and back down, staying above the bottom of your rib cage. For the lats, lie on your side with the roller near the armpit and the lower arm extended overhead. Make small passes for 30 seconds per side. If you have osteoporosis or tender ribs, ask a clinician before pressing on this area.
Supported chest opener and finish
This final move involves no rolling, which makes it a good place to end. If your roller is long enough, lie lengthwise along it with your spine, tailbone, and head supported. Bend your knees and place your feet flat on the floor, then let your arms rest out to the sides with palms facing up. If lying along the roller feels wobbly or uncomfortable, use a rolled towel or simply lie on the floor. Stay for 45 to 60 seconds and breathe slowly, then roll to one side and press up to sitting. Stand, walk a few steps, and notice how your legs and shoulders feel.
Shorter and gentler versions
You will not always have ten minutes, and some days you will not want firm pressure. Both are reasonable situations to plan for.
The five-minute version
When time is short, choose three areas that feel most tight and give each about a minute. For many people after Pilates, that means calves, hamstrings, and upper back, though you might swap in the glutes if your hips feel heavy. Do each at a light to moderate pressure, breathe steadily, and finish with the chest opener or a few slow breaths lying on your back. A short, easy routine you actually do three times a week is more useful than an ambitious one you abandon after a week.
Modifications for sensitive days
On days when everything feels tender, take weight off the roller by keeping more of your body on the floor, using your hands and feet to support yourself. Use a softer roller, a folded towel over the top, or a small ball for targeted areas. If a particular muscle is very sore or looks bruised or swollen, skip it and let it rest. Aim for sensations on the lighter end of the scale described earlier. Pain that feels sharp, or that worries you, belongs in a conversation with a clinician and not on a roller.
Common Mistakes and Easy Fixes
Foam rolling looks simple, which is exactly why small habits go unnoticed. Most of the mistakes below come from enthusiasm and not from carelessness, and each has an easy fix.
Technique mistakes
These happen on the floor, in the moment, and they are usually the reason someone decides that foam rolling is “just painful.”
Pressing too hard, too fast
The most common error is treating discomfort as proof that something is working. Rolling quickly across a muscle with maximum body weight tends to make the muscle guard and tighten, which defeats the point. The fix is to slow down, shift more weight onto your hands or feet, and aim for the 3 to 6 range on the pressure scale described earlier. If you finish a session feeling bruised or achy in a way that lingers into the next day, you went too hard, and next time you can cut the pressure in half.
Rolling the wrong areas or holding your breath
Two other classic errors are rolling directly over joints or the lower back, and holding your breath through the tender parts. Pressing on the lower back with a roller can encourage you to arch and strain, and joints are not designed to take that kind of direct pressure. Stay on muscle bellies, away from bony points, and use the upper back for trunk work. For breath, pick one cue, such as a slow exhale through the most intense part of each pass, and return to it whenever you notice yourself tensing. Calm breathing is a better indicator of the right pressure than any number.
Planning mistakes
Some problems have nothing to do with how you roll and everything to do with what you expect from it.
Treating rolling as a substitute for recovery basics
Rolling is a small add-on, not a replacement for rest days, sensible progression, or the easy cooldown movements your instructor builds into class. If you’re consistently very sore, the more likely explanation is that your training load rose faster than your body adapted, and a roller won’t solve that. A better fix is to adjust the schedule, add an easier day, and ask your instructor how to scale a hard session. The roller can make the evening more comfortable, but it can’t cancel the effect of piling on too much work too soon.
Chasing persistent pain with a roller
If one area hurts every time you stand up, sit down, or move through a familiar exercise, rolling it repeatedly may delay finding out what’s going on. Rolling does not diagnose anything, and discomfort that lasts beyond a few days, wakes you at night, or comes with numbness, weakness, or swelling deserves professional attention. A physical therapist, sports medicine clinician, or doctor can assess it properly. In the meantime, the safest approach is to avoid pressing on the sore area, and continue with the parts of your routine that feel fine.
Fitting Rolling Into Your Week
A routine only helps if it fits your real schedule. The right frequency depends on how hard you train, how you feel, and how much time you have, and nothing in the research sets a single correct number.
How often to roll
Think in terms of your training load and not a fixed calendar rule. Heavier weeks and new routines justify more attention than steady, familiar ones.
Light weeks and heavy weeks
Cleveland Clinic describes rolling as something people can do daily or several times a week as they prefer, and it is not tied to a strict schedule. In a lighter week with two gentle classes, a short roll after one of them may be all you want. In a heavier week with extra reformer sessions or a new challenge, a longer routine after your hardest class may feel good. Use soreness as a rough guide, and let it return to normal before adding more.
A sample week to adapt
The pattern below shows how rolling can sit around your classes without crowding your schedule. It is an example and not a prescription, so adjust it for your own life.
| Day | Activity | Rolling plan |
|---|---|---|
| Monday | Mat Pilates class | Five-minute version after class |
| Tuesday | Easy walk or rest | Optional light roll on any sore areas |
| Wednesday | Reformer or strength-focused class | Full routine that evening |
| Thursday | Rest | Skip, or one or two minutes on the sorest area |
| Friday | Mat Pilates class | Five-minute version after class |
| Saturday | Longer walk or favorite activity | Optional |
| Sunday | Rest | Optional; supported chest opener only |
Other options that feel similar
Foam rolling is one way to wind down among several. The others are cheaper, quieter, and in some cases better supported by research.
Walking and stretching
A short walk after class raises your heart rate gently and lets your legs move through an easy range, and it needs no equipment. Stretching can also improve short-term range of motion, and a 2021 meta-analysis of 12 studies by Konrad and colleagues found that combining stretching with foam rolling gave no extra range-of-motion benefit over doing either one alone. That finding applied to single sessions in healthy participants, so it is not a verdict on every situation. It does mean you can choose whichever one you enjoy more.
The bigger picture of recovery habits
Rolling is a minor player next to the basics: enough sleep, regular meals, and a sensible training plan. The CDC’s adult guidance suggests 150 minutes of moderate activity per week and muscle-strengthening on at least two days, and a consistent routine that you can sustain matters more than any single recovery gadget. If you are new to the method, a Pilates for beginners guide explains how to build up gradually, and the Recovery Tools & Self-Care hub collects other low-key options.
Honest Limits and Your Next Steps
It’s fair to ask whether something this simple deserves a whole routine. The honest answer is that it deserves a modest one, enjoyed for what it is. The following notes explain why the evidence supports caution and not cynicism, and how to test it on yourself.
Limits of the evidence
Understanding the weaknesses of the research makes you a better judge of what to expect from it.
Who was studied, and how
The studies behind this guide mostly involved healthy, physically active adults, often young, and they used very different rollers, pressures, and timings. The Wiewelhove authors listed small sample sizes, the impossibility of blinding participants, and widely varying methods as key limitations. That means the findings may not apply to older adults, people with health conditions, or anyone doing Pilates at a very different intensity. The safety research is thinner still, which is why the cautions in this guide lean on expert consensus and not on measured injury rates.
Placebo, comfort, and why it can still be worth doing
Because nobody can truly be blinded to a foam roller, some of the benefit people report may come from expectation and relaxation. That’s not a reason to dismiss it. If a few minutes of slow breathing and moderate pressure leaves you feeling better and more willing to stay consistent with Pilates, that is a legitimate payoff. The honest framing is that it feels good and may help modestly, and it will not transform your recovery or fix underlying problems. Bring that expectation to the floor, and the roller becomes much easier to enjoy.
A decision rule for your own practice
You don’t have to take anyone’s word for it. A small, honest experiment will tell you more about your body than a stack of studies.
A simple two-week check
For two weeks, roll after your hardest class and skip it after an equally hard one if you can manage the comparison. Each morning, rate your soreness from 0 to 10 and jot down how your next class felt. This is an informal editorial exercise and not a trial, so it can’t prove anything, but it can show whether rolling seems to make a noticeable difference for you. If it doesn’t, drop it without guilt and spend those minutes on a walk, a stretch, or an earlier bedtime.
When to see a professional
See a clinician or physical therapist if pain is sharp, lingers beyond a few days, limits normal movement, wakes you at night, or comes with numbness, weakness, swelling, or warmth in a limb. Check in before starting if you are pregnant or postpartum, have osteoporosis, a history of blood clots, recent surgery, or a chronic condition. Your Pilates instructor can also suggest modifications for class that keep you comfortable, including options if you’re traveling or practicing around an injury. Rolling should support your movement practice, and not stand in for professional guidance.
Frequently Asked Questions
Should I foam roll before or after Pilates?
Either can work, and the better choice depends on your goal. Research reviews suggest rolling before exercise may help flexibility a little more, while rolling afterward is where the small soreness benefits show up. Many people do a quick roll on tight spots before class and a longer, gentler session afterward. Pick the timing you will actually stick with, and keep the pressure light in both cases.
How long should I foam roll after a Pilates class?
Plan on about 10 minutes or less in total. Cleveland Clinic suggests roughly one to two minutes per muscle group and keeping whole sessions under about 10 minutes. The routine in this guide uses 30 to 60 seconds per area, which keeps the total manageable. If you are short on time, three areas for about a minute each is a perfectly good version.
Does foam rolling stop sore muscles after Pilates?
It may reduce soreness a little, but it does not stop it. A meta-analysis of 21 studies found a small reduction in perceived soreness when people rolled after exercise. The effect was modest, and study methods varied widely. You may still feel sore a day or two later, and that is normal after a new or demanding class.
Is it okay to foam roll every day?
For most healthy adults, gentle daily rolling is generally considered acceptable. Cleveland Clinic describes it as something people can do daily or several times a week. The key word is gentle, because heavy pressure on already sore muscles can leave you more tender. If an area feels bruised or more painful the next day, take a break and use lighter pressure when you return.
Can I foam roll my lower back after Pilates?
It is better to skip it. The lower back has no rib cage to protect it, and pressing a roller there can encourage you to arch and strain. This is a cautious editorial choice and not a research finding. The routine in this guide sticks to the upper back and nearby muscles instead. If your lower back feels tight or sore, ask a clinician or Pilates professional for options that suit you.
Is foam rolling safe during pregnancy?
Ask your obstetric provider before you start. Cleveland Clinic advises people who are pregnant to check with a doctor before foam rolling. Your provider can tell you which positions and pressure levels fit your situation. The same advice applies in the postpartum period or if you have any pregnancy-related complications.
How much pain is normal when foam rolling?
You should feel mild to moderate pressure, not sharp pain. Rolling is allowed to be uncomfortable but it should never be alarming. A useful guide is to stay around a 3 to 6 on a 10-point scale, where you can still breathe slowly and relax your face. Stop if you feel stabbing pain, numbness, tingling, or dizziness. Pain that lingers for days deserves a conversation with a clinician. Lighter pressure is always an acceptable choice.
Do I need to buy a foam roller?
No, though a basic one makes the routine easier. A medium-density, smooth roller is a good place to start, and the full-length version supports your back for the upper-body moves. For feet and shoulders, a tennis ball or small ball works well. If you don’t want to buy anything yet, a rolled towel can stand in for the chest opener while you decide.