Direct answer: The best Pilates sliders are the ones whose gliding surface matches your floor. That means a smooth plastic, felt, or fabric underside for hardwood, vinyl, and laminate, a hard, slick underside for carpet, and a grippy top face that keeps your hand or foot where you put it. For most home setups, a dual-sided pair of discs roughly 7 to 9 inches (18 to 23 cm) across is the most flexible first purchase.
This guide is for anyone adding small, low-cost equipment to Mat Pilates, strength sessions, or travel workouts at home. It is a research-based comparison built on manufacturer specifications and published exercise research, and it is general fitness education, not individualized medical advice. We did not test any sliders hands-on, so you will find decision criteria, trade-offs, and a few verified examples rather than a ranked leaderboard.
What Pilates Sliders Are and How They Work
Pilates sliders go by several names, including gliding discs, core sliders, exercise sliders, and sliding mobility disks, because nobody in the equipment aisle has agreed on one. They are small, lightweight discs that you place under your hands or feet so a limb can glide across the floor instead of stepping, lifting, or pressing into it. That one change turns a familiar move into a slow, controlled one, and the slowness is where the work happens.
Anatomy of a Pilates Slider
Every slider is built from the same few decisions: what touches the floor, what touches you, how big it is, and how thick. Understanding those four choices makes product pages far easier to read.
Two faces, two jobs
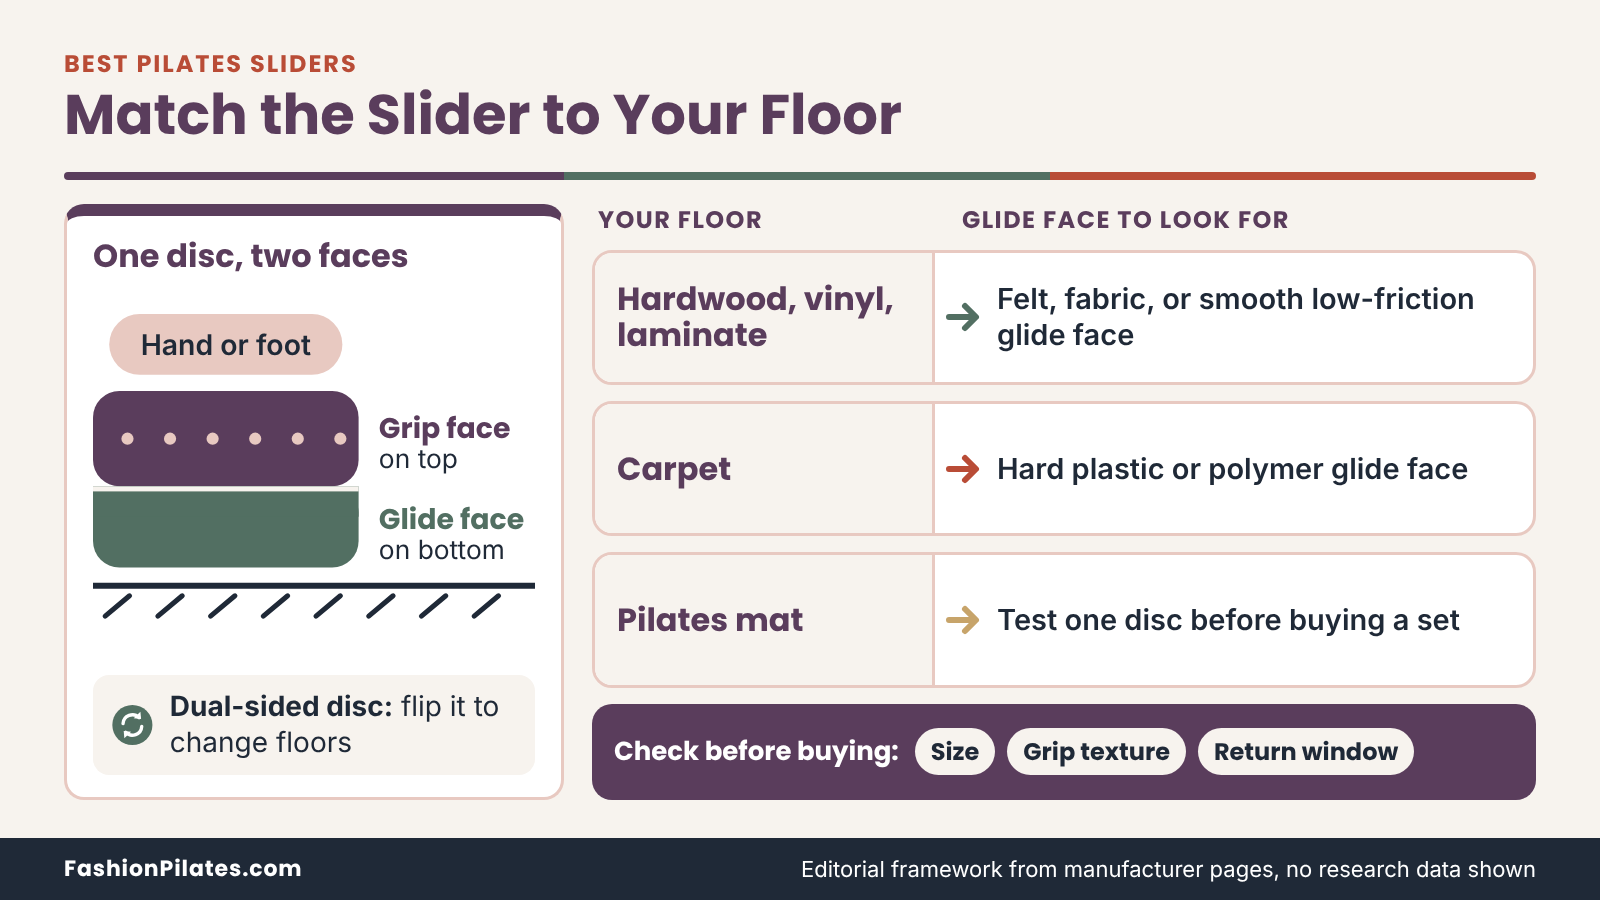
A slider has a glide face and a grip face. The glide face touches the floor and needs low friction, which is why hardwood versions often use felt or tight-weave fabric and carpet versions use hard plastic. The grip face touches your palm, foot, or sock and needs the opposite quality, usually foam or textured material that resists slipping. Many dual-sided discs put plastic on one side and foam on the other, so flipping the disc changes which floor it suits. The catch is that a disc with the wrong face down will either stick or skate away from you.
Size, shape, and material
Round discs between 7 and 9 inches are the norm. The Merrithew Sliding Mobility Disks listing gives 7 inches (18 cm) and ABS plastic with EVA foam, while the PerformBetter Gliding Discs page describes discs of approximately 9 inches sized for a full hand or foot. A larger disc is easier to land on with a whole foot but harder to tuck into a travel bag. A smaller disc suits hands, narrow stances, and carry-on luggage. Material matters mostly for durability and floor safety, which we cover in the care section.
What Sliders Add to Pilates-Style Training
Sliders do not turn a living room into a studio, but they do give small-equipment training a feature that bodyweight moves lack: a surface that moves with you. Used well, that supports the same priorities Pilates teaches on the mat, such as control, alignment, and breathing paced to the movement.
Why gliding changes the exercise
When a foot slides away from your body instead of stepping, your muscles have to manage the speed and direction of the movement, not just produce force. Merrithew describes its sliding disks as a way to mobilize joints while building stability, with floor work for the arms, legs, and core that progresses to standing balance. That framing is a useful way to think about the tool. A slider rewards slow, deliberate movement and quietly punishes rushing, which is why a slide done at double speed usually turns into a wobble.
Where sliders fit, and where they do not
Sliders are a supplement to your practice, not a stand-in for resistance-spring equipment. If you are comparing small props to a machine, our explainer on what a reformer is and how it works covers what springs and a carriage add that a disc cannot. Sliders do shine in three places: a short strength block after a mat session, a travel kit that weighs next to nothing, and a home setup where a full studio is not realistic. Our hub for small Pilates equipment and props places them alongside bands, rings, and balls.
How to Choose the Best Pilates Sliders: Criteria That Matter
Product photos make most sliders look identical, so finding the best Pilates sliders for your home comes down to a short list of criteria, not a brand name. Work through them in this order: your floor, the build details, and only then price. Choosing the other way around is how a bargain pair ends up as a very light, very round paperweight.
Start With Your Floor
The floor under your workout space decides which glide face you need, and it is the single most common reason a slider disappoints. Check what you actually stand on, including any rug or mat, before comparing a single listing.
Hardwood, vinyl, and laminate
Smooth hard floors want a soft or low-friction glide face. The PerformBetter page describes its hardwood discs as soft and flexible with a tight-weave nylon fabric sliding surface, and the Power Systems Versa-Slides page lists a wood and vinyl version with a soft felt bottom that it says protects floors. A hard plastic underside can still glide on these floors, but grit trapped beneath it may mark a finish, so check your floor manufacturer’s care guidance and sweep first. If you rent, a softer glide face is the cautious choice. Vinyl and laminate add a wrinkle of their own: textured planks that mimic wood grain can slow a smooth disc, so a short test slide before you commit to a full routine saves frustration.
Carpet, rugs, and exercise mats
Carpet fibers grab felt and fabric, so carpet discs go the other way. Power Systems lists a carpet and turf version with a hard PVC bottom, and PerformBetter describes a hard polymer carpet version. Sliding on a Pilates mat is a legitimate use too: Merrithew’s workshop for its disks calls for one mat and two disks per participant. Mat surfaces vary, so test a disc on yours before committing to a routine. If you are still choosing the mat itself, our Pilates mats and flooring guide covers thickness and grip.
The table below turns those floor-by-floor points into a quick lookup you can check against your own space.
| Floor or surface | Glide face that suits it | What to watch for |
|---|---|---|
| Hardwood | Felt, fabric, or smooth low-friction plastic | Grit under the disc; check floor care guidance first |
| Vinyl or laminate | Felt or soft glide face | Textured planks can slow a smooth disc |
| Low-pile carpet | Hard plastic or polymer | Felt and fabric tend to drag on fibers |
| Thick or shag carpet | Hard plastic, with caution | Deep pile may stop the glide; test before buying several |
| Pilates mat | Depends on mat texture; test one disc first | Grippy or cushioned mats may resist sliding |
Check the Build Details
Once the glide face matches your floor, three physical details separate a pleasant pair from a frustrating one. None are glamorous, but all show up in how the discs feel mid-slide.
Grip, thickness, and edge shape
The top face should hold a bare foot, a socked foot, or a palm without crawling. Power Systems describes a textured non-slip top on both of its versions, which is the right idea, and EVA foam, as on the Merrithew disks, adds a little cushion under the hand. Thin discs keep your wrists closer to neutral in hand-on-disc moves, while thick foam raises you higher and can feel unstable. A rounded edge is also kinder if a disc ever flips mid-move.
Weight limits, durability, and what listings leave out
Product pages tell you about size and materials far more often than about load. In the product details we reviewed for this guide, none stated a user weight limit, so treat durability as an open question and ask the seller if it matters to you. Look for a return window and a warranty statement: the Merrithew page lists a 30-day return policy and replacement of defective products with proof of purchase. Expect foam to compress and glide faces to wear over months of regular use. Warranty wording is also worth reading closely, because a replacement for a manufacturing defect is not the same as coverage for ordinary wear, and most small-equipment policies draw that line.
Slider Types and Alternatives Compared
Once you know your floor, the next decision is the product format. Sliders come as dual-sided discs, as floor-specific discs, and as a handful of household stand-ins that people try first. Each has a clear use and a clear limit.
Disc Sliders by Design
True exercise sliders are made for body weight, with a grip face meant for hands or feet. They split into two design families, and the right one depends on how many floor types you train on.
Dual-sided discs
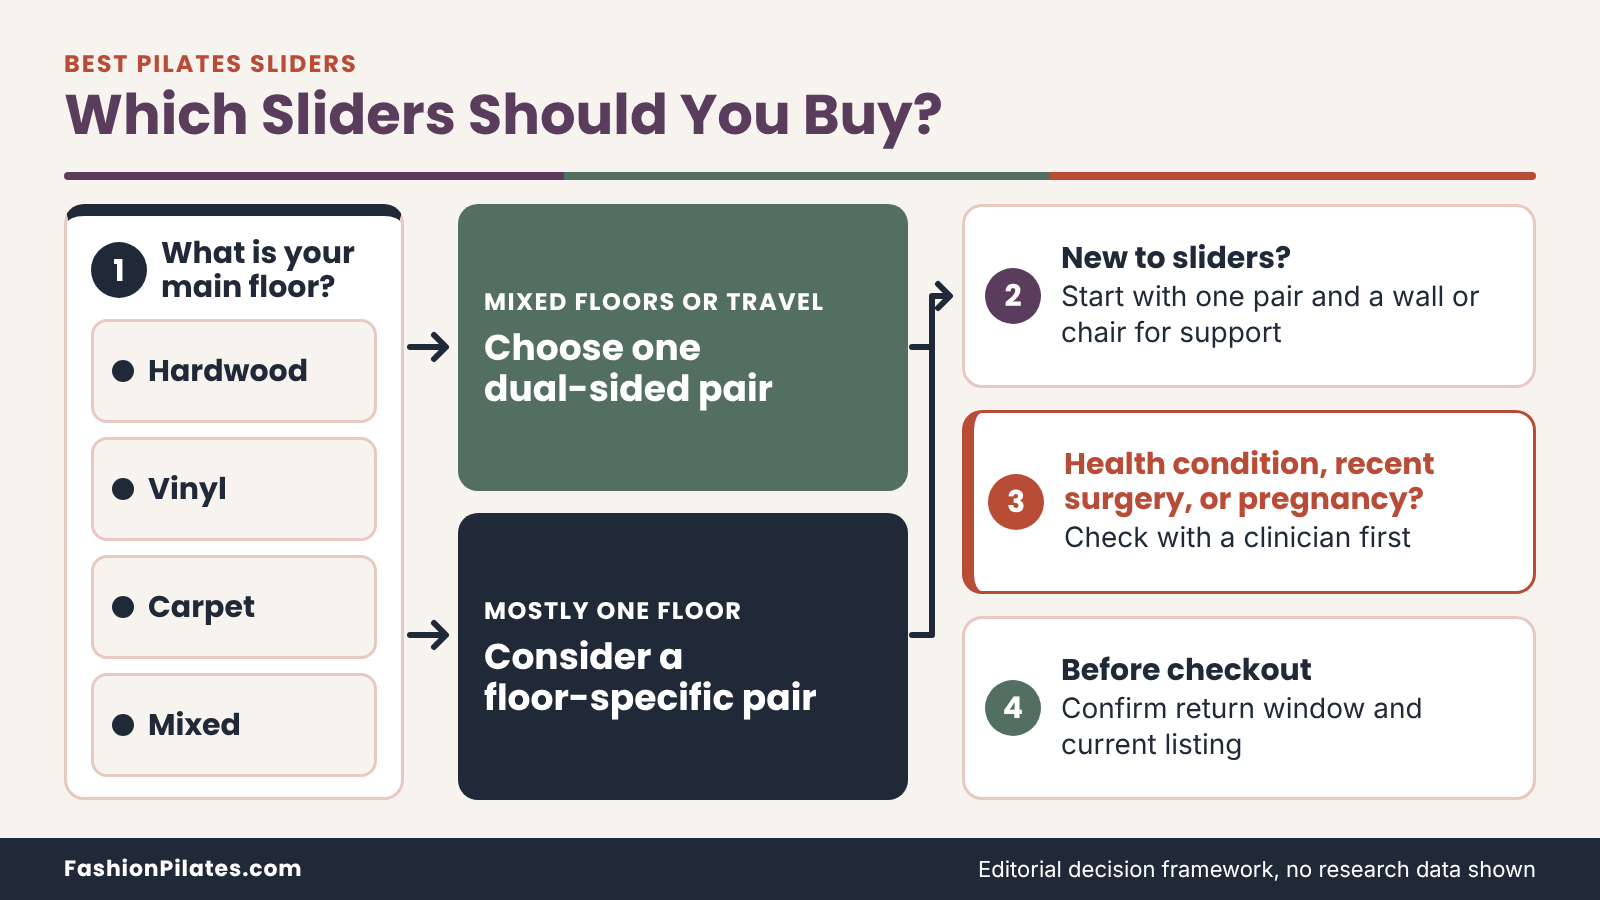
A dual-sided disc carries a glide face on each side so you can flip it for a different floor. Merrithew lists its pair as working on both hardwood and carpeted floors, which suits a household with mixed flooring or a traveler who trains wherever the hotel puts a free patch of floor. The trade-off is compromise: a face designed for two surfaces rarely glides as smoothly as one built for a single surface. For most beginners that small difference is outweighed by flexibility.
Floor-specific discs
Floor-specific discs are sold in separate versions, and both Power Systems and PerformBetter list a carpet version and a hardwood version of the same product. That specialization can give a more consistent glide on your main floor. The risk is ordering the wrong one, because the two versions look nearly alike and sit side by side on the product page. Read the surface label twice before checkout, and keep the receipt.
Towels, Cloths, and Other Stand-Ins
Household items are the natural first experiment, and some are fine for it. Knowing where they fall short saves you from blaming the movement for what is really a gear problem.
Towels and cloths
A cloth under the foot is the classic stand-in. A Swiss health insurer’s page on core slider exercises lists cloths as an alternative while noting that the purpose-built sliders are easier to clean. A dry hand towel on hardwood works for a few supported slides. It bunches, glides unevenly, and offers no real grip face, so reserve it for a trial run of gentle moves, not weight-bearing work on your hands.
Furniture sliders and bulk packs
Furniture glides are designed to move couches, not to carry a person’s hand or foot, so their edges, grip, and load handling are unknown for exercise. Bulk packs are a different mismatch: PerformBetter sells 25-pair club packs with a mesh carrying bag, which suits a studio or a class, not a single household. Unless you are outfitting a group, a single pair is plenty. If you later want a full small-props kit, the small Pilates equipment and props hub is a better next stop than a bulk order.
This comparison puts the formats side by side so you can pick the one that fits your space and budget.
| Format | Best for | Avoid if |
|---|---|---|
| Dual-sided discs | Mixed floors, travel, first-time buyers | You want the smoothest possible glide on one floor |
| Floor-specific discs | One dominant floor type and consistent feel | You move between carpet and hard floors |
| Towel or cloth | A low-risk trial of gentle supported slides | You need grip or plan to load your hands |
| Furniture sliders | Moving furniture | You plan to exercise on them at all |
| Club packs | Studios, classes, and shared spaces | You train alone at home |
Three Designs Verified on Official Pages
Instead of a ranking, this section names three real products whose official pages we read on October 7, 2026, so you can see how the criteria above show up in actual listings. They were chosen because their pages state the details that matter (floor type, size, and materials), not because they beat anything in a test. Prices below come from those pages and change, so check the current listing before you buy.
Manufacturer Pages: Merrithew and Power Systems
Two of the three examples come straight from the companies that make them. That is the best place to confirm specifications, because the numbers are the maker’s own rather than a reseller’s paraphrase.
Merrithew Sliding Mobility Disks (set of 2)
Merrithew, a Pilates education and equipment company, lists this pair at 7 inches (18 cm) across, made from ABS plastic and EVA foam, with a double-sided design for hardwood or carpet. The page showed $16.99 when we checked and describes the disks as lightweight and portable for travel. Care guidance on the page is simple: clean with diluted mild soap and water, rinse thoroughly, and dry completely before use. Its trade-off is the one every dual-sided disc shares, a single design asked to suit two floors.
Power Systems Versa-Slides
The Power Systems page sells a pair in two floor-specific versions: 7.5 inches with a hard PVC bottom and high-density foam top for carpet and turf, and 7.0 inches with a soft felt bottom and textured vinyl top for wood and vinyl. The listed price was $19.50 per pair, and the shipping weight was 2.0 pounds. When we checked, the page showed the item on backorder, a useful reminder that availability moves around. This is the clearest example of buying a disc for one specific floor.
A Seller Listing and How to Read It
The third example is a fitness equipment seller’s page rather than a maker’s, and that difference changes how you should read it. Seller pages are useful for variants and pack sizes, but they are summaries, not specification sheets.
PerformBetter Gliding Discs
This page lists discs of approximately 9 inches in diameter, with a hardwood version using a tight-weave nylon fabric sliding surface on soft, flexible discs and a carpet version using hard polymer. A single pair comes in purple for either floor type, and the larger 25-pair club packs add a mesh carrying bag. Prices on the page run from $14.95 to $229.99, which spans a single pair up to a club pack, so the headline range tells you nothing about what one household pays.
What these pages cannot tell you
None of the three listings measures how a disc glides after months of use, how it holds up under a lunge, or how it behaves on your particular floor. Marketing copy about toning and strengthening is the seller’s claim, not independent evidence, and we have not weighed it as such. Treat the pages as a way to confirm size, surface, materials, and policies, and as a reminder that a clean product photo says nothing about glide. A pair that looks identical to its neighbor can behave quite differently on your floor. Then use the fit check later in this guide to judge glide and grip yourself, and keep the return window in mind.
The table gathers the verified details in one place so you can compare them without reopening three tabs.
| Product | Diameter | Glide face | Grip face | Listed price |
|---|---|---|---|---|
| Merrithew Sliding Mobility Disks | 7 in (18 cm) | Double-sided for hardwood or carpet | EVA foam | $16.99 per set of 2 |
| Power Systems Versa-Slides, carpet and turf | 7.5 in | Hard PVC | High-density foam | $19.50 per pair (backordered when checked) |
| Power Systems Versa-Slides, wood and vinyl | 7.0 in | Soft felt | Textured vinyl | $19.50 per pair (backordered when checked) |
| PerformBetter Gliding Discs | About 9 in | Nylon fabric (hardwood) or hard polymer (carpet) | Not specified on the page | From $14.95 for a pair; club packs cost more |
Matching Sliders to Your Goals and Space
The best purchase depends less on the disc than on the person using it. The best Pilates sliders for one household are not always the best for another. A traveler, a beginner learning to slow down, and a long-time Mat Pilates regular each want something slightly different from the same small object.
By Experience Level and Space
Start with how much support and room you have. Those two factors narrow the field faster than any feature comparison.
If you are new to Pilates or to sliders
Buy one dual-sided pair and set up near a wall or a sturdy chair. The Swiss insurer’s guide suggests beginners work with one slider or chair support, and uses two rounds of five to eight repetitions per side for its starter moves. That is a sensible dose for week one. Skip the multi-pair bundle; you do not need extra discs until you know which moves you like. If you are still learning the foundations, begin with our beginner Mat Pilates workout and add sliders afterward.
If you are short on space or travel often
Sliders are among the most packable pieces of equipment you can own. The Power Systems pair lists a shipping weight of 2.0 pounds, and Merrithew highlights portability for travel. Hotel rooms usually mean carpet, so a dual-sided pair or a carpet version is the practical choice there. Our Pilates travel plan covers how to build a workout around limited space; sliders simply make a few of its moves a little more demanding.
By Training Goal and Health Context
What you want sliders to do, and what your body needs from them, shapes how you use them more than which pair you pick. Some of this belongs with a professional, not a product page.
If you already practice Mat Pilates
For regular mat practitioners, sliders work well as a short finisher after a session, adding a controlled strength challenge for the legs, hips, and trunk. The CDC recommends that adults do muscle-strengthening activity on at least 2 days each week that works all the major muscle groups, so a ten-minute slider block can be one piece of that weekly pattern. Choose discs that match the mat or floor you already use, and keep the pace slower than feels necessary. A simple pattern is to finish your usual mat session with two or three of the moves from the fit check later in this guide, rest for a minute between them, and stop while your form is still crisp. Fatigue is the enemy of control on a gliding surface, so a short block done well beats a long block done sloppily.
If a health condition or recent surgery is involved
Gliding takes away the stable support of a planted foot or hand, which is the point of the tool and also the reason to be careful. Merrithew’s blog describes a sliding disk series for clients recovering after surgery, but it presents that as guided work with a professional who can adapt each move. If you are pregnant or postpartum, have osteoporosis, joint or balance problems, an acute injury, or a recent surgery, check with a qualified clinician or Pilates professional first. Stop any move that brings sharp pain, dizziness, or numbness.
A Five-Move Fit Check for Your New Sliders
A slider can look right on paper and still feel wrong under your foot. This short sequence, about 12 minutes including warm-up, is designed to reveal glide, grip, and comfort on your own floor so you can decide whether to keep a pair or return it. It is general fitness education, not individualized medical advice, and every move should feel controlled, not strained.
Before You Start
Preparation is what separates a useful test from a slippery one. A minute of setup lowers the odds of a fall and gives you cleaner information about the discs.
Set up the space and warm up
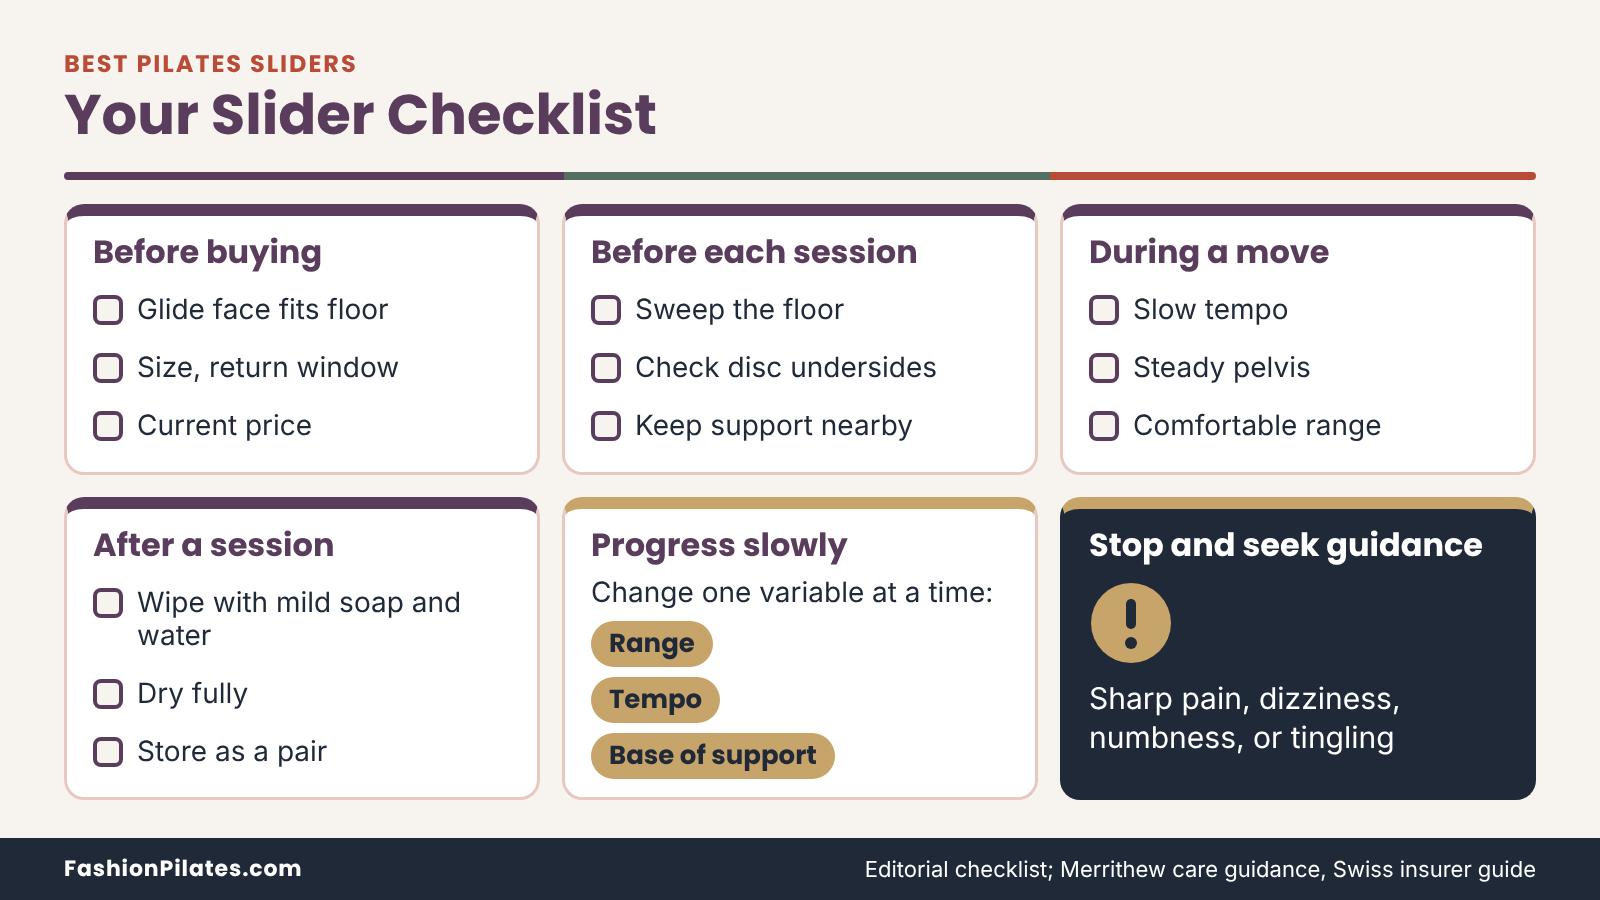
Sweep the floor so no grit sits under the discs, and clear enough room to extend your arms and legs fully in every direction. Keep a wall or a sturdy chair within reach for the standing moves. Spend two to three minutes warming up with easy marching, hip circles, and gentle shoulder rolls, which the Swiss insurer’s slider guide also advises. Try bare feet first, because socks can slide on the grip face and confuse your results.
Who should skip or modify, and when to stop
Skip this sequence for now, or get individual guidance, if you are pregnant or postpartum, have osteoporosis, a recent surgery, an acute injury, balance problems, or a chronic condition that affects your joints or blood pressure. A qualified clinician or Pilates professional can tell you which moves are appropriate. For everyone else, stop immediately if you feel sharp pain, dizziness, numbness, or tingling. Mild muscle effort is expected; pinching in a joint or a catch in your lower back is not. If you are unsure whether a move suits you, treat that uncertainty as a reason to ask a professional before you try it, not as a challenge.
The Five Moves
Do each move slowly, for five to eight repetitions on each side, which matches the starter dose in the Swiss insurer’s guide. Rest for 30 to 60 seconds between moves. One action at a time is the rule: finish the slide before you think about the next breath cue.
Floor moves: heel slide and bridge slide-out
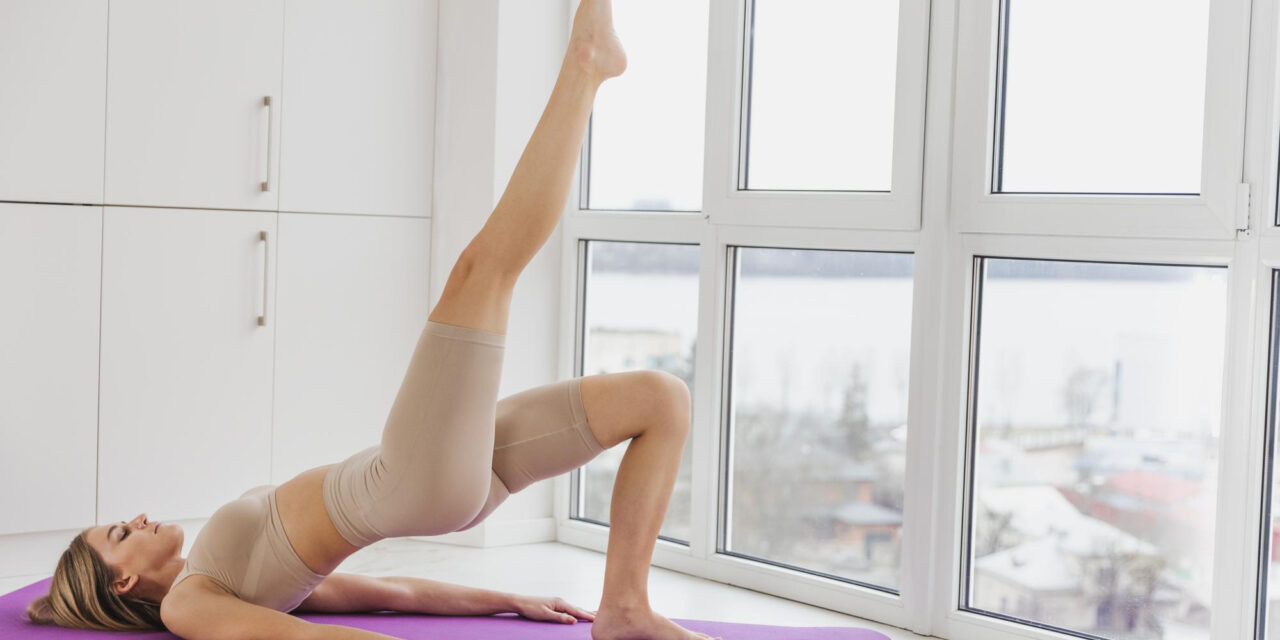
Move 1, heel slide. Lie on your back with your knees bent and feet flat. Place one heel on a disc and keep your spine and pelvis in a comfortable neutral position. Exhale as you slide that heel away until the leg is nearly straight, or until your pelvis starts to tilt, then inhale as you draw it back. Modify by shortening the range.
Move 2, bridge slide-out. Start the same way with both heels on discs. Exhale and lift your hips into a bridge, then slide both heels outward only a few inches while your hips stay level. Draw them back, then lower with control. If you feel a hamstring cramp, shorten the slide or do the bridge without sliding.
Standing moves: side slide, reverse lunge, and wall slide
Move 3, side slide. Stand beside a wall or chair with one hand on it and one foot on a disc. Keep your standing leg steady, exhale, and slide the disc foot out to the side, then inhale and return. Keep your torso upright. Move 4, reverse lunge. With one foot on a disc and a hand near support, exhale as you slide that foot back and bend the front knee, keeping it tracking over your second toe. Press the front foot into the floor and slide back to standing. Take a shallower range if your balance wobbles.
Move 5, wall slide. Face a wall with a disc under each hand, forearms or palms resting on the wall at shoulder height. Exhale and slide your hands up the wall only as far as your ribs stay down and your shoulders feel comfortable, then inhale and lower. Check that the discs are clean so they do not mark the paint.
Reading Your Results
The point of the fit check is information. Use it to decide whether your discs match your floor and your movement, not to prove anything about your fitness.
This table summarizes the sequence and tells you what to notice at each stage.
| Move | Starting position | Dose | What to notice |
|---|---|---|---|
| 1. Heel slide | On your back, one heel on a disc | 5 to 8 per side | Smooth glide; pelvis stays still |
| 2. Bridge slide-out | On your back, both heels on discs | 5 to 8 short slides | Discs stay under heels; no hamstring cramping |
| 3. Side slide | Standing, hand on support, one foot on a disc | 5 to 8 per side | Foot grips the top face without skating off |
| 4. Reverse lunge | Standing, one foot on a disc, support nearby | 5 to 8 per side | Control on the way back; knee stays steady |
| 5. Wall slide | Facing a wall, a disc under each hand | 5 to 8 | Even glide; shoulders stay comfortable |
What good glide and grip feel like
On a well-matched disc, the glide is steady from the start of the slide to the end, with no sticking at the beginning and no sudden skating at the finish. The grip face should hold your foot or hand without your toes or fingers gripping to compensate. If you find yourself clenching to keep a disc in place, the grip face is probably too slick for your skin or socks. A little effort is the exercise; a lot of worry is the equipment. Pay attention to noise as well: a disc that scrapes or squeaks on your floor is telling you the glide face and surface are not getting along, and that is worth fixing before you add range or speed.
When to return, swap, or switch to a different surface
If a dual-sided disc sticks on one face and skates on the other, try the opposite face before deciding. If both faces fail on your floor, a floor-specific version may suit you better, and the return window is your friend. A disc that tilts, folds, or shows foam peeling in the first week should go back. If a move feels unsafe even with support, set the discs aside and ask a Pilates professional for guidance rather than pushing through.
Care, Storage, and Smart Progression
Sliders cost little, which makes them easy to neglect. A few habits protect both your floor and the discs, and a plan for progression keeps the exercises useful beyond week two.
Floor Protection, Cleaning, and Storage
Most slider problems are really dirt problems. A clean disc on a clean floor glides better, lasts longer, and treats your finish more gently.
Protect the floor and the disc
Sweep or vacuum before every session so grit does not get trapped under the glide face. Flooring retailers such as LL Flooring recommend felt as a soft layer that significantly reduces the risk of scratching wood, which is the logic behind felt-bottomed discs. To clean, follow the Merrithew instruction of diluted mild soap and water, a thorough rinse, and complete drying. Make sure discs are fully dry before you use them on hardwood.
Storage, travel, and replacement
Keep discs together as a pair, flat or in a small pouch, so a sharp edge or a shoe does not damage the glide face. Put a cloth between them if you pack them against other gear. Replace a disc when foam crumbles, the grip face peels, an edge cracks, or the underside has worn rough enough to catch. The Merrithew page also lists a 30-day return window, so give new discs a fair trial early, while a return is still easy.
Progressing Without Rushing
Because sliders make familiar moves harder in subtle ways, progress should be gradual and deliberate. More is not automatically better.
Change one variable at a time
A session handout for Merrithew’s sliding disk workshop shows how progression works in practice: options move from two sides to one side, such as bilateral to single-leg slides, and from slow to faster tempos, along with standing lunge variations of increasing complexity. Borrow that logic. Change range, tempo, base of support, or the number of discs under you, but never several at once. If a move gets shaky, step back one variable and rebuild.
Common mistakes and fixes
The most common mistake is speed: fast slides use momentum, not muscle, and increase the odds of a lurch. The fix is to take at least three seconds each way. Another is losing neutral alignment, where the pelvis tilts or the lower back arches as the leg extends; shorten the range until the trunk stays quiet. Shrugging the shoulders during wall slides, locking the standing knee, and trusting a wrong glide face are the other regulars. Fix them by working closer to support, and by practicing each move at half range until it feels boring. Boring is the goal at this stage, because it means your body has stopped bracing and started controlling.
What the Research Can and Cannot Tell You
Buying guides lean on confident language, and equipment marketing leans harder. This section separates what published research supports about Pilates-style training from what nobody has shown about sliders specifically, and explains how this guide was built.
What Studies Say About Pilates Training
Research on the Pilates method in general is reasonably extensive, though much of it is modest in quality. It is worth knowing both the findings and their limits before you attach any health expectation to a small piece of equipment.
Reviews in healthy adults
A systematic review of 16 studies of Pilates in healthy people found strong evidence for improved flexibility and dynamic balance and moderate evidence for muscular endurance, at least through the end of training. A separate meta-analysis of nine randomized trials found that Pilates done two to three times a week for 5 to 12 weeks improved abdominal muscular endurance compared with no exercise, with no significant flexibility difference in that analysis. The two reviews do not fully agree on flexibility, which is typical of a field with small studies.
What that does not prove about sliders
Both reviews examined Pilates training broadly, on mats and on apparatus, not slider discs. The first also reported low methodological quality, with trial scores averaging 4.1 on a 10-point scale, and the second noted that benefits were tracked for roughly six months or less. We did not find a verified trial isolating sliders, so claims that discs “activate” the core more, or work better than other tools, are unproven here. Associations in exercise research are not guarantees, and sliders may simply make a movement harder, which is not the same as better.
How This Guide Was Built
Transparency matters more than polish in a buying guide, particularly when no hands-on testing is involved. Here is exactly what stands behind the recommendations above.
Methodology and sources
This is a research-based comparison, informed by manufacturer specifications, published exercise research, and general buying criteria for small exercise equipment. We read the official product pages named above and the sources linked throughout, and we did not use affiliate links or test any discs ourselves. Naming a product is not an endorsement or ranking, and the order of the examples carries no meaning. Where a page was silent, such as on weight limits or glide durability, we said so and did not fill the gap with assumptions.
Prices, stock, and what to verify before buying
Prices, stock, sizes, and warranty terms are date-sensitive. The figures in this guide reflect the official pages as read on October 7, 2026, and the Power Systems listing showed a backorder at the time. Before purchase, confirm the current price, the exact floor version you are ordering, the return window, and any care instructions on the maker’s page. Because this article covers exercise, anyone with a health concern should also check with a clinician or Pilates professional before starting.
Frequently Asked Questions
What are Pilates sliders used for?
Pilates sliders are used to add a controlled, gliding element to bodyweight exercises such as lunges, bridges, and wall slides. The disc moves under your hand or foot, so your muscles work to guide the slide instead of simply pushing or stepping. People use them for short strength sessions, as a finisher after Mat Pilates, and as a light travel kit. They do not replace spring-based equipment, and they work best when you move slowly.
Are Pilates sliders the same as gliding discs or core sliders?
Yes, for shopping purposes these names usually describe the same type of product. Brands choose different labels, and Merrithew calls its version sliding mobility disks while other sellers say gliding discs or core sliders. The details that really matter are the glide face, the grip face, and the diameter. Read the specifications on the listing rather than relying on the name. When you compare the best Pilates sliders for your space, a shared name tells you very little, and a shared diameter and glide face tell you a great deal.
Can I use Pilates sliders on carpet?
You can use them on carpet if the disc has a hard, smooth glide face made for that surface. Felt and fabric faces tend to drag on carpet fibers, so a hardwood disc is often a poor match. Some products are sold in a separate carpet version, and others are dual-sided so you can flip them. Thick or shag carpet can stop a glide entirely, so test one disc before buying several.
Will Pilates sliders scratch hardwood floors?
Hard plastic can mark a finish, especially when grit gets trapped under the disc. A felt or soft fabric glide face lowers that risk, and sweeping the floor before each session helps too. Check your floor manufacturer’s care guidance if you are unsure, and be extra careful on a rental. Keep the underside of each disc clean so dirt does not act like sandpaper.
How many Pilates sliders do I need?
One pair is enough for nearly every home routine. Two discs let you put one under each hand or each foot, and beginners can start with a single disc plus a wall or chair for support. Larger packs make sense only for studios or group classes. Buy more later if you discover a specific move that needs them.
Are Pilates sliders good for beginners?
They can be, as long as you use support and keep the movements small and slow. A beginner version might involve one disc, a chair or wall within reach, and five to eight careful repetitions per side. Learning the basics of Mat Pilates first makes sliders easier to control. If you have a health condition, are pregnant or postpartum, or are recovering from surgery, ask a clinician or Pilates professional before you begin.
How often should I use Pilates sliders?
Two or three short sessions a week is a reasonable starting point for most healthy adults. The CDC advises muscle-strengthening activity on at least two days a week, and slider work can be one way to meet that. Give your body a day between harder sessions while you learn the movements. Stop and seek guidance if you notice sharp pain, dizziness, or numbness.
How much should I spend on Pilates sliders?
The official pages we read listed single pairs in the range of roughly 15 to 20 dollars when we checked in October 2026. Prices change, so confirm the current listing before you buy. Extra cost is better spent on the right floor version, a clear return policy, and a good grip face than on branding. A cheaper pair is fine if it matches your floor and you do not need heavy daily use.