Direct answer: Shoulder mobility Pilates is a slow, controlled way to practice the range of motion your shoulders already have, pairing steady breathing with deliberate shoulder blade, rib cage, and upper back movement. A 15-minute mat routine can cover ten simple drills on your back, on hands and knees, and standing, all at a comfortable effort and none of them painful. It is general fitness education, not treatment, so sharp pain, numbness, or a shoulder that has stopped moving normally means checking with a clinician before you start.
This guide is for adults who feel tight or “stuck” when reaching overhead, reaching behind the back, or settling into a mat session after a long stretch at a desk. It covers how the shoulder moves, who should check in with a professional first, a timed routine with modifications, form cues, a weekly plan, and what research does and does not show. It is written for healthy adults without a current shoulder diagnosis; if you have one, your clinician’s advice outranks anything here. For more gentle movement ideas beyond the shoulders, browse the Mobility & Stretching hub.
A note on method: this is a research-based, expert-informed guide built from published health-agency pages, a peer-reviewed trial abstract, and Pilates education material. The routine has not been tested on readers or in a studio by our team, and it is a starting framework to adapt with a qualified instructor, not a prescription.
What Shoulder Mobility Means in a Pilates Context
Before choosing exercises, it helps to know what you are actually trying to improve. “Shoulder mobility” gets used loosely online, sometimes for stretching, sometimes for strengthening, sometimes for a party trick with a broomstick. In Pilates, the useful meaning is narrower: moving the arm, shoulder blade, ribs, and upper back through their available range with control.
How your shoulder actually moves
The shoulder is not one joint but a small team that has to cooperate every time you lift an arm. Understanding the team makes the routine below make sense.
Four links and one shared job
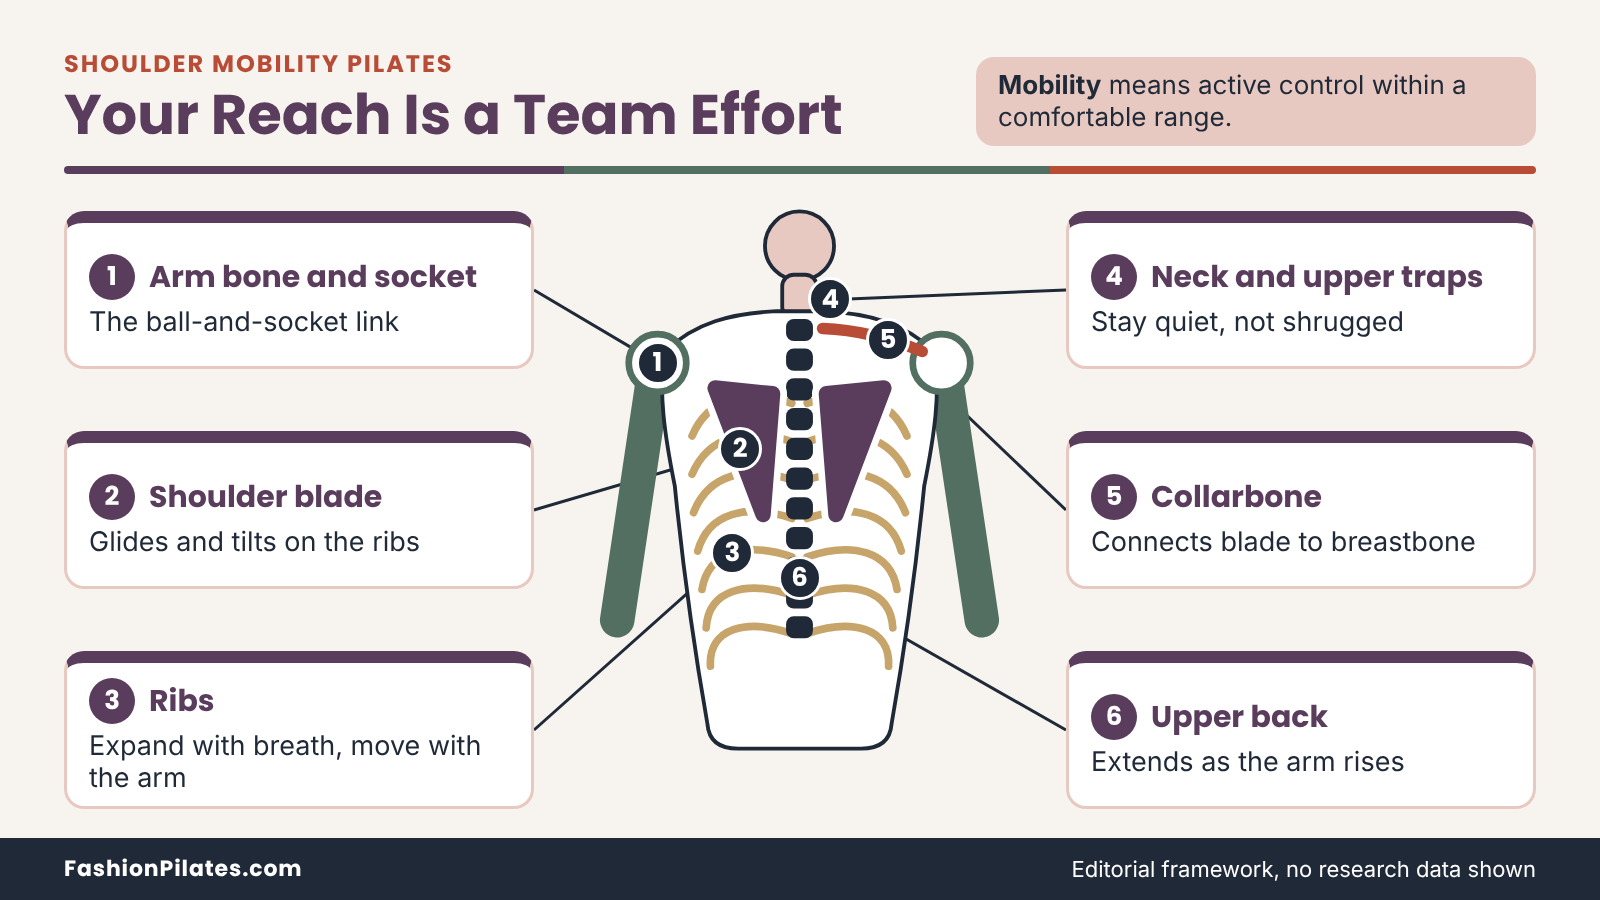
When you reach for a high shelf, the ball-and-socket joint where the upper arm meets the shoulder blade does a lot of the work, but it is not alone. The collarbone connects to the breastbone at one end and to the shoulder blade at the other, and the shoulder blade itself glides over the back of the rib cage. That gliding surface is not a true joint, yet it contributes a large share of the movement. If any link is slow to cooperate, the others tend to pick up the slack, which is why a “tight shoulder” is sometimes a stiff upper back or restricted rib movement in disguise.
The shoulder blade is the quiet partner
The shoulder blade, or scapula, tilts and rotates to turn the socket upward as the arm rises. Pilates teachers often call this “scapular movement,” and it is the single most useful idea in this article. A guide from Merrithew, a Pilates education company, lists scapular movement and stabilization among its five basic principles, describing shoulder blades that stay broad and supported on the rib cage rather than pinched together or rounded forward. In plain terms, the aim is a shoulder blade that moves freely and also knows where home is.
Mobility, flexibility, and stability are not the same thing
These three words get swapped constantly, and the mix-up leads to routines that stretch what needed support or strengthen what needed room. A quick set of definitions saves a lot of guesswork.
Plain-English definitions
Flexibility is how far a muscle can lengthen, often tested passively when something else moves the limb for you. Mobility is how far you can actively move a joint with your own muscles under control. Stability is the ability to hold a position or resist unwanted movement. A shoulder can be flexible yet unstable, or strong yet restricted, and most people need a mix. Shoulder mobility work for general fitness usually targets the middle ground: moving actively, within comfort, through the range you have.
Where Pilates principles fit in
Pilates is a natural home for this work because its basic habits overlap with what a shoulder needs. Breath that expands the ribs three-dimensionally, a steady pelvis and rib cage, and scapular awareness all show up in the Merrithew principles mentioned above, which also note that shoulder blades should be stabilized as deliberately as the abdominals at the start of an exercise. Slow tempo helps too, since rushing a shoulder drill rewards momentum rather than control. The routine in this guide borrows that framework without requiring any equipment beyond a mat and a wall.
Why Shoulders Feel Stuck (and When It Is More Than Stiffness)
Most everyday shoulder tightness is boring in the best sense: it tracks with how you spend your hours. Some of it, though, belongs to a short list of conditions where self-guided stretching is the wrong first move. This section helps you tell the two apart without playing doctor.
Everyday patterns that may limit reach
Research cannot say precisely why any single person’s shoulders feel tight, so treat the patterns below as plausible contributors, not diagnoses.
Long, still stretches of the day
Hours at a laptop, a steering wheel, or a phone keep the arms in front of the body, the upper back rounded, and the shoulder blades in roughly the same spot. Staying in any one position for a long time tends to make the end ranges of movement feel unfamiliar, the way a rarely used door feels stiff on the hinge. The shoulders may not be damaged, just under-practiced. That is the group most likely to enjoy a short, regular mobility routine, because the goal is variety of movement rather than heroic stretching.
The upper back and ribs set the stage
Lifting an arm overhead asks the upper back to extend a little and the ribs to move, not only the shoulder joint. A Physiopedia overview of thoracic and breathing evaluation puts the thoracic extension needed for overhead reach at roughly 10 to 13 degrees and suggests that a stiff upper back can push the shoulder joint to compensate. That page describes relationships observed in clinical reasoning rather than proven cause and effect, so read it as a reason to include upper back and breathing work, not as a promise. It is also why this routine does not stop at the shoulder itself.
Ordinary stiffness versus a signal to get checked
Pilates professionals and clinicians draw a line here, and it is worth drawing it yourself before moving on to exercises.
Everyday asymmetry is common
It is normal for one arm to feel looser than the other, especially if you carry a bag on one side, use a mouse with one hand, or sleep on one shoulder. A mild difference that stays steady, does not hurt, and does not interfere with daily tasks is usually just information about your habits. You can use the routine’s one-sided exercises to notice that difference without trying to force the tighter side to match. Matching ranges is a nice bonus, not the whole point.
Signs that point beyond stiffness
Progressive stiffness paired with pain, especially at night or when you reach for a seat belt, is a different story. Mayo Clinic’s page on frozen shoulder describes a condition that typically begins slowly and worsens, moves through freezing, frozen, and thawing stages, and is more common after age 40 and in people with conditions such as diabetes or thyroid disease. If your range is shrinking rather than just feeling tight, or you have had an injury that limits movement, the sensible next step is a conversation with a healthcare professional, not a harder stretch.
Before You Start: Safety, Screening, and Setup
A shoulder routine only helps if your shoulders are a good match for it. Spending two minutes on screening and setup is the least glamorous part of this guide and the most useful, so it comes before any exercise.
Who should check with a professional first
Gentle mobility work suits many healthy adults, but a few situations call for a clinician or an experienced Pilates professional to weigh in before you begin.
Stop signs and urgent symptoms
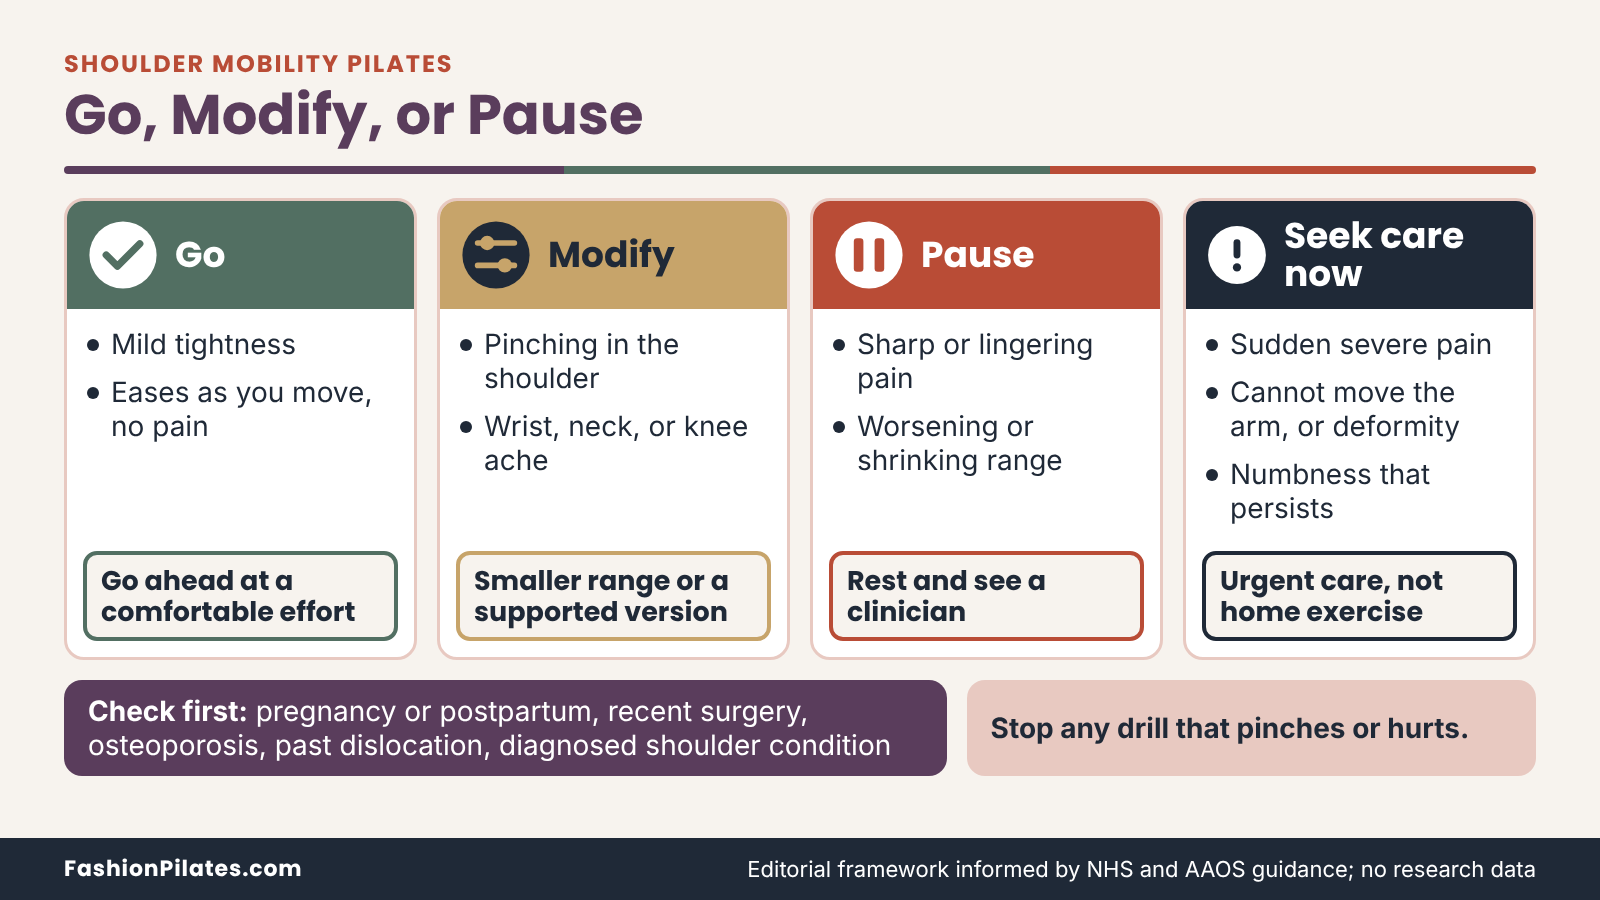
The National Health Service in England lists symptoms that need urgent care rather than home exercise, including sudden severe shoulder pain, being unable to move the arm, a visibly deformed joint, and pins and needles or numbness that do not go away. Its page on shoulder pain also suggests seeing a doctor if pain is getting worse or has not improved after two weeks. In the United States, that means contacting your clinician promptly or emergency services for the urgent signs. Arm pain that comes with chest pressure or breathlessness is an emergency, not a mobility problem.
Situations that call for a check-in first
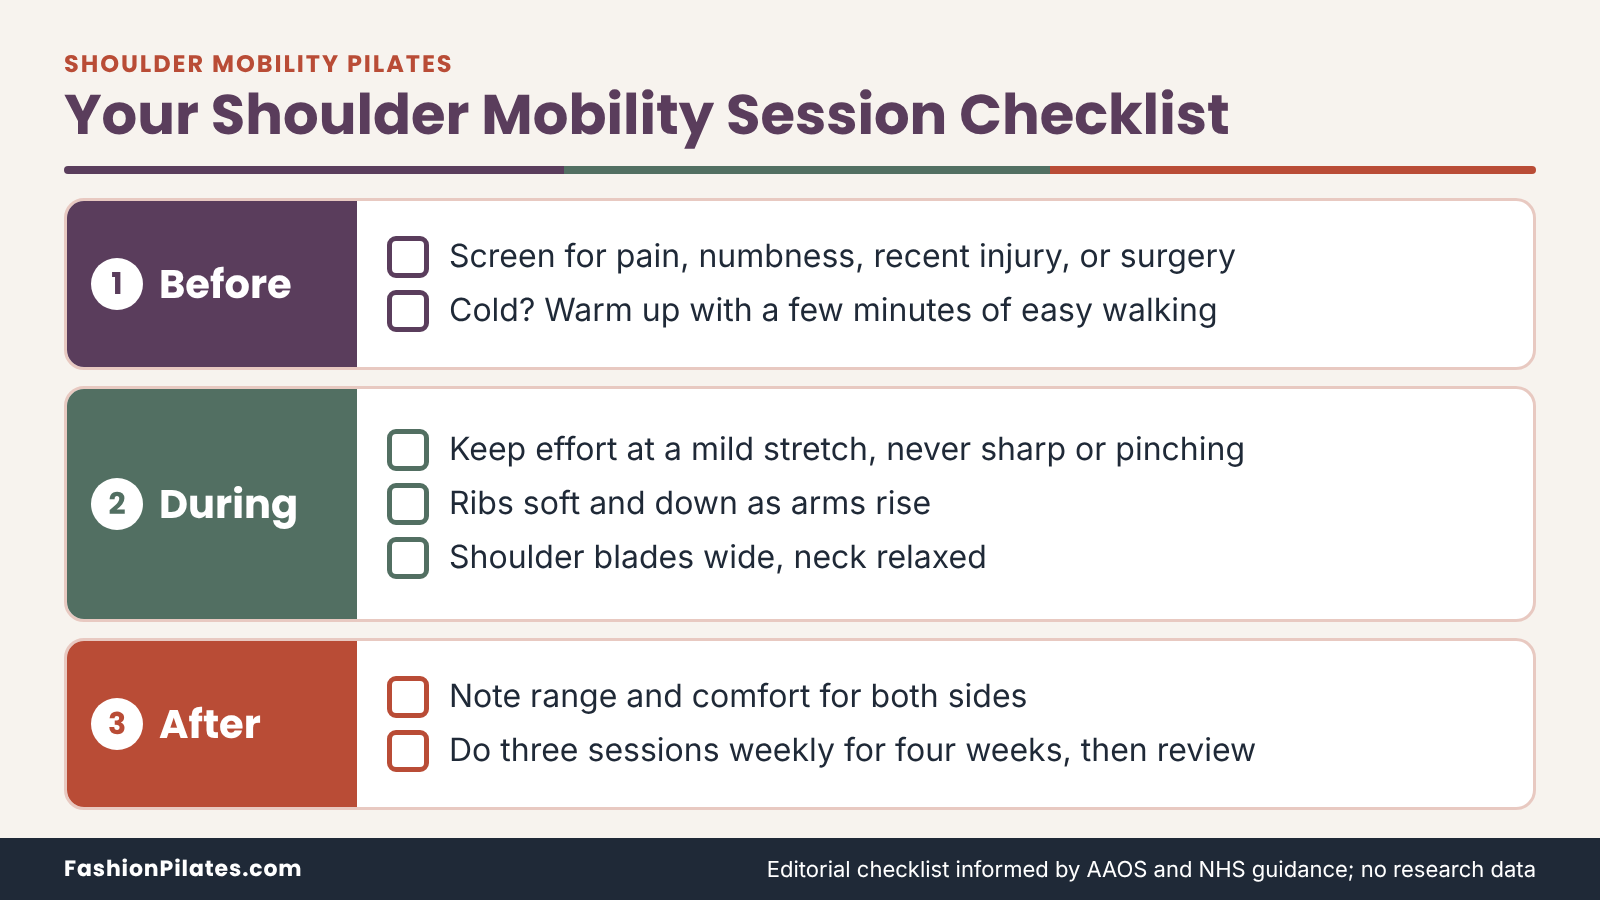
Talk with a qualified clinician or Pilates professional before starting if you are pregnant or postpartum, have had shoulder, neck, chest, or breast surgery, have osteoporosis, have had a dislocation or a recent injury, live with an inflammatory or chronic condition, or have been told you have a rotator cuff problem. People with very flexible joints may also need a different emphasis, since more range is not automatically better for them. None of this means you cannot move; it means the routine should be tailored by someone who knows your history.
The table below turns those cautions into a quick screen you can run before each session.
| What you notice | Reasonable next move | Why |
|---|---|---|
| Mild tightness that eases as you warm up | Go ahead at a comfortable effort | Typical stiffness from habits and sitting |
| Pinching at the top of the shoulder when lifting the arm | Use smaller ranges or skip the overhead drills, and mention it to a professional | A pinch is a cue to change the angle, not push through |
| Pain that lingers or worsens after sessions | Pause and see a clinician | Persistent worsening is more than ordinary soreness |
| Range clearly shrinking over weeks, especially with night pain | See a healthcare professional before stretching more | May reflect a condition that needs a diagnosis |
| Numbness, tingling, or weakness in the arm or hand | Stop and get checked | Nerve-type symptoms need assessment |
| Pregnancy, postpartum, recent surgery, osteoporosis | Get individual guidance first | Positions and loads may need adjusting |
Setting up your space and body
You need less than the wellness aisle suggests, which is good news for your closet and your countertop.
What you actually need
A mat or a carpeted floor, about six feet (roughly two meters) of clear wall, a hand towel, and a timer are enough. A folded towel or blanket helps cushion the knees, and a long dowel or broom handle can stand in for a towel if you like the extra feel, though neither is required. A purpose-made shoulder gadget with its own marketing page is optional at best. If you are still choosing a mat for kneeling work, see how to choose a Pilates mat for thickness and grip considerations.
How hard to push
Aim for a mild to moderate stretch sensation, around a 3 or 4 on a 10-point scale, that eases as you breathe. Sharp, pinching, burning, or zinging sensations are stop signals. The American Academy of Orthopaedic Surgeons’ rotator cuff and shoulder conditioning program, which is designed for people recovering from injury or surgery, states plainly that you should not feel pain during an exercise, and it recommends five to ten minutes of low-impact warm-up such as walking first. If your body feels cold, a short walk before the routine is a smart opener.
The 15-Minute Shoulder Mobility Pilates Routine
Here is the full sequence: ten drills in three phases, moving from lying down to hands and knees to standing so that gravity helps early and challenges you later. Read each description once before you start, set a timer, and treat the times as guides rather than a stopwatch contest. If you want a full-body sibling to this routine, 15 minute beginner mat Pilates mobility workout covers more than the shoulders.
| Time | Drill | Dose | Main focus |
|---|---|---|---|
| 0:00 to 1:00 | Rib breathing | 5 to 6 slow breaths | Rib movement and calm neck |
| 1:00 to 2:30 | Shrug and drop | 8 slow reps | Shoulder blade lift and lower |
| 2:30 to 4:30 | Reach and return, small arm circles | 8 reaches, 5 circles each way | Shoulder blade glide and arm control |
| 4:30 to 5:30 | Cat-cow with shoulder blade focus | 6 slow cycles | Shoulder blades and upper back |
| 5:30 to 7:30 | Thread the needle | 4 per side | Upper back rotation |
| 7:30 to 9:00 | Shell stretch with side reach | 3 breaths per direction | Side body and arm length |
| 9:00 to 11:00 | Wall slide | 8 slow reps | Overhead reach with ribs settled |
| 11:00 to 12:30 | Cross-body stretch | 2 holds of 20 to 30 seconds per side | Back of the shoulder |
| 12:30 to 14:00 | Towel behind the back (optional) | 2 holds of 20 to 30 seconds per side | Reaching behind |
| 14:00 to 15:00 | Standing arm sweep | 5 slow reps | Putting it together |
Phase one: on your back, minutes 0 to 4.5
Lying down removes the demands of standing and lets you feel what the shoulder blades and ribs are doing. Keep the whole phase quiet and unhurried.
Rib breathing (minute 0 to 1)
Lie on your back with knees bent, feet flat about hip-width apart, arms resting at your sides or hands loosely on your lower ribs. Inhale through your nose and let the ribs widen to the sides and back, without lifting the chest toward the ceiling. Exhale slowly through softly pursed lips and let the ribs glide back down. Take five or six unhurried breaths, keeping the neck soft and the jaw loose. If lying flat is uncomfortable, do this seated on a chair. Stop if you feel lightheaded and return to normal breathing.
Shrug and drop (minute 1 to 2.5)
From the same position, rest your arms long by your sides with palms down. Inhale and slide both shoulders gently toward your ears, a small movement rather than a big hike. Exhale and slide the shoulder blades away from the ears toward your hips, as if lengthening your neck. Do eight slow reps, keeping the ribs quiet and the head heavy on the floor. The goal is to feel the shoulder blade moving on the ribs. If your neck tenses, shrink the movement. Pause if your shoulders cramp or tingle.
Reach and return, then small arm circles (minute 2.5 to 4.5)
Extend both arms toward the ceiling directly above your shoulders, palms facing each other. Exhale and reach the fingertips higher so the shoulder blades slide forward and lift slightly off the mat, keeping the ribs down. Inhale and let the shoulder blades settle back onto the mat. Do eight reaches. Then draw small circles with your arms, about the size of a dinner plate, five in each direction, keeping the ribs still. If circles pinch, stay with the reaches and skip the circles. Stop if you feel a pinch at the top of the shoulder.
Phase two: on hands and knees, minutes 4.5 to 9
Moving to hands and knees adds weight through the arms and brings the upper back into the picture. Check that your wrists are comfortable first; if they are not, the forearm options in the modifications section will help.
Cat-cow with shoulder blade focus (minute 4.5 to 5.5)
Start on hands and knees with wrists under shoulders and knees under hips, spine long. Exhale and gently round the upper back toward the ceiling while pressing the floor away, so the shoulder blades spread wide. Inhale and lengthen the chest forward, letting the shoulder blades slide closer together without crunching the neck or sinking into the shoulders. Move through six slow cycles, with more attention on the shoulder blades than on the lower back. Ease off if wrists ache, or if neck pain appears when you look forward.
Thread the needle (minute 5.5 to 7.5)
From hands and knees, inhale and lift your right arm toward the ceiling, turning the chest to open to the right. Exhale and thread the right arm under the left, palm up, sliding along the floor as you lower the right shoulder and ear toward the mat. Rest there for two breaths, then inhale and unwind to return. Keep hips over knees and let the movement come from the upper back. Do four per side. If the shoulder feels pinched, stay higher and reach less far. Skip the lowered position if there is any sharp pain.
Shell stretch with side reach (minute 7.5 to 9)
From hands and knees, send your hips back toward your heels and rest your forehead on the mat or on stacked hands, arms extended forward. This resting posture is often called the shell or rest position in Pilates. Walk both hands slowly to the right and stay for three breaths, feeling the left side of the ribs open. Return to center, then repeat to the left. Move hips only as far back as feels comfortable; place a rolled towel behind the knees if sitting back bothers them. Stop if the knees complain.
Phase three: standing, minutes 9 to 15
Standing work asks the shoulders to function the way they do in real life, with the ribs and spine stacked on top of the pelvis. Keep feet about hip-width apart and knees soft.
Wall slide (minute 9 to 11)
Stand with your back against a wall and your feet a few inches away from it. Bend your elbows to about 90 degrees with the backs of your hands near the wall, like a goalpost. Exhale and slide the arms up the wall only as far as the ribs stay down and the lower back does not arch away. Inhale and lower slowly. Do eight reps. Many people cannot touch the wall with both hands and elbows at first, and that is information, not failure. For a gentler option, face the wall and slide forearms up. Stop if the front of the shoulder pinches.
Cross-body stretch (minute 11 to 12.5)
Stand or sit tall. Bring your right arm across the chest at about shoulder height, and support it with the left forearm, resting just above or below the elbow rather than pulling on the joint. Hold for 20 to 30 seconds while breathing slowly, keeping the right shoulder down away from your ear and the ribs facing forward. The AAOS program uses a similar stretch with 30-second holds. Repeat twice on each side. Stop if you feel pinching or a sharp pull at the front of the shoulder.
Towel behind the back, optional (minute 12.5 to 14)
Hold a hand towel behind your lower back with both hands about shoulder-width apart, standing tall. Gently pull the towel sideways with one hand until you feel a mild stretch at the front or side of the other shoulder, hold for 20 to 30 seconds, then switch. The AAOS program describes a related stick-behind-the-back stretch for internal rotation. Skip this drill if you have had a shoulder dislocation, recent surgery, or any pinching when reaching behind. It is entirely optional, and if you skip it, spend the time on the wall slide.
Standing arm sweep (minute 14 to 15)
Stand tall with arms by your sides. Inhale and sweep both arms out to the sides and upward, stopping wherever the ribs begin to flare or the neck tightens. Exhale and lower the arms slowly with the shoulder blades gliding down your back. Do five unhurried reps, treating the top of the range as a destination you arrive at rather than force. End by standing for a breath or two and noticing whether overhead reach feels any different. A little change or none is a perfectly acceptable result for one session.
Modifications and Progressions
A good routine bends to the person doing it. Every drill above has an easier version and a harder one, and the right choice shifts day to day depending on sleep, stress, and how your shoulders feel after yesterday’s laptop marathon.
Making it gentler
Gentler does not mean pointless. Smaller, supported movement is often the most informative kind, because you can feel what is happening.
Smaller ranges and supported positions
Cut the range of any drill in half and keep everything else the same. In reach and return, reach only an inch or two. In the wall slide, stop the moment your ribs start to lift. Support helps too: rest the head on a thin folded towel for floor work, or do the standing drills sitting on a stable chair with the back tall. Smaller ranges done with control still count as mobility practice, and many people find that after a few sessions they can add range without effort. Let range come back on its own schedule.
Wrists, knees, and neck
Wrists often complain first on hands and knees. Try resting on your forearms for the cat-cow and thread-the-needle drills, or make fists and bear weight on the knuckles with straight wrists, whichever feels better. Knees appreciate a folded blanket, and the shell stretch can be done seated on a firm cushion or chair if sitting back on the heels hurts. For neck sensitivity, place a thin towel under the head during floor work and keep the gaze soft. If any modification still brings pain, that drill is not a fit today.
Making it more challenging
Once the routine feels easy and comfortable for several weeks, you can nudge it in a few ways. Change one thing at a time so you can tell what helped.
Slower tempo and quiet pauses
The simplest progression costs nothing. Slow each rep so that it takes four counts to go up and four to come down, and add a one-breath pause at the end of your comfortable range. Slower tempo makes the shoulder blades and ribs work in sequence rather than relying on momentum, and it is surprisingly demanding; expect a bit of shaking in the wall slide, which is normal and mildly humbling. The routine will run longer than fifteen minutes with this change, so trim a drill or two instead of rushing.
Moving toward strength work
Mobility and strength support each other. The AAOS program above pairs stretching with scapula setting, rows with an elastic band, and external rotation exercises, but it is designed for rehabilitation under professional guidance, so do not copy its loads without advice. For healthy adults, a reasonable next step is to add a strength-oriented session such as 30 minute Pilates upper body workout on separate days rather than loading the mobility routine itself. The Centers for Disease Control and Prevention (CDC) recommends 150 minutes of moderate activity and two days of muscle-strengthening each week for adults, which a mobility routine alone does not provide.
If you are unsure which version to use today, the table below sorts the options by situation.
| Drill | Gentler option | Standard | Avoid or skip if |
|---|---|---|---|
| Shrug and drop | Tiny movement, head on towel | Slide ears-to-hips range | Neck cramps or tingling |
| Reach and return | Reach one inch, skip circles | Reach plus small circles | Pinch at the top of the shoulder |
| Cat-cow | On forearms | On hands, wrists under shoulders | Wrist pain that persists |
| Thread the needle | Reach less far, hand stays high | Shoulder and ear toward mat | Sharp shoulder pain when lowering |
| Shell stretch | Seated on chair, reach forward | Hips toward heels | Knee pain sitting back |
| Wall slide | Face wall, slide forearms | Back to wall, goalpost arms | Front-of-shoulder pinch |
| Towel behind back | Skip it | Gentle sideways pull | Past dislocation, recent surgery |
Form Cues and Common Mistakes
Most of what separates a helpful session from a wasted one is small: where the shoulder blades sit, what the ribs do, and how fast you move. This section gives you three practical cues and four common mistakes, with a fix for each.
Cues for shoulder blades, ribs, and neck
Cues are shortcuts that tell your body what to aim for. Try one at a time; stacking five at once is how people end up holding their breath and glaring at the wall.
Wide, not pinched
“Wide, not pinched” captures the Merrithew guidance on keeping shoulder blades broad and flat on the rib cage rather than squeezed together or rounded forward. In a drill like cat-cow or the wall slide, imagine the shoulder blades staying wide across the back as the arms move. Picture a sheet of paper resting on the ribs rather than a vice closing around the spine. If you notice the upper trapezius, the muscle between neck and shoulder, working hard, let it soften and use a smaller range.
Ribs down as arms go up
The most common way to cheat on overhead reach is to arch the lower back and flare the ribs, which makes the arms look higher without the shoulders doing any extra work. Think about letting the lowest ribs stay soft and heavy as the arms rise. A useful check is to place one hand on the bottom ribs during the wall slide: if they pop forward, you have reached the edge of your honest range, and that is where practice belongs. Working there is more valuable than touching the wall with a flared ribcage.
Mistakes that undo the work
None of these mistakes is dramatic, but each can cancel the benefit of an otherwise careful session.
Stretching into pain or bouncing
It is tempting to treat a tight spot as an opponent. Pushing into pain, or bouncing at the end of a stretch to gain a little extra, usually tells the body to guard instead of relax. The AAOS program’s wording that you should not feel pain during exercise is a good rule for healthy adults too. If a stretch is uncomfortable rather than painful, breathe out slowly and wait; if it hurts, back off by half and reconsider the position. Gentle and consistent beats aggressive and occasional.
Holding the breath, rushing, and chasing symmetry
Breath-holding and speed both bring the neck and upper trapezius into the job, which is the opposite of what a mobility session wants. Count breaths to keep the pace honest. A related trap is chasing perfect left-right symmetry: bodies are rarely identical on both sides, and forcing the tighter side to match the looser can overshoot comfort. Aim for the same effort and quality on each side, and treat any difference in range as a note to yourself rather than a score to equalize.
Here is how those mistakes tend to look in a real session. Imagine someone who does the wall slide on a lunch break, wanting to touch the wall with their elbows. They arch the lower back, lift the ribs, and shrug, and the movement looks fine in the mirror. Cutting the range in half, keeping the ribs down, and breathing out through the lift looks smaller but uses the shoulder blades and ribs the way the drill intends. The version that looks less impressive is the one doing the work.
Fitting Shoulder Mobility Into Your Week
A fifteen-minute routine does little if it lives only in your good intentions. Making it fit your real schedule matters more than finding the perfect time slot, so this section focuses on frequency, timing, and how the routine sits alongside other Pilates work.
How often and when
No published guideline sets an exact dose of mobility work for healthy adults, so the suggestions below are practical starting points to adjust, not evidence-based prescriptions.
A realistic starting frequency
Three sessions a week for about four weeks is a sensible trial period, followed by a check on how your reach feels and whether any drill needs changing. For comparison, the AAOS recovery program asks people rehabilitating from injury to stretch five to six days a week, while the NHS suggests trying shoulder exercises for six to eight weeks when working to stop pain from returning. Those are clinical contexts, not general-fitness targets. Start smaller, and add days only if you enjoy them and your shoulders respond well.
Choosing a time of day
The best time is the one you will keep. Many people like to do it before a Mat Pilates session as a warm-up, which gives the shoulders and upper back a chance to move before loaded work. Others prefer a midday break after hours at a desk, when a short chair version of the breathing, wall slide, and cross-body stretch can reset the afternoon. Evenings work for people who find the slow pace calming. Avoid squeezing it in straight after a hard upper-body strength session if your shoulders feel fatigued.
The table below sketches one possible week for a person who already does two Pilates sessions.
| Day | What to do | Time | Notes |
|---|---|---|---|
| Monday | Full 15-minute routine | 15 minutes | Fresh start to the week |
| Tuesday | Pilates class or mat session | Per class | Mention any shoulder issues to the instructor |
| Wednesday | Desk version: breathing, wall slide, cross-body | 5 minutes | Short and optional |
| Thursday | Full 15-minute routine | 15 minutes | Note any differences between sides |
| Friday | Rest or easy walking | As desired | Easy movement counts |
| Saturday | Pilates class or mat session | Per class | Use the routine as a warm-up if helpful |
| Sunday | Full 15-minute routine | 15 minutes | Review how the week felt |
Pairing with Pilates classes and other training
Shoulder mobility work is a supporting player. It works best when it fits into the rest of your movement life rather than replacing it.
Inside a Mat Pilates routine
Mat Pilates, the method of exercise done on the floor with body weight, already includes many shoulder-friendly moments, from rolling movements to planks. If you are new to the method, Pilates for beginners guide explains the basics and gives context for terms like “neutral spine.” For everyday posture and movement habits beyond the mat, Pilates travel posture shows how small adjustments work outside the studio. Doing the routine first can make the shoulder blades feel more available in planks, while still letting you adjust the plan around how you feel.
In studio and reformer classes
If you attend studio classes, tell the instructor about any shoulder history before the session starts, and ask them to suggest alternatives to positions that bother you. Questions worth asking include which exercises load the shoulders most, what a gentler version looks like, and how to scale arm positions. Spring settings on a reformer vary by brand and model, so follow your instructor’s guidance and the manufacturer’s manual rather than copying someone else’s settings. For a broader introduction to the equipment, see reformer Pilates explained.
What the Evidence Says, and What It Does Not
Good guidance separates what we know from what is merely plausible. Here is an honest look at the research most relevant to Pilates and the shoulders, and where it runs out.
Research on Pilates and shoulder complaints
The literature on shoulder-focused Pilates is small, and much of it involves people who already have pain, not healthy adults looking to move more freely.
A small trial of clinical Pilates
A randomized trial published in the Journal of Bodywork and Movement Therapies in 2017, listed on PubMed, enrolled 33 people with shoulder pain lasting at least four weeks and compared clinical Pilates exercises with conventional exercise. Over ten treatment days, delivered five days a week, the Pilates group improved on both pain and disability scores, and between-group comparisons favored Pilates on pain and total disability scores. Clinical Pilates here means exercise supervised in a rehabilitation setting, which is not the same as a self-guided mat routine.
Why one trial is not a verdict
Thirty-three participants over ten treatment days is a small, short study. The abstract reports results immediately after treatment, so it says little about whether benefits last, and it involved people with shoulder pain rather than healthy adults. Small trials can be a useful signal and a reason for larger studies, but they cannot show that Pilates is better than other exercise in general. Read it as one encouraging data point, not as proof that this routine will change your shoulders.
Mobility drills and tracking your own progress
Most of the practical advice in this guide rests on exercise principles and clinical guidance rather than direct tests of this routine.
What can fairly be said
No study has tested this specific sequence, so claims about outcomes would be guesses. What is reasonable to say is narrower: gentle, pain-free movement is consistent with the NHS advice to stay active and gently move a sore shoulder, and with the AAOS emphasis on pain-free stretching and shoulder blade control. Observational clinical reasoning links the upper back and breathing to overhead reach, though that does not establish cause and effect. Treat the routine as a low-risk way to practice movement, not a treatment.
A simple way to track change
Pick two or three markers and check them every two weeks: how high the wall slide travels before the ribs flare, how the cross-body stretch feels on each side, and how easy it is to reach a high shelf. Write brief notes rather than chasing numbers. If after four to six weeks nothing has improved, or something feels worse, bring your notes to a clinician or experienced Pilates instructor, who can look at how you move and adjust the plan.
| Source | What it offers | Limit to keep in mind |
|---|---|---|
| 2017 randomized trial of clinical Pilates | Improvement in pain and disability scores in people with shoulder pain | 33 people, ten treatment days, rehabilitation setting |
| AAOS shoulder conditioning program | Pain-free stretching, warm-up advice, and strength exercises | Written for recovery from injury or surgery |
| NHS shoulder pain page | Stay active, gently move the shoulder, see a doctor if no improvement in two weeks | General UK guidance, not exercise-specific |
| Mayo Clinic frozen shoulder page | Stages, risk factors, and when to talk with a professional | Describes a condition, not a mobility routine |
| Merrithew principles brochure | Scapular movement and stabilization as a Pilates principle | Educational material from a training company |
Frequently Asked Questions
What is shoulder mobility Pilates?
Shoulder mobility Pilates is a gentle approach that uses Pilates-style breathing, control, and shoulder blade awareness to move the arms and upper back through a comfortable range. It usually involves slow drills on a mat and against a wall rather than heavy equipment. The aim is smooth, controlled movement rather than extreme stretching. It is general fitness education and does not replace assessment or treatment for a shoulder condition. Anyone with pain, numbness, or a recent injury should check with a clinician first.
How often should I do shoulder mobility exercises?
Three sessions a week for about four weeks is a reasonable starting point for most healthy adults. No published guideline sets an exact dose for general fitness, so adjust based on how your shoulders feel. Short desk versions on other days are fine if they stay comfortable. If soreness lingers into the next day, reduce the range or the number of sessions. After four weeks, review how your reach feels and decide whether to continue, change drills, or ask a professional.
Can Pilates help a stiff or frozen shoulder?
A stiff shoulder and a frozen shoulder are not the same thing, and the second needs a proper diagnosis. Mayo Clinic describes frozen shoulder as a condition that begins slowly and moves through stages that can last many months. A clinician or physical therapist can decide whether movement of any kind is appropriate at your stage. This routine is not a treatment for frozen shoulder. If your range of motion is shrinking or pain disturbs your sleep, see a healthcare professional before exercising.
Is it normal for my shoulders to click or pop?
Painless clicking or popping is commonly reported and is often not a concern. Pain, catching, or a feeling that the shoulder is slipping out of place is different and deserves attention. Mention any painful or unstable sensation to a clinician, especially if it follows an injury. In the meantime, stay within comfortable ranges and skip drills that provoke the sound along with discomfort. A professional can check how the joint and shoulder blade move together.
Should I do shoulder mobility before or after a Pilates class?
Before is the more common choice, since gentle movement can prepare the shoulders and upper back for loaded work. Some people prefer to do it afterward as a calm cool-down when muscles are already warm. Either works if the effort stays easy. If your class already includes a long warm-up, you can shorten the routine to a few drills. Choose the timing that you will actually repeat each week.
Can I do these exercises at my desk?
Several of them adapt well to a chair. Rib breathing, the cross-body stretch, and a seated arm sweep all work sitting tall with feet flat on the floor. A wall slide can be done standing against any free wall during a short break. Keep the effort mild and skip anything that causes pain or tingling. A five-minute desk version on non-routine days keeps the habit going without needing a mat.
Do I need equipment for shoulder mobility Pilates?
A mat or carpeted floor, a wall, and a hand towel are enough for the routine in this guide. A folded blanket can pad the knees and a broom handle can replace a dowel if you want one. Elastic bands and light weights belong in strength sessions rather than in this mobility routine. Specialized shoulder gadgets are not necessary. If you are unsure whether an item suits you, ask a qualified instructor.
When should I see a professional about shoulder tightness?
See a clinician if pain worsens, if it has not improved after about two weeks, or if moving the arm becomes very difficult, which matches NHS guidance. Seek urgent care for sudden severe pain, an arm you cannot move, visible deformity, or numbness and tingling that do not go away. Anyone who is pregnant, postpartum, or recovering from surgery should ask for individual advice before starting. A Pilates instructor with training in working around injuries can also help you adapt the routine. Bring notes on what hurts and when.