Direct answer: A good pilates obliques workout trains three separate jobs: turning the ribcage over a steady pelvis, bending sideways without collapsing, and resisting unwanted twist while you hold a side-supported position. The 20-minute mat routine below covers all three with a four-minute warm-up, thirteen minutes of rotation and side-support work, and a three-minute cooldown. You need a mat, a little floor space and the patience to move slowly, because small, controlled ranges do more for the side body than big swinging ones.
This guide is written for adults who can already get down to the floor and back up comfortably, including newer Pilates students who are willing to use the easier options. You will find the anatomy in plain English, a timed session map, step-by-step instructions for each exercise, a mistake-and-fix table, progressions, a sample weekly layout and an honest look at what the research does and does not say. It is a research-based, expert-informed routine built from published anatomy references, health agency guidance and standard mat technique. The FashionPilates team did not run hands-on trials of it, and it is general fitness education, not individualized medical advice.
What Your Obliques Actually Do
Before you add a single repetition, it helps to know what you are training. The obliques are a team of muscles on the sides of your trunk, and they are more versatile than the word “side abs” suggests.
Where the obliques sit and how they move you
Think of the obliques as the diagonal layers of your midsection wall. They connect the lower ribs to the pelvis and to a strip of connective tissue running down the middle of your belly, which is why they can turn, tilt and brace the whole trunk.
External and internal obliques in plain English
You have two pairs. The external obliques are the outer layer, starting on the outer surfaces of the lower eight ribs and fanning downward and forward toward the midline and the front of the pelvis, according to the Kenhub anatomy reference. The internal obliques lie underneath them and work as partners. When one side contracts together with the opposite internal oblique, the trunk turns toward the opposite side; when it works with the same-side muscles of the abdomen and back, the trunk bends sideways toward its own side. With both sides working together, the obliques help the abdominal wall tighten and flex the trunk forward.
Rotation, side bending and bracing: three different jobs
Those anatomical facts translate into three training goals that are worth keeping separate in your head. Rotation is turning the ribcage while the pelvis stays quiet, as in a criss-cross or a saw. Side bending is lengthening and curving the trunk sideways, as in the mermaid.
Anti-rotation and side support is holding a position while something tries to twist or sag you, as in a side plank. A balanced session includes all three, which is exactly how the routine later in this guide is built. If you only ever twist, you are training one-third of what the obliques do.
Why Pilates is a natural home for oblique work
Mat Pilates leans heavily on controlled trunk movement, slow tempo and breath timing, which suits muscles that are asked to coordinate rather than simply lift weight. If you want the full method background, our guide to what Mat Pilates is covers the principles in detail.
Rotation with a still pelvis
The signature Pilates idea for oblique work is separation: the upper trunk turns, the lower body stays stable. That separation is harder than it sounds. Most people twist by swinging the shoulders and letting the hips follow, which feels strong but moves the effort away from the muscles you are trying to train. Slowing the tempo, shrinking the range and watching the pelvis (imagine a glass of water resting on your lower belly) forces the ribcage to do the turning. It also makes the exercise feel humbling, in a good way, because a five-inch rotation done well is more demanding than a fifteen-inch rotation done sloppily.
How the obliques fit with the rest of the core
The obliques never work alone. Deep abdominal muscles, the straight “six-pack” muscle at the front, the muscles along the spine, the hips and the diaphragm all share the job of controlling your trunk. That is why a pilates obliques workout still feels like a whole-trunk workout, and why the exercises below ask for steady breathing and a stable base rather than isolated squeezing. If you want a longer session that spreads effort across the entire center, the 30-minute intermediate Mat Pilates core workout is the natural companion to this one, and this 20-minute routine is the side-body specialist.
Before You Start: Setup, Safety and Who Should Modify
Twisting and side-bending are ordinary movements, but they can be loaded in ways that matter for some bodies. A few minutes of setup and screening is the least glamorous part of any routine and one of the most useful.
What you need and how to set up
This routine is deliberately low on gear. The only real requirement is a surface that is comfortable for your spine, hips and forearms.
Mat, space and clothing
Use a mat with enough cushioning for your spine, hip bones and forearms; the side plank in particular puts concentrated pressure on one elbow and one hip. If you are still choosing between options, our Pilates mat versus yoga mat comparison explains how thickness and grip differ. Clear a rectangle roughly the length of your mat plus an arm’s reach on each side, so you can extend your arms and legs without hitting furniture. Wear clothing that stays put when you rotate and lie on your side, since a waistband that rolls down or a loose top that rides up will pull your attention away from your ribs. Grip socks are optional; bare feet work fine on a mat.
Reading the dose: reps, holds and rests
Every exercise in this guide lists a time, a rep count and a rest. A “rep” for a rotating exercise means one trip to one side, and “each side” means you complete the count on the right and then on the left. The minute totals include the short pauses and position changes, so you will not be doing nonstop work for twenty minutes.
If a set feels easy, resist the urge to speed up; add a one-second pause at the end of the range instead. If a set feels too hard, trim the repetitions rather than the quality. Finishing with two good reps left in the tank is a better outcome than grinding through ragged ones.
Who should skip or modify, and when to stop
General fitness guidance cannot see your medical history, so this section is the one to read slowly. Nothing here replaces advice from your own clinician or a qualified Pilates professional.
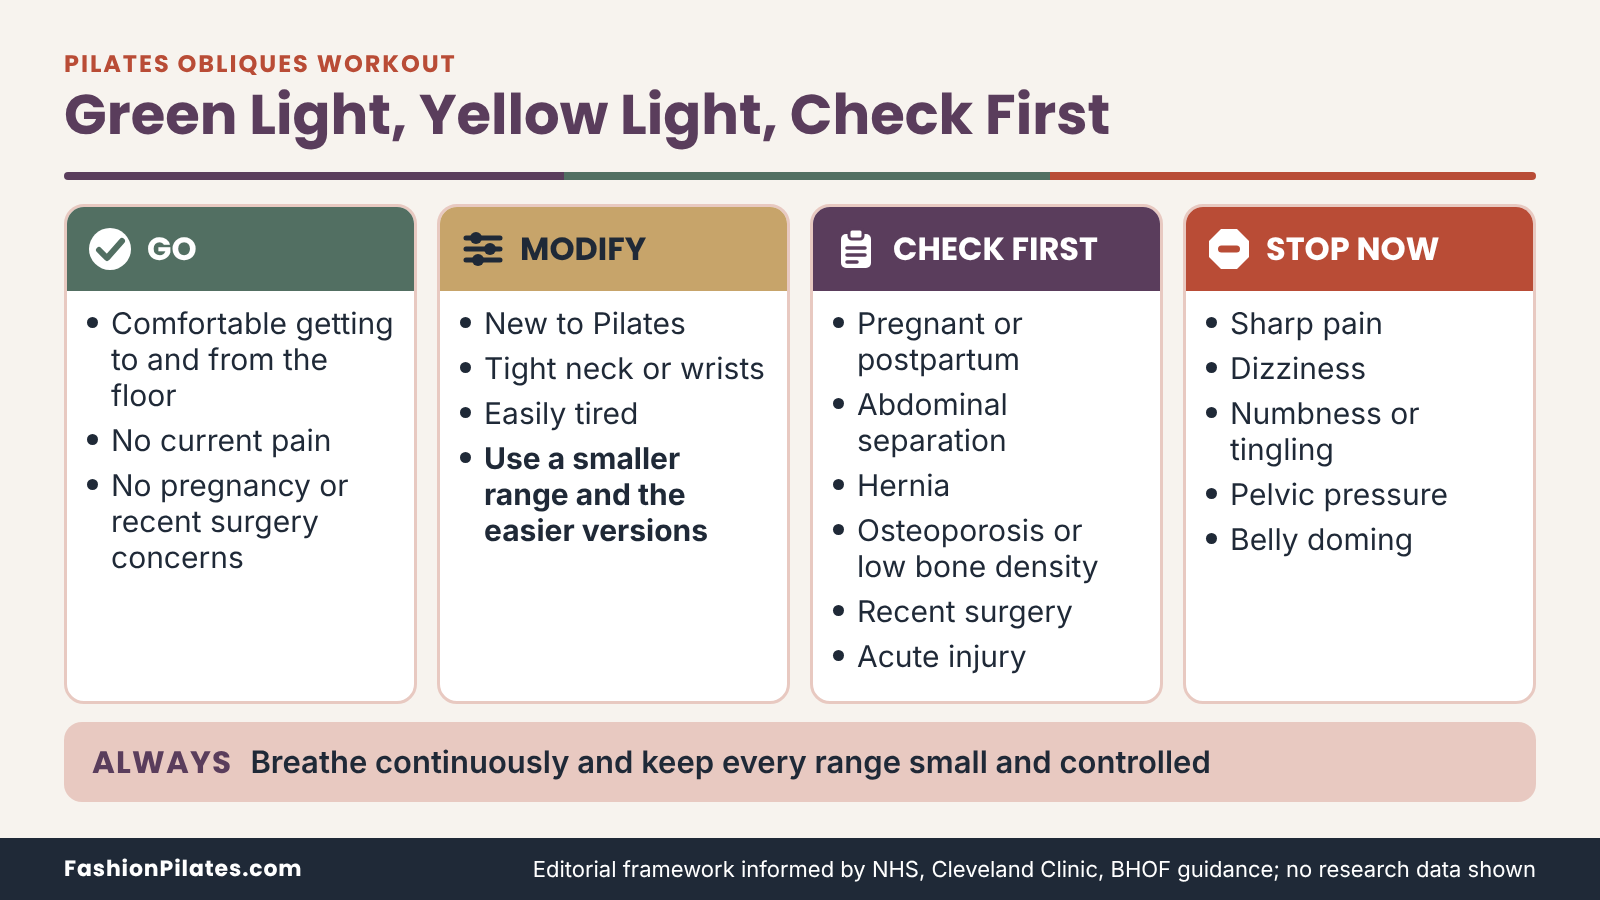
Check first if any of these apply
Talk with a qualified clinician or an experienced Pilates instructor before doing this routine if you are pregnant or recently postpartum, have had recent abdominal or spinal surgery, have a known hernia, have an acute back, neck, shoulder or wrist injury, or live with a chronic condition that affects balance or bone strength. Pregnancy deserves a specific mention: the NHS guidance on exercise in pregnancy advises avoiding lying flat on your back for more than a few minutes later in pregnancy and telling any instructor you are pregnant. Separation of the abdominal muscles after pregnancy is common, and the Cleveland Clinic overview of diastasis recti lists crunch-style moves and unmodified planks among the movements that can worsen a bulge along the midline, so a professional should help you choose appropriate options. For people with osteoporosis or low bone density, the Bone Health and Osteoporosis Foundation’s moving-safely guidance says to avoid forceful or extreme twisting and forward bending of the spine, and it specifically notes that Pilates and yoga can involve end-range movements that need adjustment. Clearance and a customized plan come first if that is you.
Stop signs and the comfort rule
Stop the exercise, and the session if needed, if you feel sharp or pinching pain, dizziness, numbness or tingling, chest discomfort, unusual shortness of breath, pelvic pressure or heaviness, or a ridge or dome pushing up along the middle of your belly. Ordinary muscle effort and mild shaking in a side plank are fine; pain that sharpens, spreads or lingers is not. If you are brand new to Pilates, build your basics first with our Pilates for beginners guide and use the easier option for every exercise below. Seek medical advice if symptoms continue after you stop.
The 20-Minute Pilates Obliques Workout at a Glance
This section is the map before the walk: how the twenty minutes are divided, why the exercises sit in this order, and how to pace your breath and effort so the session feels strong without feeling frantic.
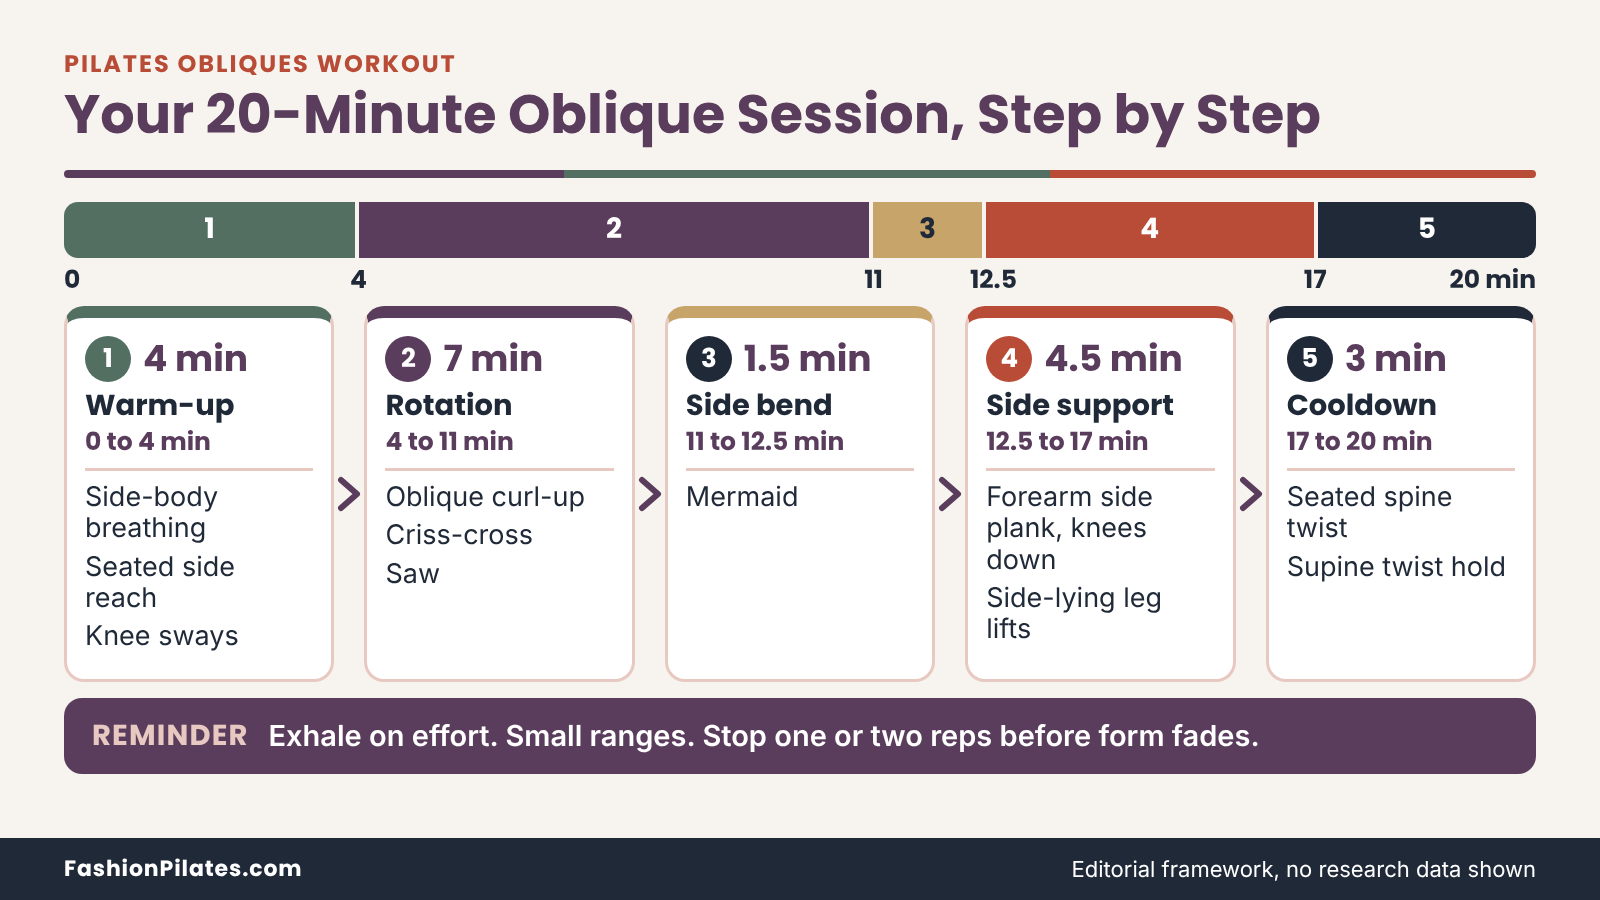
How the 20 minutes are divided
The routine moves through five body positions with as few transitions as possible: seated, on your back, seated again, on your side and finally on your back. That sequence keeps floor changes from eating the clock and keeps the effort pointed at the side body.
The session map and timing math
Here is the whole routine in one place, with the minutes added up so you can see that the exercise times, rests and position changes fit into exactly twenty minutes. Each time block includes the small pauses between sets, which is why a short set of six repetitions can occupy more than a minute.
| Minutes | Exercise | Position | Dose | Main purpose |
|---|---|---|---|---|
| 0:00 to 1:30 | Side-body breathing | Seated | 6 to 8 slow breaths | Ribcage mobility and breath timing |
| 1:30 to 2:30 | Seated side reach | Seated | 4 each side | Side-bend preparation |
| 2:30 to 4:00 | Knee sways | On back | 6 each side | Gentle rotation warm-up |
| 4:00 to 6:30 | Oblique curl-up | On back | 2 rounds of 6 each side | Rotation with a curl |
| 6:30 to 9:00 | Criss-cross | On back | 2 rounds of 6 each side | Rotation with pelvis control |
| 9:00 to 11:00 | Saw | Seated | 5 each side | Seated rotation and reach |
| 11:00 to 12:30 | Mermaid | Seated | 4 each side | Side bend with length |
| 12:30 to 17:00 | Forearm side plank (knees down) and side-lying leg lifts | On side | Each side: 2 holds of 15 to 20 seconds, then 8 lifts | Side support and anti-rotation |
| 17:00 to 18:30 | Seated spine twist | Seated | 6 each side | Cooling rotation |
| 18:30 to 20:00 | Supine twist hold | On back | About 45 seconds each side | Release and slow breathing |
The math is simple: four minutes of warm-up, seven minutes of rotation, one and a half minutes of side bend, four and a half minutes of side support, and three minutes of cooldown. That adds up to twenty. If your day only has fifteen minutes, drop the criss-cross second round and the supine twist hold rather than rushing everything.
Why this order works
The warm-up opens the ribcage and shoulders before anything is asked of them. The curl-up and criss-cross come early because they involve lifting your head and shoulders, and your neck and abdominal wall are freshest at the start. The seated saw and mermaid follow so your spine gets two different directions of movement, rotation and side bend, before the side plank asks the obliques to hold rather than move. The cooldown rotates gently the other way and then lets the whole trunk quiet down. Putting the hardest holds last is tempting, but a wobbling side plank is a poor way to finish a routine about control, and your shoulders deserve some rest before you hang your weight on them.
Pacing, breathing and effort level
Pilates is famous for its breath cues, and they are easy to overthink. The goal is simple: keep breathing, and let the breath help the effort rather than compete with it.
Breathing: inhale to prepare, exhale to turn
The default pattern throughout is to inhale through your nose to prepare and lengthen, and exhale through your mouth as you do the hard part, such as curling up, rotating or lifting a leg. Exhaling on effort helps you avoid holding your breath, which many people do without noticing when the abdominal muscles work. You do not need a perfect rhythm. If the pattern gets tangled, forget the counting, breathe in whatever way keeps the ribs moving, and return to the cue on the next repetition. A held breath, a bulging belly or a tight throat are all signs to reduce the range and start again.
How hard it should feel
Aim for a moderate effort, roughly a five or six on a ten-point scale, where you could still say a short sentence between repetitions. Form is the limit, not exhaustion. Stop each set when you have one or two clean repetitions left, not when your technique has already turned into a wiggle. Pilates rewards precision, and the obliques are small enough that a tidy twelve repetitions beats a swinging thirty. If you want more challenge, add a pause or slow the tempo before you add repetitions, and save the harder variations for the point when the standard versions feel controlled for two or three weeks.
Warm-Up and Rotation Exercises
The first eleven minutes cover the warm-up and the three rotation exercises. Each one is described as a short sequence of single actions, so you can read a step, do it, and move on.
Warm-up: minutes 0 to 4
The warm-up has one job, which is to get your ribs, shoulders and spine moving in the directions you are about to use, at a range that feels easy. Nothing here should feel like effort.
Side-body breathing (1:30)
Sit comfortably cross-legged, or on a chair if the floor is awkward, with your hands resting on the sides of your lower ribs. Inhale slowly through your nose and notice your ribs widening sideways into your palms, as if an umbrella were opening. Exhale through your mouth and feel the ribs draw gently back toward the midline without your shoulders lifting. Repeat for six to eight breaths. This exercise teaches the ribcage to move on its own, which matters because the obliques attach to the lower ribs; a ribcage that cannot expand and narrow makes every later rotation feel stiff.
Seated side reach (1:00)
- Stay seated and tall, with your right hand on the mat beside your hip.
- Inhale and sweep your left arm up beside your ear.
- Exhale and lengthen up and over to the right, making a long curve rather than a fold, while both sit bones stay heavy.
- Inhale back to center, then repeat to the left, for four repetitions each side.
- Keep your chest facing forward so the movement stays a side bend and does not turn into a twist.
If your shoulder feels pinchy overhead, rest your fingertips on your shoulder instead of reaching up. For more on moving shoulders comfortably, see our Pilates shoulder mobility routine.
Knee sways (1:30)
- Lie on your back with your knees bent and feet hip-width apart, arms out to the sides in a T.
- Exhale and let both knees sway a few inches to the right, stopping the moment your left shoulder wants to lift or your lower back arches.
- Inhale to bring them back to center, then sway to the left.
- Do six repetitions each side.
The motion should be small and unhurried, like a windshield wiper with a lazy battery. You are not stretching here; you are teaching the pelvis and ribcage to rotate at different speeds, which is the skill the next three exercises depend on.
Rotation block: minutes 4 to 11
These three exercises ask the obliques to turn the trunk against gravity, with the pelvis as the steady base. Move slowly enough that you could pause at any point.
Oblique curl-up (2:30)
- Lie on your back with your knees bent and feet flat.
- Rest your fingertips behind your head with your elbows wide, and let your neck stay relaxed in your hands rather than pulled.
- Inhale to prepare.
- Exhale, nod your chin slightly, curl your head and shoulder blades off the mat, and turn your ribcage so your right shoulder reaches toward your left hip.
- Pause for a beat.
- Inhale and unwind slowly, then repeat.
- Complete six repetitions to the right, six to the left, rest about twenty seconds, and do a second round.
Aim your shoulder rather than your elbow, and keep both hips pressing evenly into the mat. If your neck tires, keep your head down and lift only your shoulder blades with your hands on your thighs.
Criss-cross (2:30)
- Lie on your back with your hands behind your head and your legs in tabletop position, shins parallel to the floor.
- Exhale, curl up, and rotate your ribcage to bring your right shoulder toward your left knee as you extend your right leg out at about a forty-five degree angle.
- Inhale through the center as the legs switch, then exhale to the other side.
- Each side-to-side pair counts as two repetitions; complete six to each side in each of two rounds, with a short rest between.
Keep your elbows wide and your lower back heavy on the mat. If extending a leg makes your back arch, keep both feet on the floor and simply alternate the shoulder reach, which is the easier version used in the progressions later.
Saw (2:00)
- Sit tall with your legs extended a little wider than your hips and your feet flexed, arms out in a T.
- Inhale to grow taller.
- Exhale and rotate your trunk to the right, then fold slightly forward as your left hand reaches past your right little toe, with your right arm reaching back behind you.
- Inhale to return to upright and center, then repeat to the left.
- Do five repetitions each side.
- Keep both sit bones grounded so the turning comes from the ribcage, not from swinging the pelvis.
Bend your knees or sit on a folded towel if your hamstrings pull your lower back round. Anyone who has been advised to avoid forward bending can rotate without the fold.
Side-Bend, Side-Support and Cooldown
The second half of the session shifts from turning to bending and holding, then winds down. The side plank is the hardest piece, so it gets extra detail and a gentler version first.
Side-bend and side-support block: minutes 11 to 17
Here the obliques work as side benders and as stabilizers. Quality matters more than duration, so rest between sides and between holds.
Mermaid (1:30)
- Sit with your legs folded to one side or crossed, whichever lets both sit bones stay heavy.
- Place your right hand on the mat beside your hip.
- Inhale and sweep your left arm overhead.
- Exhale and reach up and over to the right, keeping your ribs facing forward and your chest open.
- Inhale to return to center, then repeat to the left, for four repetitions each side.
The aim, as one Pilatesology description of the side bend frames it, is equal length and lift on both sides rather than crunching one side or leaving the other idle. Feel the long side stretch and the short side work, and avoid collapsing into the supporting hand.
Forearm side plank, knees down
- Lie on your right side with your elbow directly under your shoulder, your forearm on the mat and your knees bent behind you at about ninety degrees.
- Stack your hips and shoulders.
- Exhale, press your forearm into the mat and lift your hips until your body makes a line from knees to head.
- Rest your top hand on your hip.
- Hold for fifteen to twenty seconds, breathing steadily, then lower with control and rest for ten seconds.
Do two holds, then lift your legs as described next before changing sides. Keep your shoulder pressing away from your ear and your hips directly stacked; if your hips drift back, move your knees slightly forward and try again.
Side-lying leg lifts
- Stay on your right side and lower your hips to the mat.
- Rest your head on your bottom arm, place your top hand in front of you for balance and bring your legs slightly forward of your body, about thirty degrees.
- Flex the top foot lightly.
- Exhale and lift your top leg to hip height, keeping your waist long and your hips stacked.
- Inhale and lower with control.
- Do eight repetitions without letting the top hip roll backward.
- This exercise asks the side-body muscles to keep the pelvis level while the leg moves, which is a different job from rotating.
Then roll to your left side and repeat the plank holds and lifts. Allow about two and a quarter minutes per side.
Cooldown: minutes 17 to 20
The cooldown is not an optional extra. It lowers the effort gradually, returns the spine to gentle rotation and gives you a moment to notice how the session felt.
Seated spine twist (1:30)
- Sit tall with your legs extended together, or crossed if that is more comfortable, and your arms in a T at shoulder height.
- Inhale and grow taller through the crown of your head.
- Exhale and rotate your ribcage to the right, turning your head with your chest.
- Inhale to center, then exhale to the left.
- Do six repetitions each side, moving smoothly.
- Keep your pelvis quiet and your shoulders level, and stop the turn as soon as one hip begins to lift.
This is the same trunk rotation as the saw but without the forward reach, so it works as a calm reset. Keep the range modest if you have been advised to limit twisting.
Supine twist hold (1:30)
- Lie on your back with your knees bent and let both knees fall slowly to the right, resting on a pillow or folded blanket if they do not reach the mat.
- Extend your left arm along the floor in a T and rest your right hand lightly on your knees.
- Breathe slowly into your ribs for about forty-five seconds, letting the exhale soften your waist.
- Bring your knees back to center with a gentle exhale and repeat to the left.
The point of the hold is to relax, not to force a deeper stretch, and a small rotation counts. If your lower back complains, shrink the range or skip the hold.
After the session: what to notice
Take a minute to check in. A pleasant, mild warmth in the sides of your waist, a mild fatigue in the side plank shoulder and a sense of taller posture are all ordinary. Sharp or lingering pain, numbness, a dull ache in your neck that did not go away after lying down, or soreness that makes it hard to move normally the next day are all reasons to shorten the next session. Light movement and a glass of water are all most people need. If you like a tool-assisted wind-down, our foam rolling routine after Pilates pairs well, though it is optional.
Common Mistakes and Simple Fixes
Almost every oblique exercise goes wrong in a handful of predictable ways. Spotting them early saves your neck, shoulders and patience.
Rotation mistakes
Rotation errors tend to come from trying to look strong rather than be strong. The obliques are small, and they are easy to bypass.
Pulling on the neck and swinging the elbow
In a curl-up or criss-cross, the most common error is yanking the head up with the hands and aiming an elbow at a knee. The elbow is just a pointer; the shoulder is what travels. Pulling on your head puts effort into your neck and takes it away from the obliques. Fix it by letting your head rest in your hands as if you were holding a delicate egg, keeping your elbows wide so you can see them at the edge of your vision, and lifting your breastbone rather than your chin. If the neck still complains, switch to the easier version with your hands on your thighs and a smaller lift.
Rocking the pelvis and rotating from the shoulders
The second common error is moving the whole body together. If your hips rock from side to side during a criss-cross or a saw, the turn is coming from the pelvis and the legs, and the obliques are getting an easy ride. A quick check is to put your hands lightly on your hip bones and see if they move.
They should stay level. To fix it, shrink the rotation until the pelvis is calm, then gradually increase the range over several sessions. Think of turning the ribcage on top of a stable pelvis, not of throwing the shoulder across the body.
Side-support mistakes
Side work has its own tendencies: sagging, rolling and bracing too hard. Each has a straightforward correction.
Sinking into the supporting shoulder
In a side plank, many people let the supporting shoulder collapse up toward the ear, which makes the top of the shoulder carry everything and the waist do very little. Press your forearm into the mat as if you were pushing the floor away, and lift your ribcage away from the ground. If it still feels like all shoulder, lower your hips for a minute and try the knees-down version with a shorter hold. People with sensitive shoulders or wrists may do better with the side-lying leg lifts only, and may find that gentle shoulder mobility work on other days makes the side plank more comfortable.
Rolling the chest and holding your breath
Another frequent fault is turning the chest toward the floor or ceiling during a side plank or side-lying lift, which swaps a clean side-support position for a half-twist. Keep your sternum and your pelvis facing the same direction, as if you were between two panes of glass. The related habit is holding your breath, which can make the abdominal wall bulge and the neck tense. If you notice either, lower for a moment, breathe out fully and start again with a shorter hold. The next table collects these fixes in one place so you can scan it before a session.
| What you notice | Likely cause | Simple fix |
|---|---|---|
| Neck aches during curl-ups | Hands pulling the head forward | Rest the head in your hands, keep elbows wide, or use hands on thighs |
| Hips rock during criss-cross or saw | Turning from the pelvis instead of the ribcage | Shrink the range until the hips stay level |
| Lower back arches when legs extend | Legs too low or too far away for current control | Keep feet on the floor or extend the legs less far |
| Side plank feels like all shoulder | Collapsing into the supporting arm | Press the forearm down, lift the ribcage, shorten the hold |
| Belly bulges or breath is held | Effort too high for the day | Reduce the range, exhale on effort, rest and restart |
| Top hip rolls backward in side-lying lifts | Leg lifted too high or pelvis unstable | Lift only to hip height and keep the hips stacked |
Make It Easier or Harder
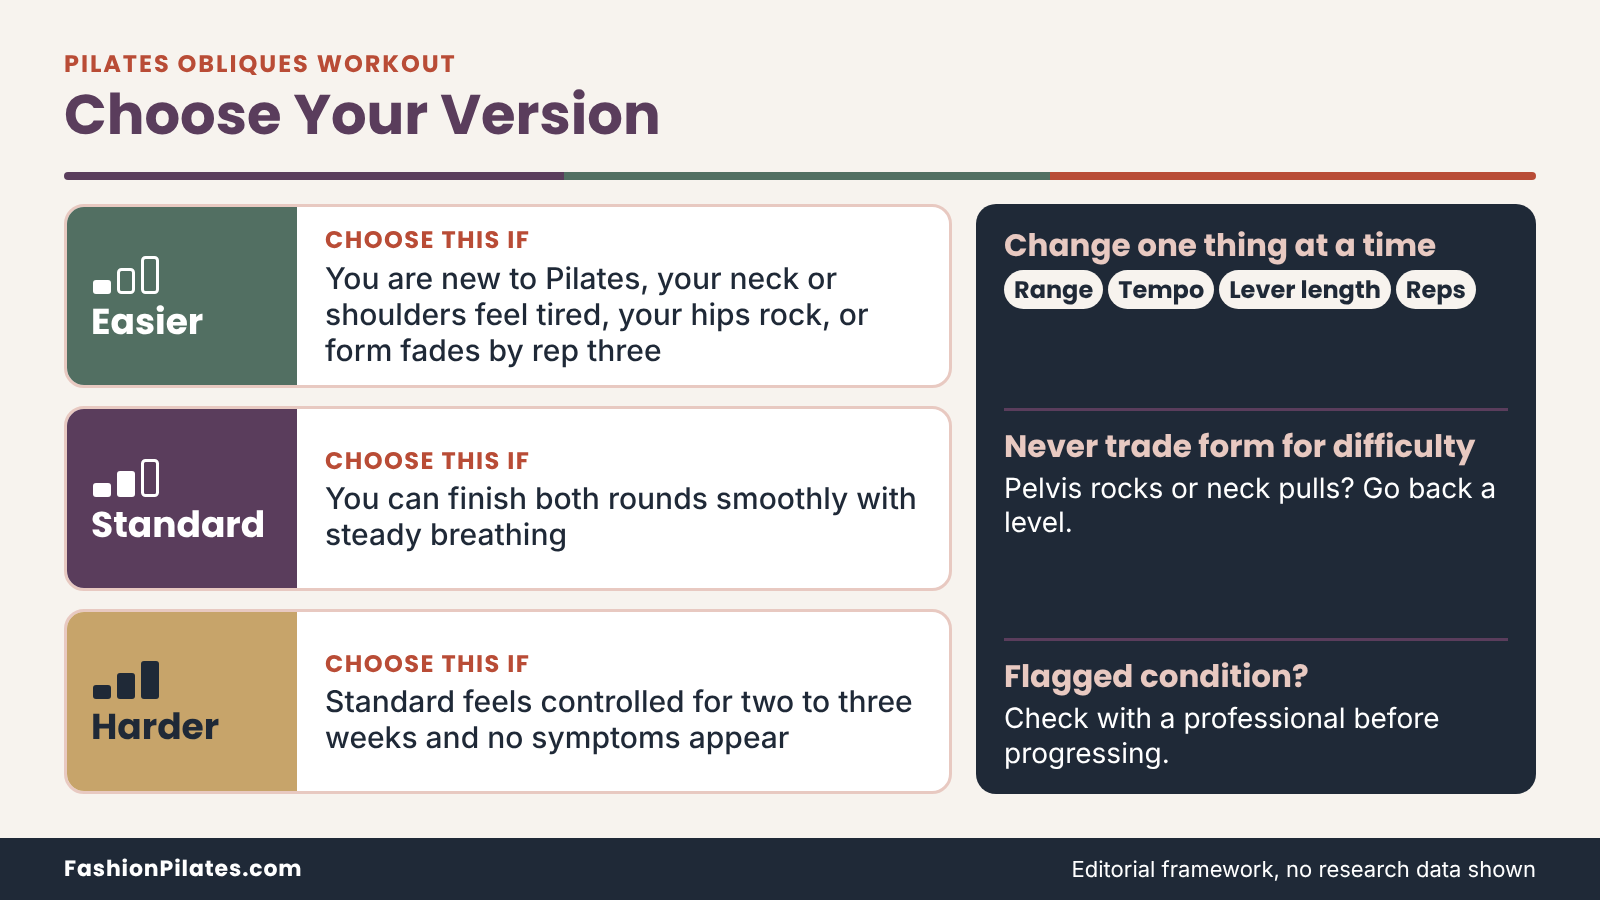
The routine above is the standard version. Pilates is built for scaling, so you can dial each exercise up or down without abandoning the sequence. The rule is to change one thing at a time.
Easier options
Choosing a gentler version is not a downgrade. It is often the quickest route to clean technique, and clean technique is what makes the harder versions worth doing.
Smaller range, fewer reps, more support
The simplest adjustments are the most powerful. Cut the range of every rotation in half, so your ribcage turns only a few inches. Reduce each set by two repetitions. Lengthen the rest between rounds from twenty seconds to forty.
Keep your head down on the mat for the curl-ups and criss-cross, and use a folded towel or small cushion under your hips for the seated work if your lower back rounds. Support makes any exercise easier to control, and control is the whole point. If you are new to Pilates, you may find that easy versions are plenty challenging for the first several sessions, and that is a good sign, not a failure.
Exercise-by-exercise gentler versions
For the oblique curl-up, rest your head on the mat and lift only your shoulder blades, with your hands on your thighs. For the criss-cross, keep both feet on the floor and alternate the shoulder reach toward the opposite knee. For the saw, bend your knees and rotate without the forward fold. For the mermaid, sit on a cushion or in a chair.
For the side plank, stay with the knees-down version, shorten the hold to ten seconds, or replace it with side-lying leg lifts only. For the spine twist, reduce the range and keep your hands on your thighs. Any of these keeps the movement pattern while lowering the load.
Harder options
Once the standard versions feel controlled, you have a few ways to raise the challenge. The key is that harder should still mean good form, never a sloppy imitation of a more advanced exercise.
Add control before adding difficulty
Before you make the movement more complex, make it slower. Take three seconds to curl up, pause for one second at the top of the rotation and take three seconds to lower. Hold the side plank for a few seconds longer than before. Add a single extra repetition per side rather than a full extra set.
These changes demand more from the obliques without adding the neck, back or shoulder strain that bigger changes can bring. If you are able to do the whole routine slowly and smoothly with steady breathing, you are ready to try the next set of variations. If not, stay with the standard version for another few weeks; there is no prize for rushing.
Exercise-by-exercise challenging versions
For the criss-cross, extend the legs a little further from the body while keeping the lower back heavy on the mat. For the saw, add a pause with the hand reaching forward before you return to center. For the mermaid, slow the tempo and add a second reach at the bottom of the bend. For the side plank, straighten your legs and stack your feet, or stagger them if stacking is too unstable, and lift only as high as you can control.
For the side-lying lifts, add a small pulse at the top. Choose one change at a time, and return to the standard version if your technique slips. People who have been told to avoid certain movements should skip these variations unless a professional has cleared them.
The following table summarizes the three levels for each exercise so you can pick your version without paging back through the instructions.
| Exercise | Easier | Standard | Harder |
|---|---|---|---|
| Oblique curl-up | Head down, shoulder-blade lift, hands on thighs | Hands behind head, rotate to the opposite hip | Three-second lift, one-second pause |
| Criss-cross | Feet on the floor, alternate shoulder reach | Tabletop legs, extend one leg at a time | Legs extended farther from the body |
| Saw | Bent knees, rotate without the fold | Legs wide, rotate and reach | Pause at the end of the reach |
| Mermaid | Sit on a cushion or chair | Cross-legged, side bend with equal length | Slower tempo, second reach at the bottom |
| Side plank | Knees down, 10-second holds, or lifts only | Knees down, 15- to 20-second holds | Legs straight with stacked or staggered feet |
| Spine twist | Smaller range, hands on thighs | Arms in a T, six each side | Slow tempo with a pause at the turn |
Fitting Oblique Work Into Your Week
One twenty-minute session is a good start, but how it fits around the rest of your week matters just as much. This section covers frequency, pairing, realistic expectations and the research behind it all.
Frequency, pairing and a sample week
Think of this routine as one tool in a balanced week, not as a stand-alone solution. The side body works best when it is part of whole-trunk and whole-body training.
How often to repeat the routine
For general health, the US Centers for Disease Control and Prevention advises muscle-strengthening activity on at least two days a week that works all major muscle groups, including the abdomen, along with the usual weekly aerobic target. A reasonable editorial suggestion, not a research-proven prescription, is to do this routine two or three times a week on nonconsecutive days, so the muscles and the neck, shoulders and wrists have a day between sessions. If you feel any lingering soreness in the side body, take an extra day. A routine you can repeat consistently beats one you only manage once.
Pairing with other sessions
Oblique work is a supporting actor in many workouts, so it helps to place it thoughtfully. Pair it with a longer core session, a full-body strength day, a walk or a different Mat Pilates class. Avoid stacking it directly after an intense twisting sport or heavy core session when your trunk is already tired. If you want more variety in the same family, browse the targeted Pilates workouts for other body areas. This sample week is one way to arrange things, offered as a template rather than a rule.
| Day | Session | Time | Reason |
|---|---|---|---|
| Monday | This 20-minute oblique routine | 20 minutes | Fresh start, low impact |
| Tuesday | Walk or easy cardio | 20 to 30 minutes | Aerobic activity without trunk load |
| Wednesday | Full-body strength or a Mat Pilates class | 30 to 45 minutes | Covers legs, back, chest and arms |
| Thursday | Rest or gentle mobility | 10 to 15 minutes | Recovery for shoulders and neck |
| Friday | This 20-minute oblique routine | 20 minutes | Second dose, two days after the first |
| Saturday | Longer core or full-body session | 30 minutes | Whole-trunk integration |
| Sunday | Rest or a walk | Optional | Recovery |
What the research does and does not show
Fitness content is full of confident promises about the waist. A little skepticism is healthy, and the evidence is more modest and more interesting than the marketing.
Spot reduction and the “waist” claims
A common hope is that oblique exercises will shrink the waist. The National Strength and Conditioning Association’s overview of spot reduction says that working a muscle does not burn fat from the area above it, that fat loss comes from an overall energy deficit, and that studies have found abdominal exercise did not reduce belly fat more than no exercise. What training the obliques can do is build trunk strength and control. Where your body stores or loses fat is individual and is not something a side plank can aim. Treat any program that sells a “snatched” or “cinched” waist as marketing, not physiology, and notice that waist-trainer prices rarely include evidence.
Pilates research in context
Pilates research is real but narrower than the headlines suggest. A Cochrane review of Pilates for low back pain included ten randomized trials with 510 adults and found low-to-moderate certainty that Pilates beat minimal intervention for pain and disability, with no conclusive evidence that it beat other forms of exercise. That review is about people with non-specific low back pain, not about oblique strength, and it does not mean this routine treats back pain. The honest takeaway is that Pilates is a reasonable form of exercise to choose if you enjoy it and will stick with it, and that individual guidance from a clinician matters when pain is involved.
Setting realistic expectations
Progress with oblique work is easier to feel than to photograph. Knowing what is realistic keeps you motivated without promising anything bodies cannot guarantee.
What you may notice, and when
In the first couple of weeks, most people notice better coordination more than strength: it becomes easier to turn the ribcage without moving the hips, and the side plank feels steadier. Over a longer period, you may find everyday rotations such as reaching for a seat belt or turning to look behind you feel smoother, though individual results vary and none of this is guaranteed. Pay attention to the quality of your movement, your breath and your comfort. These are more reliable markers than the mirror, and they are what the routine is designed to improve.
Tracking progress without a mirror
Pick two or three simple markers and recheck them every few weeks. Time how long you can hold the knees-down side plank with clean form on each side. Note whether both sides feel equally steady, because most people have a stronger side.
Count how many criss-cross repetitions you can do before your neck or hips take over. Write down the version you chose and how you felt afterward. Our beginner material has more tips for building a practice you can sustain, and a short log makes it easier to see steady, boring, real progress.
Frequently Asked Questions
Can Pilates give me a smaller waist?
Pilates can strengthen the muscles around your waist, but it cannot choose where your body loses fat. Training the obliques improves trunk control, and many people feel more upright and stable as a result. Changes in waist measurement depend on overall energy balance, genetics and other factors that no single exercise controls. If a smaller waist is your goal, speak with a qualified professional about a plan that includes your nutrition, sleep and overall activity. The more useful question is whether you feel stronger and move more comfortably.
How many times a week should I do an obliques routine?
Two or three nonconsecutive days a week is a sensible starting point for most healthy adults. That pattern lets the neck, shoulders and wrists recover between sessions, and it fits alongside other strength and cardio work. Many people do best when they treat this session as one part of a balanced week rather than a daily habit. If you feel lingering soreness or a pull in your side body, add a rest day. Consistency over several weeks matters more than doing everything at once.
Is it safe to do oblique exercises with back pain?
It depends on the cause and on how your back responds, so the right answer comes from a clinician who knows your history. Mild stiffness may feel better with gentle, small-range movement, while sharp, spreading or worsening pain is a reason to stop and seek advice. Rotation and side bending can be uncomfortable in some back conditions, and a professional can tell you which ranges are suitable. Start with the easier versions and keep the movement small. Never push through pain to finish a set.
Why do I feel the criss-cross in my neck and not my sides?
Most often the hands are pulling the head forward, which shifts the effort into the neck. Resting your head in your hands, keeping your elbows wide and lifting your breastbone instead of your chin usually helps. Your range may also be too big for your current strength, so shrink the rotation and slow the pace. Placing your hands on your thighs or keeping your head down is a perfectly good alternative. If neck discomfort continues, ask a Pilates professional to watch your form.
Can I do this routine during pregnancy or after having a baby?
Check with your doctor, midwife or a qualified prenatal or postnatal Pilates professional before you try it. Several moves involve lying on your back, lifting the head and shoulders, and loading the abdominal wall, and those positions are often adjusted during and after pregnancy. Separation of the abdominal muscles is common after birth, and certain exercises may need to be avoided or changed until a provider has assessed you. Tell any instructor about your pregnancy or recent delivery. A personalized plan is better than adapting a general routine on your own.
Do I need equipment, and can I do oblique work on a reformer?
This routine needs only a mat, and a folded towel or cushion is helpful for support. Reformer classes include oblique exercises too, often with rotation on the carriage or side-lying work. Spring settings differ between brands and are not standardized, so follow your instructor and the manufacturer’s manual rather than a number from a website. A mat routine is a good way to learn the movement patterns before you add a machine. Many people use both over time.
How long until I notice a difference?
Many people notice better coordination and a steadier side plank within a few weeks of regular practice. Changes in strength are usually gradual and depend on frequency, effort, sleep and your starting point. Visible changes, if they happen at all, are more variable and are influenced by many factors beyond this routine. A practical approach is to track what you can control, such as hold time, form quality and how the exercises feel. If you see no progress after several weeks, consider adjusting the version or asking an instructor for feedback.
What if one side feels weaker or less flexible than the other?
That is very common, and it does not mean something is wrong. Most people have a stronger or more mobile side, and even small differences become obvious in a side plank. Start each exercise on your weaker side, and match the same number of repetitions or the same hold time on the stronger side rather than doing extra on the weaker one. Work at a pace that keeps both sides controlled. If the difference is large, comes with pain or has appeared suddenly, ask a clinician to take a look.