Direct answer: A well-built 30 day pilates challenge is a month of short, mat-based sessions done five days a week with two planned rest days, starting with breath and basic control and building toward smoother, longer flows. Choose a 10, 20 or 30 minute track, follow the day-by-day schedule below, and measure success by how well you move rather than how your body looks. This plan is general fitness education, not individualized medical advice, so anyone with a health condition should check with a clinician first.
This guide is for adults who want a structured month of Mat Pilates at home with no equipment beyond a mat and a little floor space. It covers the safety checks, setup, level choice, weekly progression, every day of the schedule, precise exercise cues with modifications, breathing, recovery, tracking, missed days and what to do next. It is a research-based, expert-informed plan built from public health guidance, published reviews and standard Mat Pilates teaching conventions; no hands-on testing was involved.
What a 30 day pilates challenge can and cannot do
Before you roll out a mat, it helps to agree on what a month of Pilates is for. Challenges are great at creating momentum, but they are often sold with promises that no 30 days of any exercise can keep. A realistic frame makes the plan easier to finish and safer to follow.
What 30 days can realistically build
Skills, vocabulary and a routine you can repeat
The most reliable result of a first month is competence. By Day 30 you will have practiced roughly two dozen foundational Mat Pilates movements, learned how to coordinate breath with effort, and found out which exercises your body finds easy, awkward or surprisingly hard. That vocabulary is the real asset, because it lets you build your own sessions later without a video playing.
You will also have rehearsed a routine. Showing up on 22 of 30 days, even for ten minutes, teaches your schedule where Pilates lives. Habit is the part of fitness that most programs underestimate, and a challenge format exists mostly to make it concrete.
Steadier control and, for many people, early strength gains
Many people notice that familiar movements feel steadier by the third or fourth week: the pelvis rocks less during leg work, holds last a little longer, and the shaking that shows up in a plank starts later. Some of that is genuine strength, and some of it is simply better coordination, because a new exercise improves quickly as your nervous system learns the pattern. Both are useful. Neither is a visible transformation, and neither needs to be.
Expect gradual change, uneven days and the occasional session where everything feels heavy. That is normal training noise, not a sign the plan is failing.
What a month of Pilates will not do
No spot reduction, no body transformation, no posture fix
Exercise cannot remove fat from one body part, so no sequence of curls or leg circles will slim a particular area. Appearance changes depend on genetics, nutrition, sleep, hormones and many months of consistent training, and a 30-day window is too short to promise any of it. This plan makes no body-composition claims, and you should be wary of any challenge that does.
The same caution applies to posture. Pilates can build strength and awareness in the muscles that support the spine, but there is no single correct posture to snap into, and nothing here promises to correct yours. If posture or pain is the reason you are starting, a clinician or physical therapist is the right first stop.
Not a treatment, and not a full fitness program by itself
A challenge built on Mat Pilates is general exercise education. It is not rehabilitation, it does not treat medical conditions, and it should not replace care you are already receiving. If you are managing an injury, a chronic condition or persistent pain, the safest use of this article is as a conversation starter with your clinician or a certified Pilates instructor.
It is also not a complete cardio plan. Public health guidance for adults pairs muscle-strengthening work with weekly aerobic activity, and mat sessions alone usually do not cover the aerobic side. The schedule below suggests walking on rest days partly for that reason, and the later sections return to how the guidelines fit together.
What the research says, and where it runs out
Studies in healthy adults: encouraging but limited
Systematic reviews, which gather and appraise many individual trials, have looked at Pilates in healthy people. One systematic review of 16 randomized trials found strong evidence for improved flexibility and dynamic balance and moderate evidence for muscular endurance, but it also rated the overall scientific rigor of the studies as low, citing weak blinding, limited follow-up and poor tracking of whether participants actually did the sessions. Another review and meta-analysis of nine trials reported better abdominal muscular endurance, roughly ten more sit-ups in testing, yet found no overall difference in flexibility.
Those two reviews disagree on flexibility, which is a fair reminder of how young and uneven this evidence base is. The second review also noted that benefits appeared with two to three sessions a week for five to twelve weeks, in healthy people only, and that nothing longer than twelve weeks was studied. A 30-day plan sits just under that window, so treat the research as supportive context rather than proof of a specific outcome.
Studies in chronic low back pain: modest, and instructor-dependent
The most-studied clinical use of Pilates is chronic low back pain. A summary in American Family Physician described low- to moderate-quality evidence that Pilates taught by certified instructors reduced pain and disability, with pain benefits at three months that lasted up to a year. The same summary found Pilates was not clearly better than other forms of exercise, and that side effects were rare and mostly mild muscle soreness.
Two takeaways follow. First, regular exercise of a kind you will actually do matters more than the brand name on it. Second, the benefits in those trials came with qualified instruction, which is why this plan encourages at least one session with a certified instructor, in person or live online, if you have a back condition or are unsure about your form. Nothing in this article is a treatment for back pain.
Safety first: who should check with a clinician before Day 1
Mat Pilates is low impact, but low impact is not the same as risk free. Spinal flexion, rotation and long holds are built into many of the exercises, and several health situations call for a professional opinion before you begin.
Talk to a professional first if any of these apply
Situations that call for a clinician or Pilates professional
Check with a physician, physical therapist or other qualified clinician before starting if you are pregnant or postpartum, have had surgery recently, have an acute injury or ongoing pain, have a heart or lung condition, have blood pressure that is not well controlled, or experience dizziness, fainting or unexplained shortness of breath with effort. The Center for Young Women’s Health at Boston Children’s Hospital, in its beginner Pilates guide, advises that people with serious back injuries, joint problems or pregnancy consult a healthcare provider first and tell their instructor about existing conditions.
Pregnancy deserves its own note. A summary of the American College of Obstetricians and Gynecologists committee opinion on exercise in pregnancy and the postpartum period says people who were active before pregnancy can generally continue, that routines may need modification as the body changes, and that a conversation with your obstetric provider comes first. Several exercises in this plan, including those lying flat on the back, may need to change; let your provider and a pre- and postnatal Pilates specialist guide that.
Osteoporosis, low bone density and the spine
If you have osteoporosis, low bone density or a history of spinal fracture, the safest default is to ask your clinician first which movements are appropriate before starting. The Bone Health and Osteoporosis Foundation’s movement guidance poster lists forward bending that rounds the spine, specifically naming the Pilates spine stretch, along with extreme twisting and crunch-style exercises, as movements to avoid or modify.
That matters here because this plan includes curls, a roll-up progression, seated twists and a forward spine stretch. If bone health is a concern, do not follow those parts of the schedule until a clinician or an instructor trained in osteoporosis-informed Pilates has approved or replaced them. The exercise library flags the movements involved, and a good rule is to substitute extension-friendly or neutral-spine options rather than pushing through.
Stop signals and modify signals
When to stop an exercise or the whole session
Stop and rest if you feel sharp or stabbing pain, pain that shoots or radiates into an arm or leg, numbness or tingling, dizziness or light-headedness, or an unusual shortness of breath. Chest pain or pressure, fainting, or sudden severe symptoms need urgent medical attention rather than a rest day. Do not try to finish a set through any of these signals.
If a symptom is new, persistent or getting worse over several sessions, pause the challenge and get it assessed. A skipped week costs you nothing that matters; an ignored warning can cost a lot more. Resume only when you have been cleared or have a modified plan from a qualified professional.
When to modify and keep going
Other sensations are information rather than alarms. Neck strain in a head-lift exercise usually means lowering your head, supporting it with your hands or taking a shorter range. Wrist ache in a plank points to forearms or a shorter hold. A dull, spread-out burn in the muscles you are working is ordinary effort, and trembling at the end of a long hold is simply fatigue.
The working rule is to change one variable at a time: smaller range, fewer repetitions, a supported position or a slower tempo. Every exercise in the library comes with a modification for exactly that reason. Choosing the easier version is not falling behind; it is how a plan survives contact with real bodies.
Set up your space, your mat and your travel plan
Good setup removes friction, and friction is what ends most home challenges around Day 9. Spend fifteen minutes before Day 1 on the space, the surface and a plan for the days when life interferes.
Your home setup
Space, floor and distractions
You need a clear rectangle slightly larger than your mat: enough length to lie down with your arms reaching overhead, and enough width to extend a leg to the side without hitting furniture. About seven feet by four feet is comfortable for most adults. Check the ceiling too, because arm circles and overhead reaches are awkward under a low fan or a hanging lamp.
Choose a floor that does not slide. Hardwood, tile and low-pile carpet all work with a mat on top; a plush rug underneath can make kneeling and plank positions unstable and is better avoided. Put your phone on do-not-disturb, set a timer so you are not checking the clock mid-hold, and tell the people you live with that this is a protected block. Pets often treat a mat as an invitation, and a tolerant, slightly dignified plan for them is part of the setup.
Clothing, footwear and timing
Wear clothing that moves with you and stays put when you are upside down or lying on your side. The Center for Young Women’s Health beginner Pilates guide suggests fitted clothing, which keeps fabric out of the way, and practicing barefoot or in grip socks. Smooth socks on a hard floor are the one footwear choice to avoid.
Timing is personal. Many people do best in the morning before the day has a chance to fill up, others prefer late afternoon when their body feels looser. Pick the slot you are most likely to protect, leave a gap of an hour or so after a large meal, and keep water and a small towel within reach. Consistency matters more than the clock time you choose.
Your mat and the few extras that help
What a mat needs to do for this plan
In Mat Pilates you spend a lot of time rolling over the spine, lying on your side and kneeling, so the surface has to cushion bony points without feeling unstable. It should grip the floor, stay flat and be long enough that your head and tailbone are both supported when you lie down. Those are criteria, not a shopping list, and you can start the challenge on a carpeted floor with a folded blanket if you do not yet own one.
Choosing a physical Pilates mat is a separate decision from learning the method, and the details of thickness, density and materials are covered in our buying guidance: how to choose a Pilates mat. Thickness is usually listed in millimeters on a product page, and any figure you rely on should be checked against the current listing rather than remembered from an article. For the next thirty days, anything that is stable, cushioned and non-slip will do the job.
Props you probably already own
This plan uses almost no gear. A bath towel is the most useful object in the house: it supports your head if your neck tires, can be folded under your hips for seated work, loops around your foot for a hamstring stretch and acts as the assist in the roll-up progression. A firm cushion helps if kneeling is uncomfortable, and a sturdy chair seat or bench lets you do an incline plank when the floor version is too much.
A timer or interval app is worth having, but a phone propped against a wall is plenty. Resistance bands, small balls and rings all have their place in Pilates, and none of them is required here. Resist the urge to buy anything before Day 15, by which point you will know what you actually miss.
Small spaces, travel and busy weeks
Making the plan fit a small room
Every exercise in the schedule fits inside a mat-sized rectangle. The only movements that ask for extra room are those with long limb reaches: overhead arm arcs, the leg extensions in the hundred and double-leg stretch, and the side kicks. Placing the mat diagonally gains a surprising amount of length, and doing the side-lying work with your back toward a wall and your front toward open floor means a stray kick finds air rather than furniture.
If space is truly limited, run the Express track and keep legs and arms a little shorter than the full range. It is better to perform a smaller version with control than a bigger version that clips the coffee table. A small room also makes it easy to skip the setup step, so leave the mat rolled in sight rather than in a closet.
Hotel-room and five-minute versions
On the road, a hotel carpet with a folded towel as a mat works for nearly every movement. Hard tile bathroom floors do not. Run the Express track, or use a five-minute emergency session built from five exercises that cover the bases: five slow ribcage breaths, pelvic tilts, one set of pelvic curls, hundred prep with feet on the floor, side-lying leg lifts on each side and a short child’s pose. Log it as a completed day, because it is one.
For longer trips, a dedicated routine is easier than improvising each time: Pilates travel workout. The point of the travel version is continuity of the habit, so do not use a trip as a reason to extend the plan; just continue from where you left off.
Choose your level and session length
The plan works at three session lengths so that a hectic Tuesday and a spacious Sunday can both count. A 30 day pilates challenge only works if you can finish it, so you are choosing a track for each day, not signing a contract.
Three session tracks
The tracks are cumulative. Every session is built from the same three blocks plus a warm-up and a closing stretch, and a longer track simply adds more exercises to each block. The table shows how the tracks differ in time and content.
| Track | Typical time | What you do | Best for |
|---|---|---|---|
| Express | About 10 minutes | Short warm-up, the first exercise in each of the three blocks, one closing stretch | New exercisers, travel days, low-energy days, or a first week that needs to feel easy |
| Standard | About 20 minutes | Fuller warm-up, the first two exercises in each block, two closing stretches | Most people with a little exercise background and a free half hour |
| Full | About 30 minutes | Complete warm-up, all three exercises in each block, three closing stretches | People with regular training habits who want a full class-length session |
Express: about 10 minutes
Express is the entry track and the safety net. You get a two-move warm-up, one exercise from each of the three blocks and a child’s pose, which is enough to practice breath, hips, trunk strength and spinal mobility in a single short pass. It is a legitimate way to complete the whole month, not a consolation prize.
Choose Express if you are new to structured exercise, returning after a long break, or short on time. Plan to repeat it on days when you are tempted to skip, because ten minutes of good work beats zero minutes of ambitious intention every time.
Standard: about 20 minutes
Standard doubles the main work. You add two more warm-up moves, a second exercise in each block and a second closing stretch. Most people find that this length gives each movement time to be done carefully, with a short pause to reset between exercises, rather than rushed.
It is the best default if you have some exercise experience and no health concerns that require a lighter start. It also leaves you with energy for the rest of the day, which matters if you are training five days a week.
Full: about 30 minutes
Full adds the third exercise in every block, the complete warm-up and all three closing stretches. The pace stays slow, and the extra time is used for more movement variety and more total repetitions, not for rushing. The third exercise in each block is deliberately the more demanding or more specific one.
Choose Full only when the first two weeks of Standard feel comfortable and you recover well between sessions. If soreness lingers into the next session, step back a track for a day or two; a plan done at the right size beats a bigger plan abandoned.
How to pick, and when to switch
A quick placement check
Use these as rough guides rather than a test. If you have little recent exercise, if floor work feels unfamiliar or if you are cautious about your back, begin on Express. If you exercise a couple of times a week and can get down to and up from the floor without difficulty, begin on Standard. If you already train regularly and have taken Pilates classes, Full is reasonable, provided your first session feels comfortable instead of exhausting.
The Center for Young Women’s Health guide mentioned earlier suggests newcomers aim for two to three sessions a week and take early classes with a certified instructor. This schedule has five session days a week, so if you are brand new to exercise, treat Days 2 and 6 as optional for the first two weeks and use them for walking or a five-minute Express session instead. You can then build to five sessions as the month goes on.
Moving up or down
Move up one track when you have finished two sessions in a row with good form, energy to spare and no lingering soreness. Move down for any session that follows poor sleep, illness, a hard workout elsewhere or a long travel day. Because tracks are cumulative, you never lose the thread of the plan; you simply do more or fewer exercises from the same day’s list.
Do not use track changes to avoid the exercises you dislike. The exercise at the top of each block is the one most worth doing, and the order in the schedule is deliberate. If one movement hurts or simply will not work for your body, use its modification from the library or ask an instructor for a substitute.
How the minutes add up against national guidelines
The CDC adult physical activity guidelines recommend at least 150 minutes of moderate-intensity aerobic activity a week, or 75 minutes of vigorous activity, or an equivalent mix, plus muscle-strengthening activity on at least two days a week that works all the major muscle groups. The federal Physical Activity Guidelines page adds that some activity is better than none and that people starting out should go gradually, and the World Health Organization fact sheet makes the same basic points for adults worldwide.
Five sessions a week add up to about 50 minutes on Express, 100 on Standard and 150 on Full. Those minutes are mostly strengthening and mobility work rather than aerobic work, and whether a particular session counts as muscle-strengthening depends on how challenging it is and which muscle groups it covers, so do not assume the sessions alone meet the guidelines. A brisk walk on rest days is the simplest way to cover the aerobic side, and the later section on rest days explains how to judge intensity without gadgets.
The four-week arc: Foundations, Control, Flow, Integration
A month of random workouts is not a plan. This one is organized as four weeks, each with a single job, so that every session builds on the last and nothing arrives before you are ready for it.
How the progression works
Progress by control first, repetitions second
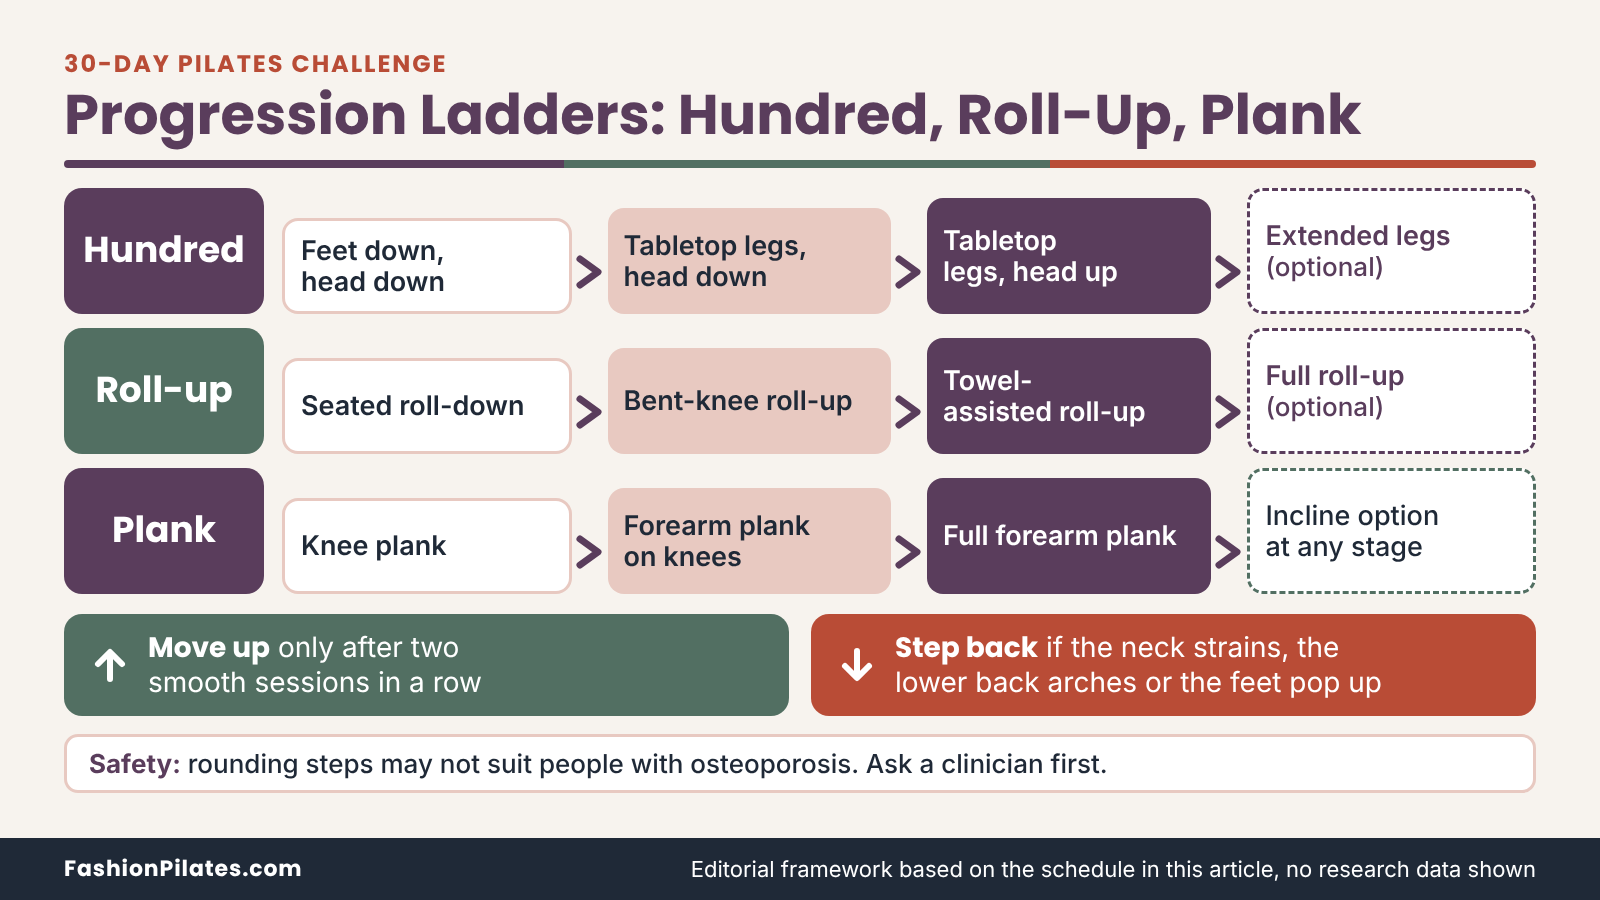
Pilates progresses differently from a typical strength program. Instead of adding weight, you change the demands on control: how far a limb reaches, how much support the floor provides, how slowly you move and how many movements you chain together. Early exercises use short levers, such as bent knees and a head resting down. Later versions lengthen the lever, lift the head or remove a support, but only after the earlier version feels steady.
That logic gives you a simple rule for the whole month. Change one variable at a time, and only after two consecutive sessions where the current version stayed smooth. If your pelvis rocks, your ribs flare or your neck takes over, you have moved too far too fast, and the fix is to step back to the previous version rather than push on.
The weekly rhythm
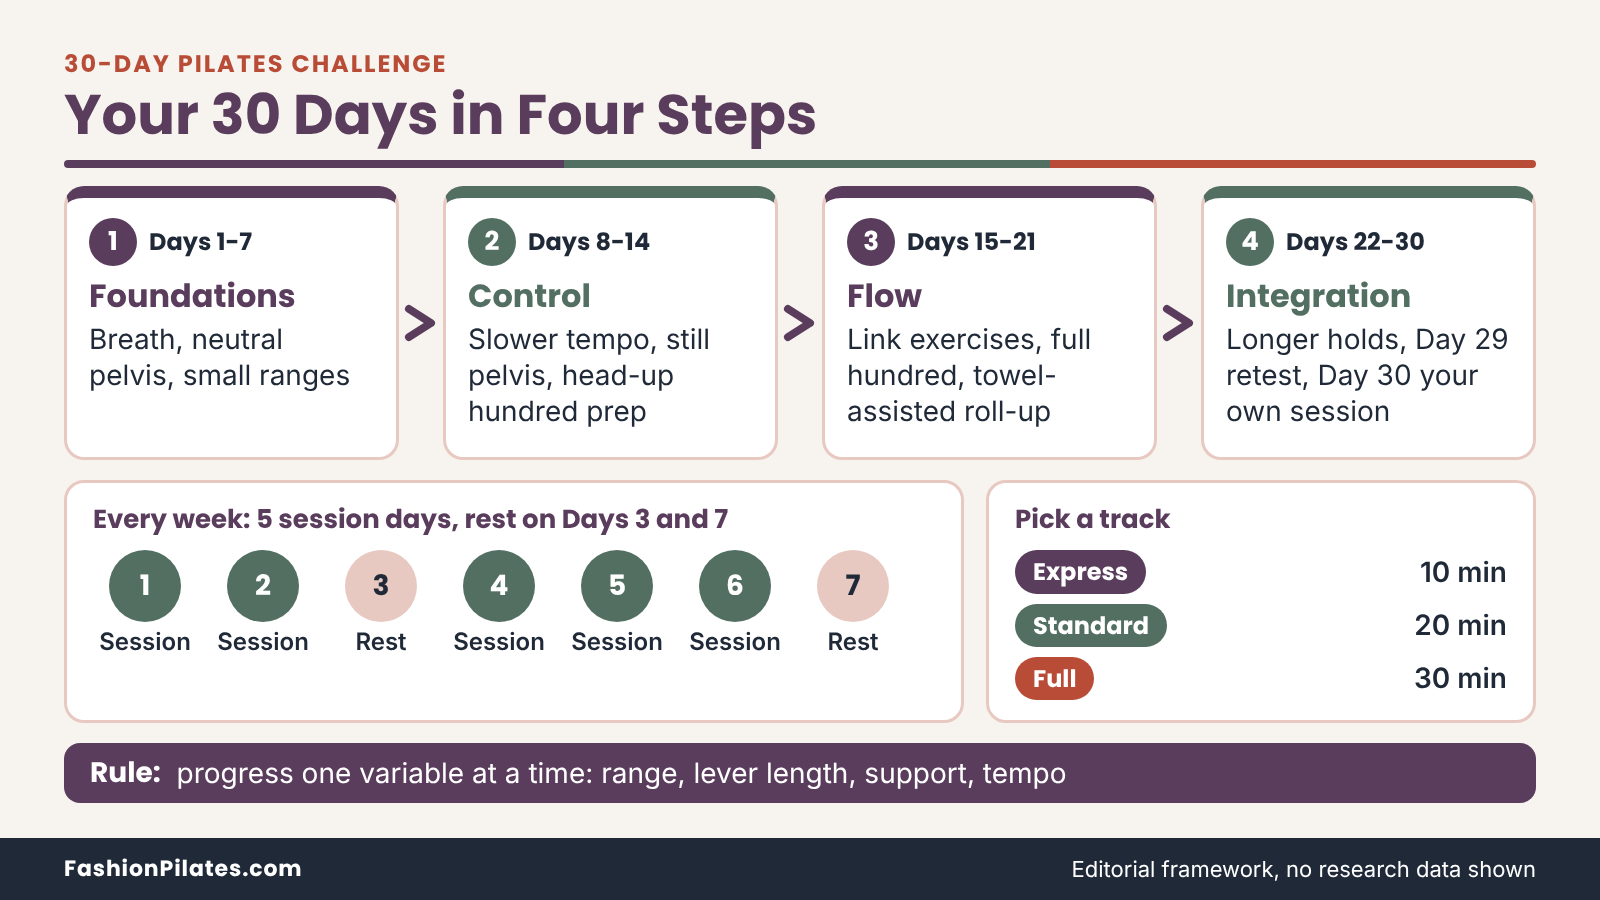
Every week has the same shape: five session days and two rest days. In the first three weeks the rest days are Days 3 and 7 of each week, so your recovery lands after two or three sessions rather than at the end of a long run. Week 4 keeps the same rest days on Days 24 and 28 and then closes with two sessions on Days 29 and 30.
Within a week, sessions alternate emphasis between hip and trunk control, strength endurance and flowing practice, so no single area is loaded day after day. Rest days are not blank space: the schedule suggests an easy walk and a few minutes of gentle mobility, which supports recovery and covers some of the aerobic activity that mat sessions do not.
Weekly goals at a glance
The table gives each week a theme, a goal and the main progressions, so you can see where the month is heading before you start.
| Week | Theme | Goal | Main progressions |
|---|---|---|---|
| Week 1 (Days 1 to 7) | Foundations | Learn the shapes, the breath and a neutral pelvis | Small ranges, 3 to 6 repetitions, head down for hundred prep, knee plank for 10 to 20 seconds |
| Week 2 (Days 8 to 14) | Control | Slow the tempo and keep the pelvis and ribs still while limbs move | Head-up hundred prep, single-leg stretch, forearm plank on knees, swimming prep, seated roll-down toward roll-up |
| Week 3 (Days 15 to 21) | Flow | Link exercises smoothly without rushing | Full hundred with tabletop legs, double-leg stretch, forearm plank, towel-assisted roll-up, knees-bent side plank |
| Week 4 (Days 22 to 30) | Integration | Combine skills, hold quality for longer and retest your starting checks | Longer holds, more repetitions, optional full roll-up, a retest on Day 29 and a self-built session on Day 30 |
Weeks 1 and 2: Foundations and Control
Week 1 is about learning the shapes without ambition. Ranges are small, repetition counts are low, and the main goal is to find a neutral pelvis, coordinate breath with movement and notice where your body wants to cheat. Finish every session feeling you could have done a little more, because that leftover capacity is what you will spend in Week 2.
Week 2 raises the quality bar. The exercises are mostly the same, the tempo slows and new positions arrive: head-up hundred prep, the single-leg stretch, swimming prep and a forearm plank from the knees. If your Week 1 sessions felt easy, this is where the plan starts asking for attention instead of effort.
Weeks 3 and 4: Flow and Integration
Week 3 introduces the full hundred, the double-leg stretch, a towel-assisted roll-up and a knees-bent side plank. The focus shifts from individual exercises to the transitions between them: rolling smoothly from one position to the next, breathing through the change and resisting the urge to rush. Flow in Pilates means continuity of control, not speed.
Week 4 puts it all together. Holds get a little longer, repetitions rise slightly and the full roll-up becomes an option for those who have earned it. On Day 29 you repeat the self-checks from the progress section and compare them with your baseline, and Day 30 is yours: you pick favorites and build a session from the blocks, which is the skill that carries you past the challenge.
The full Day 1 to Day 30 schedule
This is the heart of the plan. Read the short notes on how it works first, because a few conventions keep each row compact.
How to read the schedule
Blocks, tracks and the fixed warm-up and closing
Each session day lists three blocks: Block 1 is supine core and hips, Block 2 is strength work on the side, front or forearms, and Block 3 is seated and spine work. Within each block the exercises are numbered in priority order. On the Express track you do number 1 from each block, on Standard you do numbers 1 and 2, and on Full you do all three, always working through Block 1, then Block 2, then Block 3.
The warm-up and closing stretches are fixed for the whole month and scale by track, as shown in the table. Do the warm-up before Block 1 and the closing after Block 3. The ribcage breathing used in the warm-up is described in the breathing section, and every other exercise name links to a full description in the exercise library.
| Part of session | Express (about 10 minutes) | Add for Standard (about 20 minutes) | Add for Full (about 30 minutes) |
|---|---|---|---|
| Warm-up before Block 1 | Ribcage breathing 5 breaths; pelvic tilts 8 | Knee folds 6 per side; supine arm arcs 5 | Knee sways 5 per side; cat-cow 6 |
| Closing after Block 3 | Child’s pose 5 breaths | Figure-four stretch 5 breaths per side | Hamstring stretch with towel 5 breaths per side |
Reading repetitions, holds and breath cycles
Numbers without a unit are repetitions, where one repetition means one complete movement and back. “Per side” means complete that number on the right, then the left. A breath cycle in hundred prep and the hundred means five pumps while inhaling and five while exhaling, so three breath cycles is thirty pumps. A hold such as 3 x 15 s means three holds of 15 seconds, with three slow breaths of rest between them.
When the schedule says “Roll-up (step 2)” or “Roll-up (towel),” it refers to the stage of the roll-up progression in the library. Pick the stage you can do smoothly, and if none of them feels right, stay at the seated roll-down. You can also ask a certified instructor to check your version.
Week-by-week schedule
Week 1 (Days 1 to 7): Foundations
Start slowly and log each session in two lines: what you did and how it felt. The point of this week is accuracy, so keep ranges small. Days 3 and 7 are rest days with an optional walk, and Day 3 is a good moment for the optional five-minute baseline check described later.
| Day | Focus | Block 1: supine core and hips | Block 2: strength | Block 3: seated and spine | Coaching note |
|---|---|---|---|---|---|
| Day 1 | Breath, neutral pelvis, first curl | 1) Pelvic curl 5; 2) Ab prep 5; 3) Hundred prep, feet down, head down, 3 breath cycles | 1) Side-lying leg lift 6 per side; 2) Breast stroke prep 4; 3) Clam 8 per side | 1) Spine twist 3 per side; 2) Mermaid 3 per side; 3) Seated roll-down 3 | Stop each exercise one repetition early and note how you felt |
| Day 2 | Steady hips and shoulders | 1) Pelvic curl 6; 2) Single-leg circles 3 each way per leg; 3) Ab prep 6 | 1) Knee plank 3 x 10 s; 2) Side-lying leg lift 6 per side; 3) Breast stroke prep 5 | 1) Mermaid 3 per side; 2) Spine twist 4 per side; 3) Seated roll-down 4 | Keep the pelvis still while the leg circles |
| Day 3 | Rest and recovery | Easy walk of 10 to 30 minutes if you like, a few minutes of gentle stretching, and the optional five-minute baseline self-check | |||
| Day 4 | Core connection | 1) Ab prep 6; 2) Pelvic curl 6; 3) Single-leg circles 4 each way per leg | 1) Side-lying leg lift 8 per side; 2) Knee plank 3 x 15 s; 3) Breast stroke prep 6 | 1) Spine twist 4 per side; 2) Seated roll-down 4; 3) Mermaid 4 per side | Exhale as the work gets harder; never hold your breath |
| Day 5 | Control repeat | 1) Pelvic curl 6; 2) Hundred prep, tabletop legs, head down, 4 breath cycles; 3) Single-leg circles 4 each way per leg | 1) Side-lying leg lift 8 per side; 2) Inner-thigh lift 8 per side; 3) Knee plank 3 x 15 s | 1) Mermaid 4 per side; 2) Spine twist 4 per side; 3) Seated roll-down 5 | Lift the second foot to tabletop only if the lower back stays comfortable |
| Day 6 | Week 1 flow | 1) Pelvic curl 6; 2) Ab prep 6; 3) Hundred prep, tabletop legs, head down, 5 breath cycles | 1) Side-lying leg lift 8 per side; 2) Breast stroke prep 6; 3) Knee plank 3 x 20 s | 1) Spine twist 5 per side; 2) Mermaid 4 per side; 3) Seated roll-down 5 | First full flow: notice which movements still feel unfamiliar |
| Day 7 | Rest and recovery | Walk or gentle stretching, and a quick look back at your Week 1 log | |||
Week 2 (Days 8 to 14): Control
Slow everything down by about a third. The new exercises, especially the single-leg stretch and swimming prep, reward patience, and rushing them is the quickest way to strain your neck or lower back. If a session feels tough, drop one track for the day and keep the order.
| Day | Focus | Block 1: supine core and hips | Block 2: strength | Block 3: seated and spine | Coaching note |
|---|---|---|---|---|---|
| Day 8 | Control and range | 1) Pelvic curl 8; 2) Hundred prep, head up, tabletop legs, 5 breath cycles; 3) Single-leg circles 5 each way per leg | 1) Side-lying leg lift 8 per side; 2) Forearm plank on knees 3 x 20 s; 3) Swimming prep 6 | 1) Spine twist 5 per side; 2) Seated roll-down 5; 3) Spine stretch forward 4 | Lower the head if the neck tires |
| Day 9 | Single-leg coordination | 1) Single-leg stretch 6 per side; 2) Pelvic curl 8; 3) Ab prep 8 | 1) Forearm plank on knees 3 x 20 s; 2) Side kicks front and back 6 per side; 3) Breast stroke prep 6 | 1) Mermaid 4 per side; 2) Roll-up (step 2) 3; 3) Spine twist 5 per side | Head down is fine for the single-leg stretch |
| Day 10 | Rest and recovery | Easy walk and gentle mobility; check for soreness that is fading rather than growing | |||
| Day 11 | Hips and back body | 1) Pelvic curl 8; 2) Hundred prep, head up, tabletop legs, 5 breath cycles; 3) Single-leg circles 5 each way per leg | 1) Side-lying leg lift 10 per side; 2) Swimming prep 8; 3) Clam 10 per side | 1) Spine stretch forward 5; 2) Mermaid 4 per side; 3) Seated roll-down 6 | Keep the gaze down and the neck long in prone work |
| Day 12 | Core endurance | 1) Hundred prep, head up, tabletop legs, 6 breath cycles; 2) Single-leg stretch 8 per side; 3) Ab prep 8 | 1) Forearm plank on knees 3 x 25 s; 2) Inner-thigh lift 10 per side; 3) Swimming prep 8 | 1) Spine twist 6 per side; 2) Roll-up (step 2) 4; 3) Mermaid 5 per side | Exhale through the hardest part of each repetition |
| Day 13 | Week 2 flow | 1) Pelvic curl 8; 2) Single-leg stretch 8 per side; 3) Hundred prep, head up, tabletop legs, 6 breath cycles | 1) Side kicks front and back 8 per side; 2) Forearm plank on knees 3 x 30 s; 3) Breast stroke prep 6 | 1) Spine stretch forward 5; 2) Spine twist 6 per side; 3) Roll-up (step 2) 5 | Move between exercises slowly, with a breath in between |
| Day 14 | Rest and recovery | Walk or gentle stretching, and a look back at the two-week log | |||
Week 3 (Days 15 to 21): Flow
The challenge peaks in difficulty here, so protect your sleep and keep your rest days honest. The hundred is named for its pump count, which is optimistic about how long 100 pumps feels around pump seventy. Expect the full version to feel hard at first; if it does, keep the head down for part of each cycle or return to hundred prep for a few days. A smooth easier version is worth more than a strained harder one.
| Day | Focus | Block 1: supine core and hips | Block 2: strength | Block 3: seated and spine | Coaching note |
|---|---|---|---|---|---|
| Day 15 | Linking movements | 1) Hundred, tabletop legs, 8 breath cycles; 2) Single-leg stretch 8 per side; 3) Pelvic curl with a 3-breath hold at the top, 5 | 1) Forearm plank 3 x 20 s (knees allowed); 2) Side-lying leg lift 10 per side; 3) Swimming prep 10 | 1) Roll-up (towel) 4; 2) Spine twist 6 per side; 3) Mermaid 5 per side | Breathe through each transition; do not rush the roll |
| Day 16 | Rhythm and breath | 1) Single-leg circles 5 each way per leg; 2) Double-leg stretch 6; 3) Ab prep 8 | 1) Side kicks front and back 8 per side; 2) Forearm plank 3 x 25 s; 3) Breast stroke prep 6 | 1) Spine stretch forward 6; 2) Roll-up (towel) 4; 3) Spine twist 6 per side | Head down in double-leg stretch is a valid version |
| Day 17 | Rest and recovery | Easy walk and gentle mobility; consider a lighter track tomorrow if soreness is high | |||
| Day 18 | Core and back body | 1) Pelvic curl 8; 2) Hundred, tabletop legs, 10 breath cycles; 3) Single-leg stretch 10 per side | 1) Side-lying leg lift 10 per side; 2) Forearm plank 3 x 30 s; 3) Swimming prep 10 | 1) Mermaid 5 per side; 2) Roll-up (towel) 5; 3) Spine twist 6 per side | Stop a hold at the first sign of the lower back sagging |
| Day 19 | Strength endurance | 1) Double-leg stretch 6; 2) Single-leg circles 5 each way per leg; 3) Ab prep 8 | 1) Side bridge on knees 2 x 15 s per side; 2) Inner-thigh lift 10 per side; 3) Clam 12 per side | 1) Spine stretch forward 6; 2) Spine twist 6 per side; 3) Roll-up (towel) 5 | Keep hips stacked in the side bridge |
| Day 20 | Week 3 flow | 1) Hundred, tabletop legs, 10 breath cycles; 2) Single-leg stretch 10 per side; 3) Double-leg stretch 6 | 1) Forearm plank 3 x 30 s; 2) Side kicks front and back 10 per side; 3) Swimming prep 10 | 1) Roll-up (towel) 5; 2) Mermaid 5 per side; 3) Spine stretch forward 6 | Link exercises with one slow breath between them |
| Day 21 | Rest and recovery | Walk or gentle stretching, and a look back at three weeks of notes | |||
Week 4 (Days 22 to 30): Integration
This week stays at Week 3 difficulty, with a few more repetitions and slightly longer holds, so the gain is consistency and quality rather than new moves. Days 24 and 28 are rest days. Day 29 is a retest day and Day 30 is an open session where you assemble your own routine from the exercises you liked best.
| Day | Focus | Block 1: supine core and hips | Block 2: strength | Block 3: seated and spine | Coaching note |
|---|---|---|---|---|---|
| Day 22 | Strength integration | 1) Hundred, tabletop legs, 10 breath cycles; 2) Single-leg stretch 10 per side; 3) Pelvic curl with a 3-breath hold at the top, 6 | 1) Forearm plank 3 x 35 s; 2) Side-lying leg lift 12 per side; 3) Swimming prep 10 | 1) Roll-up (towel) 5; 2) Spine twist 6 per side; 3) Mermaid 5 per side | Keep the last repetition as clean as the first |
| Day 23 | Mobility and control | 1) Single-leg circles 6 each way per leg; 2) Double-leg stretch 8; 3) Ab prep 8 | 1) Side bridge on knees 2 x 20 s per side; 2) Side kicks front and back 10 per side; 3) Breast stroke prep 8 | 1) Spine stretch forward 6; 2) Roll-up (towel, or full if comfortable) 5; 3) Mermaid 5 per side | Full roll-up is optional, never required |
| Day 24 | Rest and recovery | Easy walk and gentle mobility; set out your mat for the final stretch | |||
| Day 25 | Back body and core | 1) Pelvic curl 8; 2) Single-leg stretch 10 per side; 3) Hundred, tabletop legs, 10 breath cycles | 1) Swimming prep 12; 2) Forearm plank 3 x 40 s; 3) Clam 12 per side | 1) Spine twist 6 per side; 2) Mermaid 5 per side; 3) Roll-up (towel) 5 | Notice whether the neck stays relaxed during holds |
| Day 26 | Flow A | 1) Hundred, tabletop legs, 10 breath cycles; 2) Double-leg stretch 8; 3) Single-leg circles 6 each way per leg | 1) Side-lying leg lift 12 per side; 2) Forearm plank 3 x 40 s; 3) Inner-thigh lift 12 per side | 1) Roll-up (towel or full) 5; 2) Spine stretch forward 6; 3) Mermaid 5 per side | Move continuously but never fast |
| Day 27 | Flow B | 1) Pelvic curl 8; 2) Single-leg stretch 10 per side; 3) Double-leg stretch 8 | 1) Side kicks front and back 10 per side; 2) Side bridge on knees 2 x 20 s per side; 3) Swimming prep 12 | 1) Spine twist 6 per side; 2) Roll-up (towel or full) 5; 3) Mermaid 5 per side | Choose the track that leaves you feeling good tomorrow |
| Day 28 | Rest and recovery | Walk or gentle stretching; read your notes before tomorrow’s retest | |||
| Day 29 | Retest and review | First repeat the self-checks from the progress section. Then: 1) Pelvic curl 8; 2) Hundred, tabletop legs, 10 breath cycles; 3) Single-leg stretch 8 per side | 1) Forearm plank, stop at the first form break, 60 seconds at most; 2) Side-lying leg lift 10 per side; 3) Swimming prep 10 | 1) Roll-up (towel or full) 5; 2) Spine twist 6 per side; 3) Mermaid 5 per side | Compare with your baseline; do not chase a personal best |
| Day 30 | Build your own session | Choose three favorites for each block from the exercise library, keep the warm-up and closing for your track, and move through them slowly. Write down what you would keep for the next month. | |||
Exercise library: cues and modifications
Every exercise named in the schedule is described here, grouped by where it sits in a session. Each entry gives the starting position, the action, a breathing cue, what to watch for and a modification. Mat Pilates names and details vary a little between teaching traditions, so if your instructor teaches a version that differs, follow your instructor. Where a movement involves spinal rounding or rotation, the entry says who should check with a professional before trying it.
Warm-up and mobility movements
These five movements prepare the pelvis, spine and shoulders and rehearse the neutral pelvis you will use all month. Neutral pelvis means the natural resting position in which your hip bones and pubic bone sit roughly level and your lower back keeps a small, comfortable curve. Ribcage breathing, the sixth warm-up item, is explained in the breathing section.
Pelvic tilts
Lie on your back with knees bent, feet flat and hip-width apart, arms resting by your sides. Exhale and gently tilt your pelvis so your lower back moves toward the mat, then inhale and return to neutral. The movement is small, driven by the abdominals rather than by pushing through the feet, with the thighs and buttocks soft. Complete 8 repetitions.
Modification: if your neck feels tense, rest your head on a folded towel. If the tilt aggravates your lower back, shrink the range until it is barely visible, or stay in neutral and simply practice the breath. A mild sense of working low in the abdomen is the target; pushing hard into the mat is not.
Knee folds
From neutral, with knees bent and feet flat, exhale and lift one foot, folding that knee toward a tabletop position where the shin is parallel to the floor. Inhale to hold, then exhale and lower the toes to the mat with control. Alternate sides for 6 repetitions each. Keep your hip bones level throughout; if the pelvis rocks or your lower back arches, the lift is too big.
Modification: lift the foot only a few inches, or slide the heel along the mat toward your hips instead of lifting. Move more slowly if you notice the pelvis rolling. This exercise is a quiet test of trunk control, so a smaller, steadier version is a better version.
Knee sways
Lie on your back with knees bent, feet slightly wider than your hips and arms out to the sides, palms down. Exhale and lower both knees toward one side only as far as both shoulder blades remain on the mat and you feel no pinching; inhale as you come back through the center, then exhale to the other side. Perform 5 on each side, moving at a pace slower than your breath.
Modification: reduce the range, or rest the knees on a stack of pillows at the bottom of the movement. If you have osteoporosis or a history of spinal fracture, ask your clinician first; the movement guidance mentioned earlier recommends rotating gently from the pelvis and legs with the shoulder blades down rather than twisting hard.
Cat-cow
Start on hands and knees, wrists under shoulders and knees under hips, with a long neutral spine. Inhale to lengthen from tailbone to head, allowing a small, comfortable extension without dropping your head. Exhale, tuck your tailbone and round your back gently while drawing your belly in. Move slowly for 6 repetitions, keeping the elbows soft and the shoulders away from your ears.
Modification: if wrists complain, come down onto your forearms or place your hands on fists. Pad your knees with a folded towel or cushion. If rounding the spine is not advised for you, skip the rounding half and keep to a gentle neutral-to-extension movement, or leave this exercise out.
Supine arm arcs
Lie on your back with knees bent and feet flat, arms reaching toward the ceiling over your shoulders. Inhale and reach your arms overhead only as far as your ribs stay settled and your lower back does not arch; exhale and arc them out to the sides and down toward your thighs. Keep the neck long and the shoulder blades gliding rather than shrugging. Complete 5 repetitions.
Modification: if overhead reaching is restricted, stop where the ribs begin to lift and let your range grow over the month. If your shoulders feel pinched, keep the movement below shoulder height. This is a mobility exercise, not a stretch, so skip any range that feels forced.
Supine core and hip work
This group forms Block 1 of each session. Most of it involves flexing the upper spine, which is fine for many people but is the group that bone-health and neck considerations affect most. Read the modification line before you start.
Pelvic curl
Lie on your back with knees bent, feet flat and hip-width apart, arms by your sides with palms down and a neutral pelvis. The North Carolina State University Pilates program describes the sequence as exhaling to lift the pelvis and spine one section at a time, inhaling at the top and exhaling to lower each vertebra back down. Lift only until your shoulders, hips and knees form a straight line. Do 5 to 8 repetitions as the schedule shows.
Cues: keep your neck and shoulders soft, press evenly through the feet, and do not arch at the top; the movement is a curl, not a thrust. Modification: lift a smaller height, or practice only the first half of the curl and the first half of the lowering. To progress, pause at the top for three breaths, then lower as slowly as you can. If you feel the exercise mostly in the hamstrings or back, adjust your foot distance by an inch or two and reduce the lift.
Ab prep
Lie on your back with knees bent and feet flat, hip-width apart. The NC State ab prep description places the hands behind the head with elbows wide and the chin slightly toward the chest. Exhale and curl your head and upper back until your shoulder blades leave the mat while your lower back stays in contact, pause on an inhale and exhale to lower slowly. Keep a fist-sized space between chin and chest, and do 5 to 8 repetitions.
Modification: keep your head down and use hands along the thighs, or support the head with one or both hands and lift less. If your neck tires, place a rolled towel under your head. If you have osteoporosis, spinal fracture risk or a recent abdominal surgery, or if you are pregnant or postpartum, check with a clinician before curling, as crunch-style movements are among those commonly flagged.
Hundred prep
Lie on your back with arms long beside your body, palms down, hovering a few inches above the mat. Work in three stages: feet on the floor and head down, then tabletop legs with head down, then tabletop legs with your head and shoulders lifted. Inhale for five small, quick arm pumps and exhale for five; that is one breath cycle. Keep your ribs knit down, your neck long and your pumps small and lively, driven from the shoulders.
The Physitrack exercise library entry describes the same inhale-for-five, exhale-for-five rhythm. Modification: keep your head down at every stage. If your lower back arches when the legs lift, return the feet to the floor. If your neck strains, support your head with a towel and treat the stage as complete.
Hundred
The full hundred is the head-up stage of hundred prep with the legs held at tabletop. Curl your head and shoulders up, keep your gaze toward your thighs, and pump the arms through 10 breath cycles for 100 pumps in total. Maintain a steady breath, with the exhale slightly longer if that helps you stay calm. Do not hold your breath, and do not let the shoulders creep toward the ears.
Physitrack notes that more advanced versions extend the legs toward about 45 degrees; in this plan that is optional and only appropriate if your lower back stays comfortably in contact with the mat. Modification: return to head-down hundred prep, or lift your head only on the exhale. Skip the head lift entirely if you have neck pain or are pregnant, and ask your clinician first if your abdominal wall is a concern.
Single-leg circles
Lie on your back with one leg extended toward the ceiling and the other bent with the foot flat on the mat. Keep your pelvis still and your ribs settled. Draw a small circle with the lifted leg: across the body, down, around and back up. Inhale for the first half of the circle and exhale for the second, then reverse the direction. Aim for 3 to 6 circles each way per leg as the schedule shows.
The size of the circle matters less than the stillness of the pelvis, so shrink it until nothing else moves. Modification: bend the lifted knee, or loop a towel around the foot if your hamstrings are tight. If your lower back arches or your hip hikes, lower the leg or bend the supporting knee a little more, which gives the pelvis a firmer base.
Single-leg stretch
Lie on your back and curl your head and shoulders up, drawing one knee toward the chest with your hands on the shin or just below the knee; exact hand placement varies between teachers. Extend the other leg long at a diagonal that keeps your lower back comfortable. Switch legs smoothly, pulling the new knee in as the other leg extends, and keep a steady breath. Do 6 to 10 per side as the schedule shows.
Modification: keep your head on the mat, extend the straight leg higher, or hold behind the thigh instead of the shin. If your neck tires, rest your head down for a few switches, then try again. Check that your hips stay level and your ribs stay down while the legs change; a wobbling pelvis means the extended leg is too low.
Double-leg stretch
Lie on your back, curl your head and shoulders up and hug both knees in with your hands on your shins. Exhale and reach your arms overhead beside your ears while extending the legs along a diagonal as far as your lower back stays in contact with the mat. Inhale as you circle the arms out and around, pulling your knees back in. Complete 6 to 8 repetitions, moving slowly.
Modification: keep your head down, reach the arms forward instead of overhead, or extend the legs less. If your lower back lifts as the legs extend, bring them higher until it settles. This exercise only appears from Week 3, after you have built the control in the hundred and single-leg stretch, and it is a fine one to skip on days when your neck or back feels irritable.
Seated roll-down, roll-up and spine work
These movements form Block 3. They involve rounding, rotating or side-bending the spine, so they are the entries most affected by bone-health concerns, recent back or abdominal surgery and pregnancy. Do them slowly and keep the sitting bones grounded.
Seated roll-down
Sit with your knees bent, feet flat and hip-width apart, hands resting behind your thighs or arms reaching forward. Lengthen tall, then exhale, tuck your tailbone under and round your back as you roll back only as far as your abdominals can control. Inhale to hold, then exhale and stack the spine back up to sitting. Do 3 to 6 repetitions.
Cues: keep your feet heavy on the floor, your chin slightly tucked and your shoulders relaxed. Do not drop backward; the size of the roll is set by your control, which will grow over the month. Modification: hold behind the knees, or roll back less. If you have osteoporosis or a history of spinal fracture, do not do this exercise until a clinician has approved a version of it.
Roll-up progressions
The roll-up is built in four steps; use the earliest step that stays smooth. Step 1 is the seated roll-down above. Step 2 is a bent-knee roll-up: lie on your back with knees bent and feet flat, arms toward the ceiling; exhale, nod your chin and peel your head, shoulders and then spine up, reaching your hands toward your knees; inhale at the top, then exhale and roll back down one section at a time. Step 3, the towel version, is the same movement with your legs extended and a towel looped around both feet to guide you.
Step 4, the full roll-up, uses extended legs and arms reaching overhead before you curl up and over, and it is optional. Cues for every step: no momentum, no jerking and no feet popping off the floor. If they do pop up, go back one step. Skip the roll-up if you have osteoporosis, a recent back or abdominal surgery, a disc condition you are managing or are pregnant, unless your clinician has said otherwise. Do 3 to 5 repetitions.
Spine twist
Sit tall with your legs extended and together, feet flexed, and your arms out to the sides at shoulder height. Inhale and grow taller; exhale and rotate your trunk to one side, adding two small pulses of rotation if your control allows, then inhale back to center. Keep both sitting bones heavy, hips square and the rotation coming from your trunk rather than from swinging your arms. Do 3 to 6 per side.
Modification: sit on a folded towel, cross your legs or bend your knees, and fold your arms across your chest. Rotate only as far as your hips stay still. People with osteoporosis should ask a clinician before any seated twist, because the movement guidance referenced earlier lists extreme twisting among the movements to avoid or modify.
Spine stretch forward
Sit tall with your legs extended slightly wider than your hips, feet flexed, and arms reaching forward at shoulder height. Inhale to lengthen; exhale, nod your chin and round forward from the head downward as though curving over a large ball, drawing your abdominals in. Inhale to pause, then exhale and stack your spine back up to tall. Perform 4 to 6 repetitions, moving smoothly.
Modification: sit on a folded towel and bend your knees, resting your hands on your shins. Skip this exercise if you have osteoporosis or a history of spinal fracture: the Bone Health and Osteoporosis Foundation poster names the Pilates spine stretch specifically as a rounding movement to avoid. In its place, practice sitting tall and reaching your arms forward with a straight spine.
Mermaid
Sit cross-legged, or with both legs folded to one side, on a folded towel if that helps. Rest one hand on the floor beside you and sweep the opposite arm overhead. Inhale to lengthen tall; exhale and bend sideways over the supporting hand, reaching long through the fingers and keeping both sitting bones grounded. Inhale to return to center. Do 3 to 5 repetitions per side.
Think of lengthening up and over in an arc rather than folding at the waist. Modification: sit cross-legged instead of side-sitting if your knees or hips object, rest the supporting hand on your thigh and reduce the range. Move slowly and avoid any pinching in the side of the waist. Mermaid is a good low-intensity choice at the end of a session.
Prone, side-lying and plank work
Block 2 builds strength in the back body, hips and trunk. Prone work means lying face down; side-lying means resting on one side. If you are pregnant, face-down positions will not work, and a pre- and postnatal specialist can recommend replacements.
Breast stroke prep
Lie face down with your forehead resting on the mat, legs together and arms along your body with palms facing your thighs. The NC State fundamentals page describes lifting the head and upper body while pressing the arms into the sides, then lowering on the inhale. Exhale to lift only a few inches, keep your gaze down and your neck long, and keep the legs heavy. Do 4 to 8 repetitions.
Modification: lift less, or place a folded towel under your forehead or hips for comfort. Cues: lengthen rather than arch, and move from the upper back instead of cranking the neck backward. If back extension causes pain, stop and ask a clinician whether it suits you.
Swimming prep
Lie face down with arms long overhead at shoulder width and legs long, hip-width apart, forehead on the mat. Draw your lower abdomen lightly away from the floor, then lift one arm and the opposite leg a couple of inches, lower them with control and switch. Keep your neck long with your gaze down, breathe naturally and keep the movement small. Do 6 to 12 alternating lifts.
Modification: lift only the arms or only the legs, or do the same alternating reach on hands and knees, extending one arm and the opposite leg to hip height and keeping the pelvis level. Place a folded towel under your pelvis if your lower back feels pinched. Names for this exercise vary between teachers, so ask your instructor to confirm that your version matches theirs.
Side-lying leg lifts and inner-thigh lifts
Lie on your side with your bottom arm extended under your head, hips stacked and legs slightly forward of your torso line. Lift your waist lightly away from the mat. Exhale and lift the top leg to hip height, then inhale and lower with control; do 6 to 12 repetitions per side. For the inner-thigh lift, bend the top knee and place that foot flat on the mat in front of the bottom knee, then lift the bottom leg a few inches and lower it.
Cues: keep the hips stacked and the pelvis still, and do not let the top hip roll backward. Modification: bend the bottom knee for more stability, place a pillow under your head, or reduce the lift height. If your neck tires, bend the bottom elbow and rest your head on your hand.
Side kicks front and back
From the side-lying position, lift the top leg to hip height with a flexed foot. Exhale and swing the leg forward with two small pulses, then inhale and sweep it back to just behind the line of your hip while your torso stays still. Place your top hand on the mat in front of your chest for support. Do 6 to 10 repetitions per side.
Cues: the swing happens at the hip joint, and your waist and lower back should not move. If your back arches as the leg goes behind you, shorten the sweep. Modification: reduce the swing, keep the bottom knee bent for stability or return to simple leg lifts on days when the hips feel tired.
Clam
Lie on your side with your hips stacked, knees bent at roughly a 45 degree angle and heels together. Exhale and lift the top knee while your feet stay touching, keeping the pelvis stacked and the lower back still, then inhale and lower. Do 8 to 12 repetitions per side. The movement should be felt at the outer hip, not the lower back.
Modification: use a smaller range, or place a folded towel under your waist or head for comfort. Add light resistance, such as a resistance band above the knees, only after the plain version is steady. If your pelvis rolls backward as the knee opens, you are lifting too high.
Forearm plank and knee-plank versions
The plank comes in stages. A knee plank places your hands under your shoulders with your knees down and a straight line from head to knees. A forearm plank on knees swaps the hands for forearms, elbows under shoulders. The full forearm plank lifts the knees and balances on the toes. In each, draw your abdominals up, push the floor away through your forearms so your shoulder blades do not sink, keep your neck long and breathe throughout.
Hold for the time in the schedule and stop at the first sign of the lower back sagging, the hips piking up or the shoulders shrugging. Modification: use an incline, resting your forearms on a stable surface such as a sturdy bench, which makes the exercise easier, or stay on the knee versions all month. If wrists or shoulders hurt, shorten the hold or skip it for the day.
Side bridge on knees
Lie on one side with your forearm on the mat, elbow under your shoulder and knees bent at about 90 degrees, with hips and knees stacked. Exhale and lift your hips until your body forms a straight line from knees to head, hold while breathing, then lower with control. Do the time shown in the schedule on each side, with a pause between sides.
Cues: keep your shoulder away from your ear and avoid rolling the chest forward or backward. Modification: lift the hips only a few inches, or practice lifting and lowering without holding. If the shoulder or wrist objects, rest the lower arm in a different position, or return to side-lying leg lifts for the day.
Closing stretches
Closing stretches bring your breathing and heart rate down at the end of a session. They should feel like a gentle release, not a deep stretch, so move into each shape slowly and stop before any pulling or pain.
Child’s pose
Kneel on the mat, bring your big toes together and sit your hips back toward your heels, with knees about hip-width apart. Lower your torso over your thighs, reaching your arms forward or resting them alongside you, and let your forehead rest on the mat or on a folded towel. Breathe slowly into your back ribs for 5 breaths.
Modification: place a rolled towel or cushion behind your knees if kneeling is uncomfortable, or sit on a cushion between your heels. If your knees do not tolerate this position at all, lie on your back and hug your knees gently for 5 breaths instead. In late pregnancy, widen the knees to make room.
Figure-four stretch
Lie on your back with your knees bent and feet flat. Cross your right ankle over your left thigh, just above the knee, with the right foot flexed. Draw your left thigh toward your chest, holding behind the thigh with both hands, until you feel a stretch in the outer right hip. Keep your head down and your shoulders relaxed, and hold for 5 breaths, then switch sides.
Modification: keep the supporting foot on the floor and do not pull the thigh in at all. If you feel pressure in the knee, flex the crossing foot harder or use a smaller range. Stop if you feel pain on the inside or front of the knee rather than a stretch in the hip.
Hamstring stretch with a towel
Lie on your back and loop a towel around the sole of one foot. Hold both ends, extend that leg toward the ceiling, and keep the opposite knee bent with the foot on the floor, or extend that leg along the mat if it is comfortable. Gently draw the lifted leg toward you until you feel a stretch along the back of the thigh, with the tailbone staying down. Hold for 5 breaths per side.
Modification: bend the lifted knee slightly if you feel pulling behind the knee. Keep the movement slow and avoid bouncing. A mild stretch is the target, and tingling or sharp pain means you should ease off.
Breathing, tempo and control
Pilates feels different from other mat workouts because the attention goes to how you move rather than how much. Breath, tempo and pelvic position are the three controls you will adjust in every session, and they are worth a closer look.
Breathing in Mat Pilates
Ribcage breathing, the warm-up exercise
Ribcage, or lateral, breathing is the breath style most Mat Pilates teaching uses, and the plan practices it at the start of every session. Lie on your back with knees bent or sit tall, and rest your hands on the sides of your lower ribs. Inhale slowly through your nose and feel the ribs widen sideways and a little into the back, rather than your belly puffing out or your shoulders rising. Exhale through your mouth, letting the ribs close and your lower abdominals gently draw in.
Do 5 breaths in the Express warm-up and as many as you like when you want to settle yourself. If you feel light-headed, breathe at an ordinary pace and skip any deliberate deepening; the goal is smoothness, not volume. For more on technique and common cues, see Pilates breathing technique.
Matching breath to effort
A common cue is to exhale on the hardest part of a movement and inhale to prepare or to return. The pelvic curl follows that pattern in the NC State description: exhale as you lift, inhale at the top and exhale as you lower. The hundred is the exception, because it uses a steady rhythm of five pumps in and five pumps out. The principle is that the breath supports the movement and never stops.
Teachers differ on exact inhale and exhale placement for some exercises, so if your instructor cues something different, follow the instructor. If you ever catch yourself holding your breath, make the movement smaller or slower until the breath flows again. A held breath during a plank or a curl is also a signal that the exercise is too hard for that day.
Control and precision
Tempo and range
Pilates has a reputation for slow, small movements because control is the point of the system. The most useful tool you have is tempo: moving each phase of an exercise over a slow three or four count makes it harder in the right way, because momentum cannot help you. If an exercise feels easy at a normal speed, slowing it down is usually a better progression than adding repetitions.
Range works the same way. A smaller, controlled movement is a complete exercise, whereas a bigger movement that wobbles is not. Use the schedule’s repetition numbers as a ceiling, and stop a set early if the last repetition looked noticeably worse than the first. The shaking you feel in a long hold is the muscles working, and no one has ever described it as dignified, but it is not a reason to quit by itself.
Neutral pelvis and imprint
You will see two spine positions mentioned throughout the plan. Neutral is the natural position in which the lower back keeps a small, comfortable curve and the hip bones sit level. Imprint, or a gentle tilt, flattens the lower back toward the mat by tilting the pelvis slightly. Neither is correct for every moment; they are two options on a range.
Use neutral when you want to practice natural alignment, as in knee folds and single-leg circles. Use a slight imprint when a leg lift or curl makes the lower back arch, because it brings the abdominals into play and protects your range. If you cannot tell the difference at first, check with a certified instructor, who can see what you cannot feel. Keep the ribs soft and the neck long in both positions.
Rest days, soreness and pain
Recovery is where most of the adaptation happens, and it is the part of a challenge people most often skip. Treat the rest days as scheduled training, not as lost time.
Rest days that do real work
Why the schedule builds in two rest days a week
Public health guidance asks for muscle-strengthening activity on at least two days a week rather than every day, and it describes more activity as extra benefit once you meet the basics. Five Pilates days with two rest days sits comfortably above that floor and leaves recovery time for muscles and joints that are being asked to work in new ways. People who are new to exercise may need even more rest, which is why the schedule marks some days as optional for beginners.
Rest also protects the habit. A plan that has no off days fails on the first day you are tired or ill, and then the whole thing collapses. Because the rest days are built in, you can skip an extra day without guilt when you need to and still be inside the plan.
What to do on a rest day
The schedule suggests an easy walk of 10 to 30 minutes and a few minutes of gentle mobility, such as knee sways, cat-cow or a child’s pose. Walking adds the aerobic activity that mat sessions usually lack. To judge intensity without a gadget, use the talk test described by the CDC: at a moderate intensity you can talk but not sing, and at a vigorous intensity you can only say a few words before pausing for breath.
Keep rest-day movement easy enough that tomorrow’s session is not affected. Sleep, hydration and normal meals do more for recovery than any gadget, and if you feel run down, a true day off beats a walk. A rest day is not a failure of motivation; it is part of the plan working as designed.
Soreness versus pain
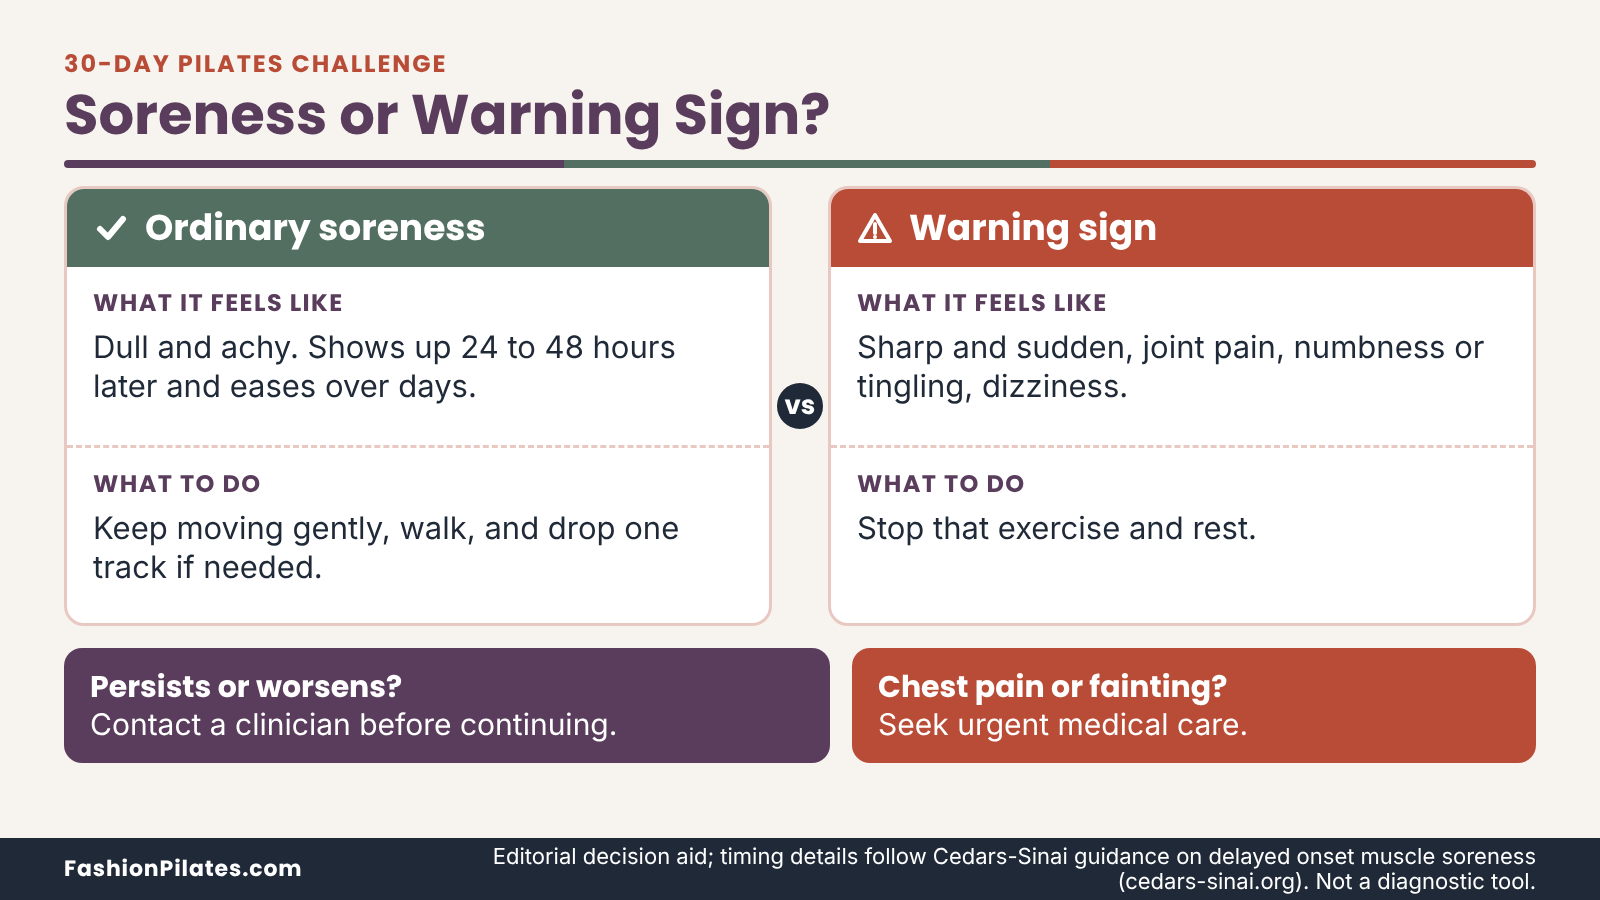
New exercisers often cannot tell the two apart, which can lead to either stopping too early or pushing through a real problem. The table below sets out the common differences, but remember that it is general information and not a diagnosis.
| Feature | Usually ordinary soreness | Pain to take seriously |
|---|---|---|
| Timing | Builds 24 to 48 hours after unfamiliar effort and peaks within one to three days | Starts suddenly during an exercise or comes on straight away |
| Feel | Dull, achy, spread across a muscle group, tender to touch | Sharp, stabbing, pinching, burning along a nerve, or located in a joint |
| Trend | Improves over several days and eases with gentle movement | Persists, worsens or returns each time you do the same movement |
| Other signs | None beyond stiffness | Numbness, tingling, swelling, dizziness, or pain that wakes you at night |
| What to do | Keep moving gently, lower the track for a day if needed | Stop the exercise, rest, and get assessed if it does not settle quickly |
Ordinary soreness after a session
Delayed onset muscle soreness is the dull ache that appears a day or so after unfamiliar or demanding exercise. Cedars-Sinai’s overview of delayed onset muscle soreness explains that it typically shows up 24 to 48 hours afterward, peaks around one to three days and then fades, and that gentle movement and gradual increases in intensity help. In the low back pain review summarized earlier, mild muscle soreness was also the main side effect reported for Pilates.
Expect some soreness in the glutes, abdominals, hip flexors and upper back during the first two weeks, mostly after new exercises. It should be tolerable, symmetrical and shrinking. If it keeps you from walking comfortably or doing everyday tasks, you added too much too fast, and dropping a track for two or three days is the right adjustment.
Pain that deserves attention
Pain behaves differently. According to the same Cedars-Sinai overview, injury pain tends to be sharp and immediate, to persist or worsen over time and to be worth raising with a healthcare provider when it does not resolve. In practice, treat pain in a joint, pain that shoots, pain with numbness or tingling, and pain that is the same every time you do an exercise as a reason to stop that exercise and seek an opinion.
Do not push through to complete the challenge. A certified instructor can check whether your form is contributing, and a clinician can check whether something else is going on. If the issue is clearly one exercise, you can usually replace it with a library modification and carry on with the rest of the plan.
How to track progress without obsessing over the scale
If success is measured by a number that fluctuates by several pounds between breakfast and bedtime, the plan will feel like failing when it is working. Better markers are available, and most of them take under five minutes to record.
What to measure instead
A baseline self-check and a Day 29 retest
Do a short self-check on Day 3, your first rest day, after the Express warm-up, and repeat it on Day 29. Stop every item at the first sign of form breaking, such as sagging, jerking or neck strain. These are not maximum tests; the point is to compare like with like, and a repeat that matches your baseline with better quality counts as improvement.
| Check | How to do it | What to record |
|---|---|---|
| Plank hold | Hold the knee plank (Week 1) or the forearm plank on knees, stopping at the first form break, up to 60 seconds | Seconds held and the version used |
| Pelvic curl control | Do pelvic curls at a slow four-count up and four-count down, stopping when the movement turns jerky | Number of smooth repetitions, up to 8 |
| Seated roll-down depth | Roll back only as far as your abdominals control and you can roll up without pushing off your hands | Rough depth: slight, halfway, or deeper |
| Hundred prep breath cycles | Hundred prep with tabletop legs and head down, stopping if the neck tires or the lower back lifts | Breath cycles completed with relaxed neck, up to 10 |
| Energy and sleep | Rate your average energy and sleep quality from 1 to 5 over the past week | Two numbers |
A simple session log
A session log takes under a minute and makes the invisible changes visible. After each session, note the date, the track, how hard it felt from 1 (very easy) to 5 (very hard), your energy from 1 to 5 and a line about what felt different. Patterns show up after a week or two: the exercise you always find hard, the day of the week when energy dips, the effect of poor sleep.
| Day | Track | Effort (1 to 5) | Energy (1 to 5) | Soreness (1 to 5) | One-line note |
|---|---|---|---|---|---|
| Day 8 | Standard | 3 | 4 | 2 | Head-up hundred prep felt steady after the third breath cycle |
| Day 9 | Express | 2 | 2 | 3 | Short night, kept the single-leg stretch head down |
| Day 11 | Standard | 3 | 4 | 2 | Swimming prep with less neck effort |
The entries above are a layout example, not a benchmark. Your numbers are only comparable to your own.
Keeping the scale out of the driver’s seat
Why body weight is a poor judge of this plan
Body weight moves with water, food timing, hormones and sleep, so a number that jumps on a Tuesday says almost nothing about a month of Pilates. This plan is also not designed as a weight-loss program, and the research summarized earlier measured strength, endurance, balance and flexibility rather than body weight. If weight loss is a goal, discuss it with a clinician and treat the plan as one part of a wider approach.
The same caution applies to tape measures, photos and clothing sizes. If you choose to track any of them, do it at most once a week or once a month, at the same time of day, and treat the result as data, not as a verdict on your effort. If tracking your body makes you anxious, skip it and rely on the performance markers. Anyone with a history of disordered eating should keep body metrics out of the picture entirely and talk to a professional.
Weekly check-in questions
Once a week, on a rest day, spend five minutes with five questions. How many of the planned sessions did I finish? Which exercise improved most in control or comfort? Which one felt harder than expected? How were my energy and sleep? What one change would make next week easier? Write the answers in a sentence each.
The questions keep you honest about the plan without turning it into a performance review. If the answers show you are skipping sessions, drop a track instead of abandoning the schedule. If everything feels easy, apply the move-up rule from the level section before changing anything else.
Missed days and common mistakes
Every 30-day plan meets real life. What matters is having a rule ready before it happens, so that a missed Tuesday does not become a missed month.
Missed-day rules
One or two missed days
The plan is a sequence of sessions, not a strict calendar, so a missed day does not need to be made up. If you miss one or two session days, continue with the next scheduled session in order, keep your rest days where they are and simply finish a day or two later. Do not double up two sessions in one day, because that raises soreness and injury risk and defeats the purpose of recovery.
If you miss a day because of low energy rather than a busy schedule, try the Express track the next day rather than skipping altogether. A short session often turns a flat day around, and a ten-minute habit protects the rhythm that makes the larger sessions possible.
Longer breaks, illness and injury
For longer gaps, use the rules in the table. They aim to restart you at a level your body is ready for, rather than demanding that you pick up exactly where you left off.
| Situation | What to do | Why |
|---|---|---|
| 1 to 2 days missed | Continue with the next session in order; keep rest days as scheduled | Fitness does not disappear in two days, and doubling up adds risk |
| 3 to 6 days missed | Repeat the last session you completed on the Express or Standard track, then continue | Eases you back in and re-checks form |
| 7 days or more missed | Restart the current week from its first session on a lighter track | Coordination and tolerance drop after a longer break |
| Short illness, such as a cold | Wait until you feel well, then return on Express for two or three sessions | Energy and recovery may still be low |
| New injury, pain or concerning symptoms | Stop the challenge and get assessed before restarting | The plan is not designed for injury care |
The aim is a calm return, not a punishment. Missing a week does not erase the earlier weeks, and many people find that the second attempt at a week feels noticeably smoother than the first.
Common mistakes and how to fix them
Technique mistakes
Most form errors in Mat Pilates come from trying to do too much, too fast, or from letting the neck, shoulders or lower back do work meant for the abdominals and hips. The table lists the most common ones and the simplest correction for each.
| Mistake | Why it matters | Fix |
|---|---|---|
| Holding the breath | Raises tension and shortens the work you can do | Make the movement smaller until breath flows |
| Pulling on the neck during curls | Shifts work from the abdominals to the neck | Keep a fist-sized space under the chin; support the head with a towel or hands |
| Rushing or using momentum in roll-ups | Skips the strength and control the exercise trains | Return to a bent-knee or towel version and slow the tempo |
| Arching the lower back when legs extend | Loads the lower back instead of the abdominals | Raise the legs higher, or bend the knees, until the back stays settled |
| Flaring the ribs | Reduces trunk control and strains the lower back | Exhale fully, let the ribs soften and reduce the reach |
| Shrugging or sinking in the plank | Overloads the shoulders and neck | Push the floor away through the forearms and shorten the hold |
| Forcing range in twists and stretches | Can irritate joints and the spine | Stop at the first sign of pinching and rotate from the trunk |
Planning mistakes
The biggest planning mistake is starting at a level that suits your ambition rather than your current fitness. A close second is skipping the rest days, either because you feel good or because you are behind. Both feel productive in the first week and tend to end in soreness, fatigue and a quit around Day 12.
Other common problems include adding extra workouts on top of the plan, comparing your Day 5 to someone else’s Day 25 on social media, ignoring pain because the schedule says to continue and treating the challenge as a way to offset meals. None of those help. If you notice yourself drifting toward them, return to the weekly check-in questions and lower the track by one step.
What to do after Day 30
Finishing a 30 day pilates challenge is a good moment to decide what comes next, while the routine is still fresh and your notes are in front of you. The best next step depends on how the month felt, not on what a challenge format suggests.
Choose your next step
Most people fall into one of four situations after Day 30. The table matches each with a sensible follow-up and the main thing to watch.
| If this describes you | Next step | Suggested rhythm | Watch for |
|---|---|---|---|
| The month felt right and you want more of the same | Repeat the plan on the same track, using the next progression for one or two exercises | 3 to 5 sessions a week | Change only one variable at a time |
| It felt hard, but you finished | Repeat Weeks 2 and 3 on Standard before moving on | 3 to 4 sessions a week | Soreness that lingers beyond three days |
| You loved it and want expert eyes on your form | Book a class or a private session with a certified instructor | 1 class a week plus 2 home sessions | Tell the instructor about any condition or injury |
| You are curious about equipment-based Pilates | Try a beginner Reformer class | 1 class a week plus mat practice | Spring resistance varies by brand; follow the instructor |
Repeat the plan and progress it
Repeating the month is a legitimate plan, not a retreat. Because each pass starts from a higher baseline, the same sessions feel different, and you can raise the difficulty with the progressions the plan already names: the full roll-up, extended legs in the hundred, longer planks or more controlled tempo. Change one variable at a time, and only when the current version has been smooth for two sessions.
Go back through your log before you restart. The exercises you always shortened or skipped are the best candidates for a fresh look with the library modifications, and the ones that became easy are the best candidates for a progression. For a week-by-week structure to follow beyond this month, see beginner Mat Pilates workout.
Add instruction or equipment
A class with a certified instructor, in person or live online, is the single most useful upgrade. The American Family Physician summary of Pilates for chronic low back pain noted that the benefits in the trials came with supervision by trained or certified instructors, and the Center for Young Women’s Health guide recommends early classes to learn form and breathing before relying on videos. An instructor can see the pelvic tilt or the neck strain you cannot feel.
If equipment-based Pilates appeals, a beginner Reformer class is a natural next step, and our beginner guidance covers what to expect: Reformer Pilates for beginners. Spring resistance is not standardized across brands, so follow your instructor and the manufacturer’s manual rather than numbers or colors from the internet. Keep your mat sessions going alongside, because they keep your home practice alive.
Keeping the habit going
A sustainable weekly rhythm
You do not need to keep five days a week forever. The Center for Young Women’s Health guide suggests two to three sessions a week for newcomers, and for many people that is the rhythm that lasts. A reasonable pattern is two Standard sessions, one Express session as a back-up on busy days, and walking on most other days to cover the aerobic side of the guidelines.
Anchor the habit to something that already happens, such as a morning coffee or the hour after work, and keep the mat visible. Use the missed-day rules without shame. Staying with the routine for six months matters far more than how perfectly you completed the first thirty days, and how often is right for you is explored further here: how often to do Pilates.
Building your own sessions
The structure you used for the month, a warm-up, three blocks and a closing, is a template for building your own sessions. Choose one to three exercises from each block, keep the fixed warm-up and closing for your track, and rotate which exercises you emphasize across the week. A hip-focused Monday, a core-focused Wednesday and a flowing Saturday keep things varied without extra planning.
Write down each session you build, and revisit it after a week. If you want shorter options for tight days, a dedicated routine helps: 10-minute Pilates routine. For the wider library of plans and challenges, browse the Pilates Plans & Challenges hub, and for the broader workout collection, visit the Pilates Workouts hub. If you are still new to the method itself, Pilates for beginners guide covers the fundamentals.
Frequently Asked Questions
Can a 30 day pilates challenge help me lose weight?
A month of Mat Pilates is not designed as a weight-loss program, and it should not be sold as one. Sessions of ten to thirty minutes use modest energy, and the research summarized in this guide measured strength, endurance and balance rather than body weight. Appetite, sleep and overall activity matter far more for weight than any single workout style. If weight is a health goal for you, a clinician or registered dietitian can help you set a plan that fits.
Do I need a Pilates mat or any equipment?
You need a stable, cushioned surface and a little floor space, and nothing else is required. A purpose-made mat is convenient because it grips the floor and protects your spine, but a folded blanket on carpet can work to start. A towel replaces most props in this plan, since it can support your head, assist the roll-up and serve as a stretch strap. Hold off on buying anything else until you know what you actually miss.
Is it safe to do Pilates every day for 30 days?
This plan deliberately includes two rest days each week, and most people do better with that than with training daily. Public health guidance asks for muscle-strengthening activity on at least two days a week, so five sessions already exceeds the minimum. Daily gentle movement, such as a walk or a few minutes of stretching, is fine on the rest days. If you want to practice more often, keep the extra sessions short and easy, and stop if soreness starts to build up.
How long should each session be?
Choose the length you can protect, because consistency matters more than duration. The ten-minute Express track is enough to practice every part of the method, the twenty-minute Standard track suits most people and the thirty-minute Full track resembles a class. You can switch tracks from day to day without losing your place. Move down a track after poor sleep, illness or a hard day, and move up only when two sessions in a row have felt smooth.
What if I cannot do the hundred or a full roll-up?
That is common, and it does not mean you are doing anything wrong. Both exercises are built from simpler steps in the library, such as hundred prep with the head down and a seated roll-down or towel-assisted roll-up. Stay at the stage that feels smooth for as long as you need, because many people finish the month without a full roll-up. A certified instructor can look at your form and suggest the next step for your body.
Can I do this challenge if I have back pain?
Check with a clinician or physical therapist first, because this plan is general education and not a treatment for back problems. Reviews of Pilates for chronic low back pain found modest benefits with certified instructors, but those were supervised programs, not self-guided videos. Several exercises here involve spinal flexion and rotation, which some back conditions do not tolerate well. If you get the all-clear, start on the Express track and use the modifications, and stop for any sharp or radiating pain.
Can I follow this plan while pregnant or postpartum?
Speak with your obstetric provider before starting, because this schedule was not written for pregnancy or the postpartum period. Many exercises here, including those lying flat on the back, lying face down or curling the head and shoulders, may need to change. A pre- and postnatal Pilates specialist can adapt the movements to your stage and your provider’s advice. Active people can often continue exercising with modifications, but individual guidance matters.
When will I notice results?
Most people first notice that familiar movements feel steadier and more controlled, often by the second or third week. Strength gains in a new exercise are partly coordination, which improves quickly. Changes in appearance are slower, vary widely and are not promised by this plan. Your session log and Day 29 retest will show progress more reliably than a mirror or a scale.
Is Mat Pilates enough exercise on its own?
For most adults, probably not, because Mat Pilates mainly covers strength, control and mobility. National guidelines also call for weekly aerobic activity, such as 150 minutes of moderate-intensity movement, and the minutes in this plan do not reliably supply it. Brisk walking, cycling or swimming on rest days is the simplest way to fill the gap. If you are unsure how to balance them, a clinician or a certified fitness professional can help you build a weekly mix.