
Direct answer: A 30 minute pilates upper body workout on the mat works best as five short blocks: about five minutes of shoulder-blade and upper-back mobility, five minutes of arm work, then planks, push-up progressions with triceps and chest work, back extension with side planks, and a four-minute cool-down. Keep the trunk steady as your base of support so the shoulders, upper back, chest and arms do the pushing and pulling without the neck or lower back taking over. Choose the easier option for any move that bothers your shoulders, wrists or neck, and treat hand weights or a band as optional extras.
This guide is for adults who already move comfortably and want a focused upper-body session that fits a crowded day. It is a research-based, expert-informed sequence built from published exercise descriptions and health-agency guidance, and we did not conduct hands-on testing. It is general fitness education, not individualized medical advice, so anyone with a shoulder problem, wrist problem, recent surgery, pregnancy or postpartum recovery should read the safety section first and check with a qualified clinician.
What Upper Body Means in Mat Pilates
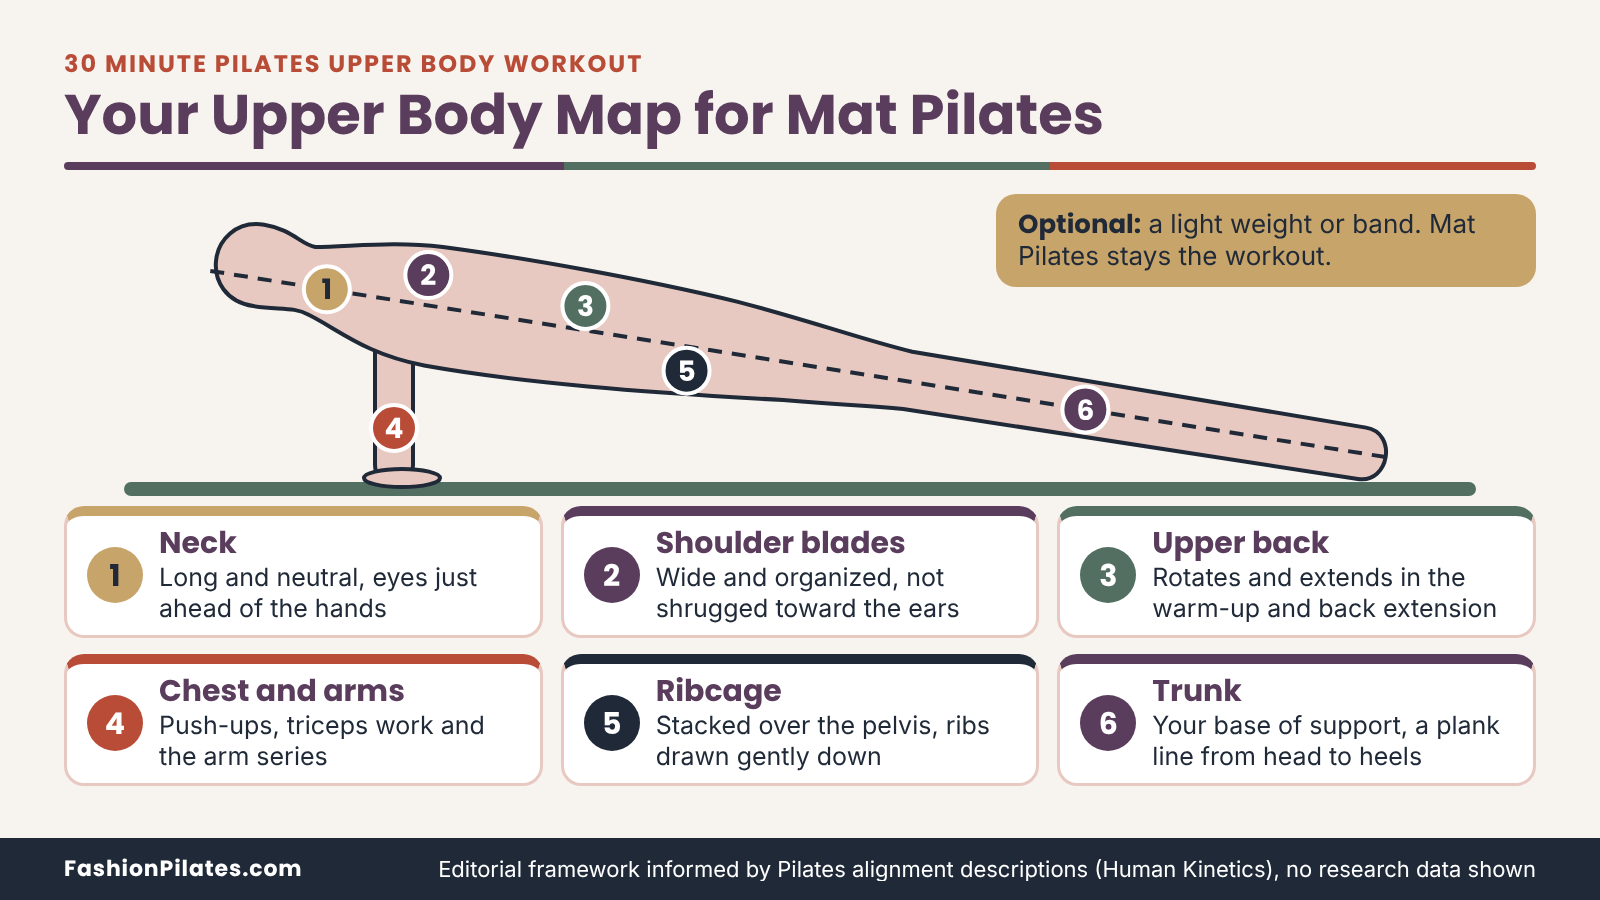
Most people picture biceps and shoulders when they hear “upper body.” Mat Pilates uses a wider map, one where the arms are connected to the ribcage, the shoulder blades and the trunk underneath them. Getting that map clear first makes every move later in the session easier to understand.
The Upper-Body Map in Plain English
Three regions do most of the work in this session, and each has a job that is easy to describe without anatomy-class vocabulary.
Shoulder blades and the shoulder girdle
The shoulder blades, called scapulae, sit on the back of the ribcage and glide as the arms move. In Pilates teaching, the goal is a stable, neutral shoulder-blade position, which means not letting the blades hike toward the ears during arm movements. One Pilates alignment text describes keeping some distance between shoulders and ears through balanced work from the upper and lower trapezius, rather than forcing the shoulders down hard, as covered in this Human Kinetics excerpt on alignment in Pilates mat work. That “organized, not clamped” feeling is the one to chase.
Upper back and chest
The thoracic spine is the part of the spine that sits behind the chest and connects to the ribs. It rotates and extends, and it is often stiff after hours at a desk, so the warm-up here spends real time on it. The chest muscles, the pectorals, work during push-ups and presses, while the muscles between and behind the shoulder blades support the back of the shoulder during almost every move. A session that only pushes, with no pulling or back-extension work, leaves that balance lopsided, which is why the swimming prep and back extension block earns its slot.
Arms
The triceps extend the elbow and work hard in push-ups and in any move where the elbows press back along the ribs. The biceps and forearm muscles join in during the arm series and during every weight-bearing hold. Arm strength is the outcome people notice, but in a plank or push-up it is the shoulder blades and trunk that decide whether the arms are working well or just being asked to hold everything up.
Why the Trunk Is the Base of Support
In every plank, push-up and side plank, the hands or forearms meet the floor, but the trunk transfers the load. When the ribcage and pelvis stay stacked, the arms and shoulders can do clean work.
The ribcage and pelvis as a single unit
A useful cue from a Pilates alignment source is to keep the ribcage in a neutral position, with the abdominals drawing the front of the ribs gently down and back so they do not flare forward, as described in the same Human Kinetics alignment excerpt. In a plank, that translates to a body that moves as one piece from head to heels. If the ribs poke forward and the lower back sags, the shoulders end up bracing against a trunk that is not helping.
Breath as part of the base
Pilates ties movement to breath, and in upper-body work the breath keeps the ribcage and neck from tightening. The usual pattern in this article is simple: inhale to prepare or to lower, exhale to press, lift or reach. Breathing into the sides and back of the ribcage during holds keeps the trunk working without bracing the throat or lifting the shoulders. When a move gets hard, the breath is usually the first thing to disappear, so it works as an early warning sign that you need the easier option.
What a 30 Minute Pilates Upper Body Workout Can and Cannot Do
Thirty minutes is enough for a focused, well-ordered session. It is not enough to cover everything, and it will not do some things people hope it will.
Strength and endurance, not spot reduction
This session builds muscular strength and endurance in the shoulders, upper back, chest and arms, and it practices the trunk control that supports them. It does not remove fat from the arms or any other area. The evidence on so-called spot reduction is mixed, but a review discussed by The Conversation notes that a meta-analysis found localized muscle training had no spot fat-reduction effect, as summarized in this explainer on spot reduction. Treat the session as strength practice and let it be good at that.
Where it fits in your weekly activity
US federal guidance for adults recommends muscle-strengthening activity on at least two days a week that works all the major muscle groups, including the chest, shoulders, arms and back, according to the CDC adult activity guidelines. The same guidance covers weekly aerobic minutes, which this session does not replace. A 30-minute upper-body session is one useful piece of that picture, ideally paired with lower-body and trunk work elsewhere in your week, such as a simple weekly pattern described later. For a broader starting point, see our beginner Mat Pilates workout.
Who Should Modify or Check First
Planks, push-ups and back extension put load through the shoulders, wrists and spine. Most healthy adults can scale them, but some situations call for a clinician or a qualified Pilates professional before the first rep.
When to Check With a Clinician Before Starting
The groups below should get individual advice instead of guessing, because the right modification depends on the specific diagnosis, stage of recovery and clearance.
Shoulder pain, impingement history or recent surgery
Shoulder impingement describes a narrowing of the space between the top of the shoulder and the rotator cuff tendons when the arm is raised, which can irritate the tendons and the bursa, according to the American Academy of Orthopaedic Surgeons patient page on shoulder impingement and rotator cuff tendinitis. That page also notes that early care often involves avoiding overhead activities that provoke symptoms, with strengthening resumed gradually under professional guidance. If you have had shoulder pain, an impingement diagnosis or shoulder surgery, get clearance and specific limits before doing planks, push-ups or the overhead parts of the arm series.
Pregnancy and postpartum
Exercise is generally encouraged in uncomplicated pregnancy, but this particular routine was not designed for it. Front-support work, prone back extension and long stretches on the back all need adjusting as pregnancy progresses. The CDC advises healthy pregnant and postpartum women to talk with a healthcare provider before starting or changing exercise and notes that after the first trimester, long periods lying flat on the back are best avoided, in its physical activity guidance for pregnancy and the postpartum period. After childbirth, planks and front support also load the abdominal wall, so wait for clearance and consider a prenatal- or postnatal-trained instructor.
Wrist, Neck and Shoulder Comfort Adjustments
Even without a diagnosis, hands-down work can feel uncomfortable at first. The adjustments below keep the movement and change the load.
Easing the wrists
Wrist discomfort in weight-bearing holds often comes from the angle at the wrist and from pressure concentrated on the heel of the hand. A Pilates instructor demonstrating wrist modifications for Pilates describes three simple options: resting the heel of the hand on the edge of a rolled mat to reduce the angle, lowering to the forearms, and making loose fists so the wrist stays straight. Spreading the fingers wide and pressing through the whole palm also helps share the load.
Easing the neck and shoulders
If the neck tightens or the shoulders creep toward the ears, shorten the lever. Move from toes to knees, from the floor to an incline, or from straight arms to forearms. Another instructor-led tutorial on Pilates modifications for weak shoulders suggests testing your comfortable range by lifting the arms overhead and to the sides before you begin, and keeping the elbows slightly rotated outward instead of collapsed so the work spreads across muscles. Skip any arm position that pinches or sharply aches.
| If this bothers you | Try this first | Stop and seek advice if |
|---|---|---|
| Wrists in plank or quadruped | Rolled mat under the heel of the hand, loose fists, or forearm version | Pain is sharp, or tingling or numbness appears in the hands |
| Shoulders pinch when lifting | Keep arms below shoulder height, use the incline or knee push-up, skip overhead reaches | Pain wakes you at night or weakness develops |
| Neck tightens in holds | Look at a spot just ahead of the hands, lengthen the back of the neck, shorten the hold | Pain shoots into an arm or hand |
| Lower back sags or pinches | Move to knees, bring ribs down toward hips, reduce the range | Pain persists after the session or travels down a leg |
What You Need Before You Start
The kit list is short on purpose. A mat, a little floor space and a timer cover the whole session, and everything else is a decision about comfort or progression.
Mat, Space and Clothing
Planks, push-ups and side planks press the hands, forearms and knees into the floor, so the surface matters more here than in a standing workout.
The floor surface and your space
You need roughly the length of a mat plus a little room at both ends, and a wall within reach is handy for the easiest push-up and plank versions. Choose a surface that does not slide: a mat on a rug can creep, and a mat on slick flooring can skate forward during push-ups. Cushioning helps the knees and forearms, but a very soft, thick surface makes planks wobblier because the hands sink into it. If you are shopping, read our how to choose a Pilates mat guide for thickness and grip trade-offs; this article stays focused on the workout itself.
Clothing that stays out of the way
Anything you wear should stay put when your head is lower than your hips and your arms are overhead. A fitted top that does not ride up or slip over the face, and bottoms that stay in place during the quadruped and side-plank work, remove distractions. Bare hands and feet or grippy socks both work on most mats. Skip long necklaces and loose bracelets, which end up under the palms in planks.
Optional Hand Weights and Resistance Bands
The session works with nothing but body weight. Weights and bands are options for the arm series and the triceps work, not requirements, and mat Pilates remains the workout either way.
When a weight or band is worth adding
Add resistance when the body-weight version feels easy at the top of the rep range with clean form, not as a way to speed things up. A light hand weight or a looped or flat band can add challenge to the arm series without changing the shape of the moves. If you are new to the arm series, learn the pattern with empty hands for the first week or two, then add resistance. Skip weights altogether on days when your shoulders feel irritated.
How much weight, in general terms
There is no universal number, but there is a sensible rule. Mayo Clinic describes choosing a weight or resistance level that is heavy enough to tire the muscles after about 12 to 15 repetitions, and building up gradually when the work becomes easier, in its strength training basics. For small shoulder muscles and Pilates-style control, many instructors start lighter than that: one university fitness article describing a Pilates arm routine suggests 1 to 3 pound dumbbells, or substitutes such as water bottles and bands, for standing arm work, as shown in this Cal Poly Pilates arms workout. Start light enough that the last two reps are hard but form stays clean, and let your instructor or clinician set limits if you have any shoulder history.
The 30-Minute Session at a Glance
Before the move-by-move detail, here is the whole session on one page. The five blocks are ordered so the shoulders are warm before they bear weight, the hardest pushing comes mid-session, and the neck and chest get relief at the end.
| Minutes | Block | Moves | Work per move |
|---|---|---|---|
| 0:00 to 5:00 | Warm-up for scapular and thoracic mobility | All-fours thoracic rotation, cat-cow, sternum drops, scapular push-up prep | 6 to 10 slow reps each, about 75 seconds per move |
| 5:00 to 10:00 | Arm series | Standing or seated curls, presses, side raises and reaches, with or without light weights or a band | 8 to 12 reps each, steady count |
| 10:00 to 15:00 | Plank progressions | Quadruped hold, forearm plank, full front support | 20 to 45 seconds each, 2 rounds |
| 15:00 to 20:00 | Push-ups, triceps and chest | Incline, knee or full push-up, triceps push-up, chest opener | 5 to 10 reps each, 2 rounds |
| 20:00 to 26:00 | Back extension and side planks | Swimming prep, back extension, side-plank progression each side | 6 to 8 reps, then 15 to 30 seconds per side |
| 26:00 to 30:00 | Cool-down | Chest opener, child’s pose, upper-back and neck release, closing breath | 20 to 40 seconds each |
How the Minutes Are Organized
The clock is a guide, not a drill sergeant. If a block runs over, trim reps in the next one instead of skipping the cool-down.
Why this order works
Mobility comes first because stiff thoracic and shoulder-blade movement pushes the work into the neck and lower back. The arm series follows because it loads the shoulders lightly and rehearses the shoulder-blade control that planks demand. Planks come before push-ups because holding still is easier to do cleanly while fresh, and push-ups come before back extension so the front of the shoulder is not tired from pushing while you ask the back of the body to lift. The side plank sits late because it is demanding and benefits from warm shoulders, but it is short enough that fatigue should not wreck form.
Work, rest and transitions
Plan on 10 to 20 seconds of rest between moves, which is mostly the time it takes to reset your hands and breathe. Move between positions deliberately: from quadruped to forearm plank, step the knees back one at a time. Keep a timer where you can see it, ideally one that beeps at five-minute marks, so you are not checking a phone during holds. If a transition takes more than 20 seconds, fold in one fewer round of the following block.
Breath and Tempo Across the Session
Pilates teaching connects each move to a breath, and the connection matters for pacing as much as for form.
The breathing pattern to use
For moves with a clear effort phase, inhale to prepare or to lower and exhale as you press, lift or reach. A Pilates arms-and-abs routine from a university fitness article puts the same rule plainly: inhale as you prepare, exhale as you exert. For holds, breathe steadily into the sides and back of the ribcage and keep the exhale long enough that the ribs stay drawn down. If you catch yourself holding your breath, shorten the hold.
Tempo and counting
Move slowly enough that you could stop at any point in the rep. A useful starting tempo is about two counts to lower and two counts to press for push-ups and triceps work, and a steady four-count rhythm for arm series reps. Fast reps let momentum do the job, which defeats the point of Pilates control and leaves the shoulders doing less careful work than they appear to.
Minutes 0 to 5: Warm-Up for Scapular and Thoracic Mobility
This block wakes up the upper back and the shoulder blades so the later weight-bearing work starts from moving joints instead of cold ones. Keep every move small and smooth, and stay well within a comfortable range.
Thoracic Mobility
Two all-fours moves take the upper back through rotation and through flexion and extension. Hospital physiotherapy handouts, including a set from Cambridge University Hospitals on thoracic spine exercises, describe all-fours rotation and cat-cow style arching as standard ways to mobilize the mid-back.
All-fours thoracic rotation
Start on hands and knees with the wrists under the shoulders and the knees under the hips. Place one hand lightly behind your head, exhale and rotate the elbow toward the opposite wrist, then inhale and open the elbow toward the ceiling, turning from the ribcage while the hips stay square. Do 6 to 8 reps per side. The usual mistake is swinging from the lower back; keep the pelvis still and let the movement come from the upper back. For an easier version, shorten the range, and if the wrist hurts, rest the supporting hand on a rolled mat edge or use a loose fist.
Cat-cow with a gentle ribcage focus
From the same position, inhale and let the chest glide forward and the tailbone lengthen away as the spine extends comfortably, then exhale and round through the back, drawing the belly toward the spine. Do 6 to 8 slow cycles. The cues that matter are keeping the neck long, avoiding cranking the head up in extension, and keeping the movement spread across the whole spine instead of folding at the lower back. Reduce the range if the neck or lower back complains, and add a little more rotation only after the movement feels fluid.
Scapular Awakening
Two further moves rehearse the shoulder blades gliding on the ribcage, the exact skill planks and push-ups will ask for in a few minutes.
Sternum drops
From hands and knees with straight arms, let the chest sink gently between the arms as the shoulder blades draw toward each other, then press the floor away and let the blades spread wide again. A Pilates upper-body routine from HealthPartners describes this as imagining the torso moving like an elevator between the arms, with about 12 reps, in its upper body home Pilates workout. Keep the elbows straight, the movement small, and the lower back from sagging. Exhale as you press away.
Scapular push-up prep
Move to a wall, an incline such as a sturdy counter, or the floor on your knees, with straight arms under the shoulders. Keep the shoulders back and down and not shrugged, let the chest lower a small amount, then push back to the start without bending the elbows. A MacEwan University exercise guide on scapular push-ups says this move mainly challenges the serratus anterior, a muscle along the side of the ribcage that helps hold the shoulder blade against the back, and suggests starting wall-assisted before kneeling. Do 8 to 10 careful reps. The usual mistakes are letting the lower back cave and letting the neck poke forward.
Minutes 5 to 10: Arm Series
Pilates arm work is slow and posture-focused, closer to controlled shoulder-blade practice than to a gym bicep session. You can do all of it with empty hands, with light weights, or with a band, and the moves are the same either way.
The Arm Series Moves
Stand tall with the feet hip-width apart, knees soft, ribs stacked over the pelvis and the shoulder blades wide on the back. You can also sit on a chair or the mat if standing is uncomfortable. Do 8 to 12 reps of each move, roughly a minute per move, resting briefly as you change.
Biceps curl with a stable ribcage
Hold weights, the two ends of a band under your feet, or nothing at all, with palms facing forward and elbows at your sides. Exhale and curl the hands toward the shoulders, keeping the elbows fixed beside the ribs, then inhale and lower slowly. Cal Poly’s arms workout suggests 15 to 20 reps for lighter curls, but for a short session 8 to 12 controlled reps is plenty. Common mistakes are swinging the arms, letting the ribs flare as the hands rise, and shrugging. If the shoulders feel tired, rest the elbows in against a wall or reduce the load to nothing.
Forward or overhead press
Start with hands at shoulder height, elbows bent. Exhale and press the hands forward and up on a slight diagonal, then inhale and lower with control. Keep the neck long and the shoulder blades from climbing toward the ears. People with shoulder history should keep this press in front of the body and below an overhead range that provokes symptoms, as noted in the earlier safety section. An easier option is a forward press at chest height. A harder one is a slow four-count lowering phase.
Side raise to shoulder height
Hold the arms at your sides with a slight bend in the elbows. Exhale and lift the arms out to the sides, stopping at about shoulder height, then inhale and lower slowly. The torso should not lean or swing. Many people find the movement easiest with no weight at all, because the arm itself is a meaningful load for small shoulder muscles. Common mistakes include lifting above the shoulders, rolling the shoulders forward, and letting the neck tense. Try a smaller range if the top of the shoulder pinches.
Body Weight, Band or Light Weights
All three versions train the same pattern, so choose the one that lets you keep form for every rep.
The empty-hands version
Without resistance, the arm series becomes a shoulder-blade control drill: move slowly, keep the hands in view, and focus on the neck staying long while the arms travel. Adding a count of four to lower makes empty hands more demanding than most people expect. This is also the right starting point if you are returning from a break or are new to the pattern. Another useful variation is small controlled arm circles, which keep the shoulders moving without any load, with the circles kept within a pain-free range.
Adding a band or light weights
A looped or flat band under the feet offers smooth, continuous resistance, and a pair of light hand weights offers a fixed load. Both change how hard the move feels, but neither replaces the posture cues. If the weight makes the shoulders rise, the ribs flare or the elbow lock out forcefully, it is too heavy for this session. Stop adding load when the last two reps are demanding and the form stays unchanged. Keep any weight you use at a level the shoulders tolerate without any pinching.
Minutes 10 to 15: Plank Progressions
Planks teach the shoulders to work while the trunk stays steady. Everyone has a plank that shakes at some point, and a trembling hold is information, not failure: it usually means the muscles are working near their current limit.
Quadruped and Forearm Plank
These two holds are the low-load entry to front support and a good place to practice shoulder-blade control.
Quadruped hold with opposite reach
Set up on hands and knees with the wrists under the shoulders and the knees under the hips, holding the spine neutral. A HealthPartners routine describes the bird dog as extending the opposite arm and leg in line with the spine while keeping the hips level, without arching the back or letting the belly sag, as laid out in its upper body Pilates routine. Exhale as you reach, inhale as you return. Hold each side for 15 to 20 seconds, or simply reach one limb at a time. If balance is the issue, extend only the leg or only the arm.
Forearm plank
From hands and knees, lower to the forearms with the elbows under the shoulders and the forearms parallel or hands lightly clasped. Step the knees back until the body forms a line from head to heels or from head to knees. Draw the ribs down, press the forearms into the mat so the shoulder blades stay wide, and keep the neck long, looking at the floor just ahead of the hands. Hold 20 to 40 seconds. The forearm position removes wrist extension, so it is a common choice for tender wrists. Easier option: knees down. Harder option: lift one foot slightly for a few seconds. Common mistakes are sagging at the lower back and hiking the hips.
Full Front Support
Front support is the plank on straight arms. It asks the most of the shoulders and wrists, so earn it with the first two holds.
Front support from quadruped
A Human Kinetics description of the front support Pilates exercise sets up in quadruped with the hands under the shoulders and a neutral spine, then extends one leg back on an exhale, and the second on an inhale, to a straight line with the feet hip-width apart. It describes holding for 30 to 60 seconds, and cues thinking of the body as an immovable bridge with the shoulder stabilizers and trunk engaged throughout. For this session, hold 20 to 45 seconds. Come down with control if the hips sag or the shoulders sink between the blades.
Easier and harder front-support options
To make it easier, place the hands on a wall, a counter or a sturdy bench, or stay on the knees. Make it harder by holding longer or by adding plank arm marches, where you alternate pushing from forearms to hands while keeping the hips fairly still, an option that appears in an ACE Fitness triceps workout. The same Human Kinetics description warns that when form is sacrificed for repetitions, the trunk and the shoulder region can collapse, so the progression should follow your alignment, not the stopwatch.
Minutes 15 to 20: Push-Ups, Triceps and Chest
This block is the heart of the session for the chest and the back of the arms. Choose the push-up level that lets you complete every rep with a straight body line, and use the same level through both rounds.
Push-Up Progressions
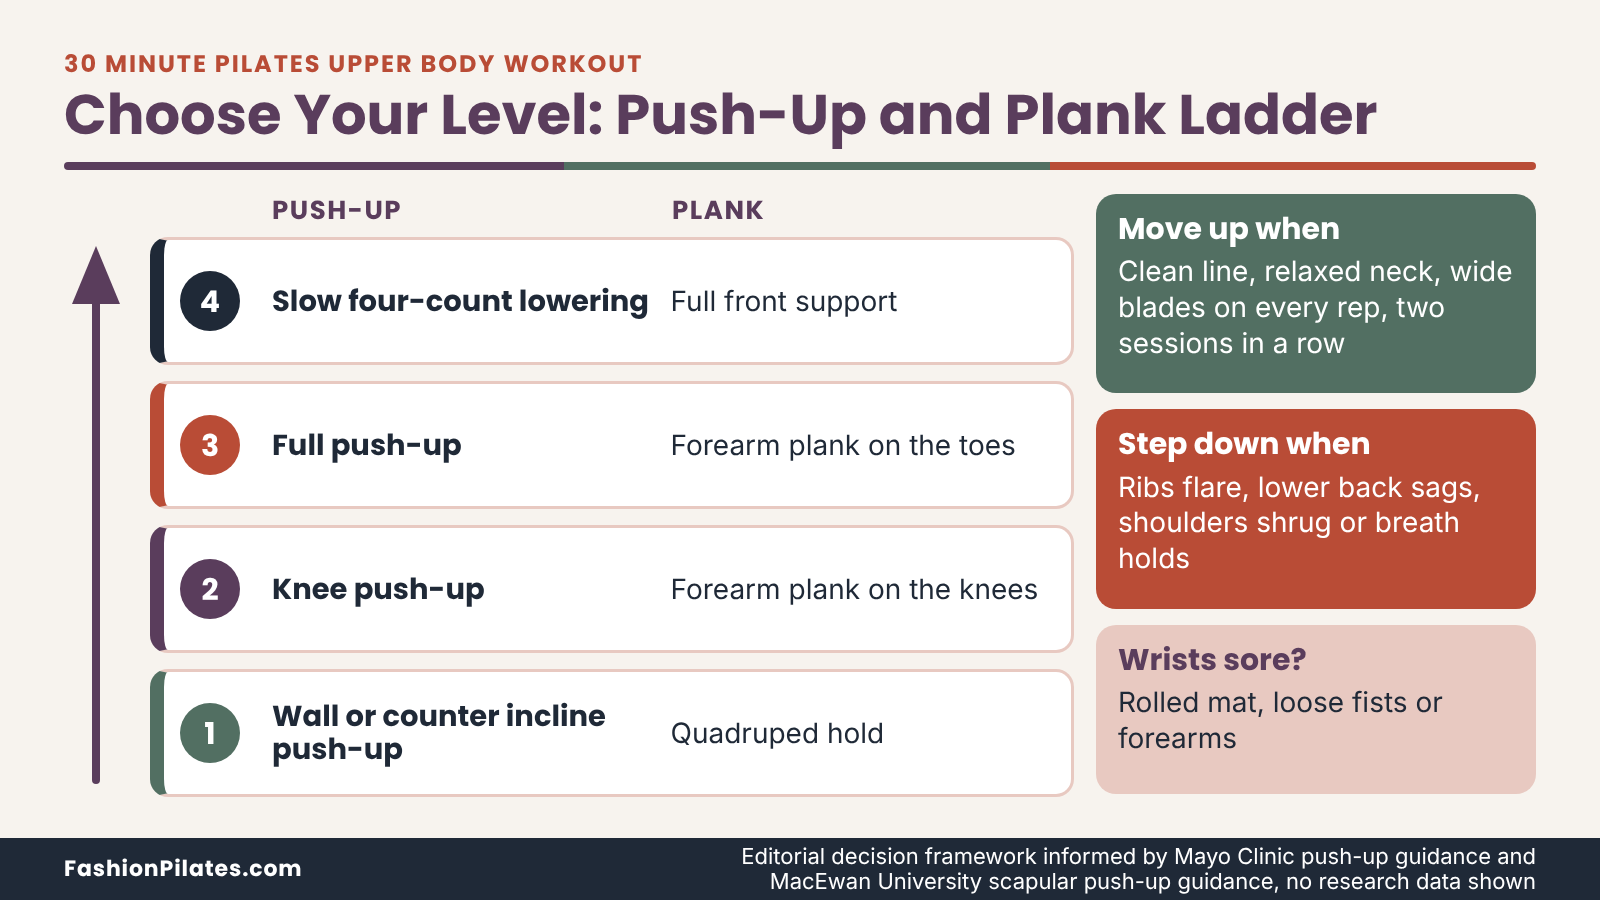
The three levels below change the load by changing the angle of the body. Move up only when the lower level feels controlled and calm.
Incline push-up
Place the hands on a wall, counter or sturdy bench, slightly wider than the shoulders, and step the feet back until the body forms a straight line. Mayo Clinic’s page on push-ups and modified push-ups describes a wall version in which you lower the chest toward the wall with the core contracted and then push back. Inhale as you bend the elbows, exhale as you press. Do 6 to 10 reps. Mistakes to watch: elbows flaring far out, the head dropping forward, or the hips poking back. Lower the incline for more challenge.
Knee push-up
Kneel on the mat with the hands slightly wider than the shoulders and the body in a straight line from head to knees. Lower the chest with control as the elbows bend, then press back to the start. The line from head to knees should stay unbroken, so avoid dropping the hips back toward the heels. Do 5 to 8 reps. If the wrists object, rest the heels of the hands on a rolled mat or use the incline instead. A harder version is the knee push-up with a four-count lowering phase.
Full push-up
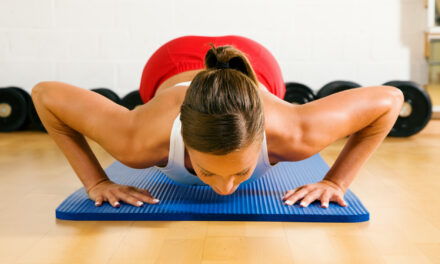
From a front support on the toes with the shoulders over the wrists, bend the elbows and lower the chest in a single line, then press away without letting the lower back sag or the ribs flare. Keep the neck neutral. Do 3 to 6 slow reps and stop when the line begins to break, even if the target is not met. For a harder challenge, lower slowly, pause for one count above the floor, or raise the feet on a low step. The usual mistakes are leading with the chin, shrugging and half-range reps.
Triceps and Chest Work
Triceps and chest work follow the push-ups and use a Pilates classic plus a short opener to balance all the pressing.
Pilates triceps push-up
In the traditional mat Pilates push-up, you stand, roll down, walk the hands out into a plank, bend the elbows toward the ribs for three to five reps, and walk back. Pilates Anytime classes this movement as intermediate and cues drawing the elbows into the ribcage while avoiding sinking in the shoulder girdle or pelvis, according to its Pilates push-up exercise page. A simpler session-friendly version is a narrow knee push-up with the elbows tracking back along the body. Do 5 reps, keeping the hands under the shoulders and the shoulders away from the ears. Skip the full roll-down if the neck or lower back is irritable.
Chest opener
Finish each round with a short chest stretch to balance all the pushing. Kneel or stand tall, clasp the hands behind the back or hold the elbows behind you without forcing, exhale and gently lift the chest while the ribs stay drawn down. Hold for 20 to 30 seconds and breathe into the sides of the ribcage. Keep the neck long and the shoulders away from the ears. If the shoulders feel tight or pinch, let the arms rest lower behind you, or stretch one arm at a time out to the side.
Minutes 20 to 26: Back Extension and Side Planks
After a lot of pushing, this block trains the muscles along the back of the body and the sides of the trunk. It keeps the session balanced and gives the shoulders a different job to do.
Swimming Prep and Back Extension
Lie face down with the legs long, the forehead resting on the mat or hovering lightly, and the arms extended in front. These moves are small and precise. Lifting higher does not make them better.
Swimming prep with one limb at a time
Start with the arms reaching forward and the legs long and slightly apart. Exhale and lift one arm and the opposite leg a short distance, keeping the neck long and the belly lifted away from the mat, then inhale to lower and switch. Pilatesology describes the full Swimming exercise with cues to keep the neck muscles long and the belly lifted, to control the legs from the seat, and to reach in opposite directions, and it classifies the movement as advanced, in its Swimming exercise encyclopedia entry. Do 6 to 8 lifts per side. Common mistakes are cranking the head up and letting the lower back take over. Lift less if the lower back pinches.
Small back extension
With the hands beside the shoulders or in front of the chest, press the pubic bone and the tops of the feet gently into the mat, then exhale and lift the head and chest a short way, keeping the eyes down and the neck in line with the spine. Inhale to lower. Reach the crown of the head forward as you lift instead of tipping the chin up. Do 6 reps. The ribcage should lift in one smooth piece rather than the lower back folding. For a gentler version, keep the hands on the mat and lift only a few inches, or skip the move if you are pregnant or have been advised to avoid back extension.
Full swimming as a later option
Once swimming prep feels steady, you can lift both arms and both legs together and then flutter them in alternation. A HealthPartners routine describes the swimmers as fluttering the arms and legs with controlled movement and focusing on control instead of maximum height, with 20 alternations in its set. The Pilatesology entry pairs the flutter with a long breathing rhythm, about five counts in and five counts out. Because Pilatesology marks this movement as advanced, keep it out of your first month and shorten the set if the neck or back tires.
Side Plank Progressions
The side plank challenges the shoulder, the side of the trunk and the hips in one move. Because the load sits on one arm, go slowly and use the lowest version that feels strong.
Side plank from the knees or forearm
Lie on one side with the knees bent, prop onto the forearm with the elbow under the shoulder, and lift the hips so the line from head to knees is straight. Exhale as you lift, then hold for 15 to 30 seconds, breathing into the top ribs. A MacEwan University guide to the side plank pose offers kneeling and fisted-hand variations as easier options and cues lifting through the hips to avoid straining the shoulder. Keep the neck long and the ribs stacked. Mistakes include letting the lower hip sink and shrugging toward the ear.
Full side plank
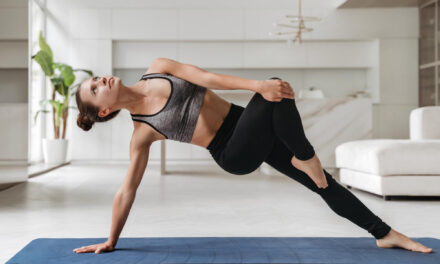
From the same setup, straighten the legs and stack or stagger the feet, pressing the forearm into the mat and lifting the hips until the body forms a single line from the head to the feet. Hold 15 to 30 seconds on each side. The same MacEwan guide describes stacking the feet and lifting the top arm overhead, and lifting the top leg as an additional challenge. If you want more stability, stagger the feet with the top foot in front. If the shoulder objects, return to the knees or skip the arm lift.
Minutes 26 to 30: Cool-Down
Four minutes is enough to let the heart rate settle and to stretch the areas that worked hardest. Move slowly, stay inside a comfortable range, and avoid forcing any stretch.
Stretch and Release
The cool-down targets the chest, the upper back and the neck, where tension tends to collect after a session of pushing and holding.
Child’s pose with reaching arms
Sit back toward the heels with the knees apart or together and the arms stretched forward on the mat. Let the forehead rest down, breathe into the back of the ribcage, and walk the hands slightly to one side and then the other to feel the side body lengthen. Stay 30 to 40 seconds. If the knees or ankles object, place a folded towel behind the knees or sit on a cushion. Skip the deep fold if you are pregnant and it presses on the belly.
Gentle chest and neck release
Stand or sit tall, clasp the hands behind the back or hold a towel behind you, and let the chest open without leaning the ribs forward. Then let the ear lower toward one shoulder without pulling on the head and breathe for three slow breaths on each side. Stop if the stretch pinches or sends tingling into the arm. Keep each hold to 20 to 30 seconds and let the shoulders rest away from the ears.
Closing Breath and Check-In
The last minute is for settling and for noticing how the session felt, which helps you plan the next one.
Three slow ribcage breaths
Sit or lie comfortably, place the hands on the sides of the lower ribs, and breathe in slowly through the nose so the ribs widen under the hands. Exhale gently and feel the ribs draw back together. Repeat three times. This keeps the breath connected to the ribcage, which is the same cue used during every hold. If lying on your back, avoid staying there for a long time if you are pregnant, and sit instead.
A 30-second self-check
Take a moment to notice the wrists, shoulders, neck and lower back. Mild muscle fatigue in the arms, chest and upper back is normal. Sharp pain, pinching, tingling or a feeling that one joint worked far harder than the muscles should be noted and addressed before the next session, by choosing an easier option or checking with a clinician. A brief note in a phone or notebook, such as which push-up level you used, makes progression much easier later.
Weekly Schedule and Busy-Day Versions
A session you can actually fit in beats a perfect one you skip. This section shows where upper-body work sits in a normal week and how to shrink the session without losing the structure.
Where the Session Fits in Your Week
Two sessions a week covers the basics for most people, and a third is optional once recovery feels good.
Two sessions with recovery between
The CDC recommends muscle-strengthening activity at least two days a week, and Mayo Clinic suggests allowing a full day of rest between workouts that train the same muscle group. A practical pattern is to place this session on two nonconsecutive days, such as Tuesday and Friday, and leave the days between for lower-body, trunk, walking or gentle mobility. If your shoulders feel tender the day after, take an extra day or lower the load instead of pushing through.
Pairing it with other Pilates days
This session works well beside a lower-body or full-body Mat Pilates day, because the two do not compete for the same muscles. See our Pilates workout schedule for the week for a full pattern, and browse the wider Targeted Pilates Workouts hub for lower-body and core sessions to pair with it. Keep the hardest upper-body session away from the day you do your heaviest chest, shoulder or arm work in other training.
| Day | Session | Why it works |
|---|---|---|
| Monday | Lower-body or full-body Mat Pilates | Trains different muscles and leaves the shoulders fresh |
| Tuesday | 30-minute upper-body session | First upper-body day of the week |
| Wednesday | Walk or gentle mobility | Light movement while the upper body recovers |
| Thursday | Core or lower-body Pilates | Another day away from heavy pushing |
| Friday | 30-minute upper-body session, or 15 or 20 minutes on a busy day | Second upper-body day, at least a full day after the first |
| Weekend | Optional walk, stretch or rest | Recovery and variety |
15- and 20-Minute Cut-Downs
When the clock is tight, keep every block and shrink each one, so the shortened session is still a real 30 minute pilates upper body workout in miniature, just with fewer rounds. Dropping a block entirely, usually the cool-down or the warm-up, is what tends to leave the shoulders cranky.
The 15-minute version
Spend three minutes on the warm-up with rotation, sternum drops and scapular push-up prep, three minutes on one round of the arm series, three minutes on a forearm plank and a quadruped hold, three minutes on push-ups and triceps work, two minutes on swimming prep and one side plank each side, and one minute on child’s pose and a chest opener. Use the lowest comfortable level for every move and move on when the timer says so.
The 20-minute version
Give the warm-up four minutes, the arm series four, the plank block three, push-ups and triceps four, back extension and side planks three, and the cool-down two. That keeps the order and the push-pull balance while trimming each round to a single pass. On days when time slips, drop one round of the push-up block rather than cutting the warm-up.
| Block | 15 minutes | 20 minutes | 30 minutes |
|---|---|---|---|
| Warm-up | 3 | 4 | 5 |
| Arm series | 3 | 4 | 5 |
| Plank progressions | 3 | 3 | 5 |
| Push-ups, triceps and chest | 3 | 4 | 5 |
| Back extension and side planks | 2 | 3 | 6 |
| Cool-down | 1 | 2 | 4 |
Soreness, Progression and Mistakes
Upper-body work in the shoulders and arms is easy to overdo because the muscles are small and the moves feel gentle. This section covers how to tell normal soreness from a warning sign, how to build the session over a month, and the mistakes worth catching early.
Soreness Versus Pain
Some muscle soreness is a normal response to new work. Pain that behaves differently deserves attention.
What ordinary soreness looks like
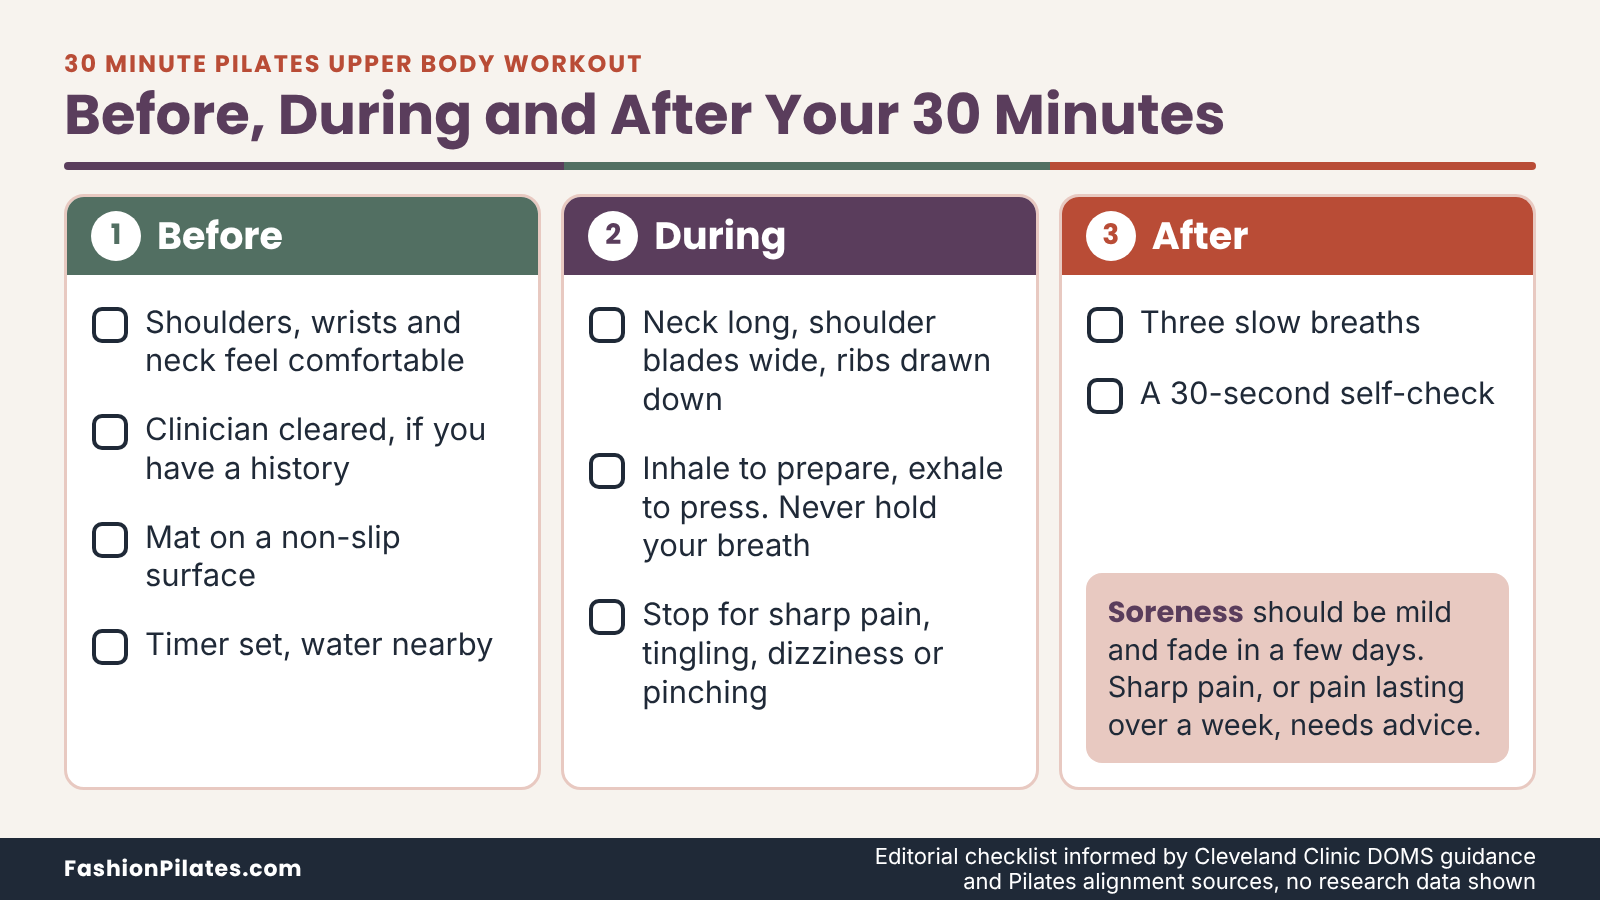
Cleveland Clinic describes delayed onset muscle soreness as discomfort that typically begins one to three days after challenging exercise, affects the muscles you worked, and usually resolves within a few days, rarely lasting beyond five, in its overview of delayed onset muscle soreness. In this session that usually means a dull, achy tiredness in the triceps, chest, upper back or the sides of the trunk. It tends to feel better with gentle movement, and it should not stop you from doing daily tasks.
Signals to stop and get advice
The same Cleveland Clinic page contrasts soreness with injury pain, which tends to feel sharp and constant, and advises seeing a provider when pain lasts more than a week, is sharp and constant, comes with severe swelling, or interferes with normal movement. For this routine, add your own stop rules: sharp pinching in the shoulder, pain that wakes you at night, numbness or tingling in the hands, dizziness, or pain that travels down an arm or leg. Stop the move, choose an easier option or end the session, and check with a qualified clinician if it recurs.
A Four-Week Progression
Progress by changing one thing at a time. A new level, a longer hold or a little extra load is enough for any single week.
The four-week plan
Use the table below as a template and adjust to how your shoulders and wrists respond. If any week brings sharp pain or lingering soreness, repeat the previous week instead of moving on.
| Week | Focus | What to change | Check before moving on |
|---|---|---|---|
| Week 1 | Learn the order and the cues | Easiest option for each move, one round of the plank and push-up blocks, empty hands in the arm series | Can you finish every move without shrugging or holding your breath? |
| Week 2 | Add volume | Two rounds of the plank and push-up blocks, add 5 seconds to holds | Does the plank line stay unbroken in round two? |
| Week 3 | Add one challenge | Move one exercise up a level, or add light weights or a band to the arm series | No sharp pain, and the shoulders feel normal the next day |
| Week 4 | Consolidate | Keep the week 3 levels, slow the lowering phase to a four-count tempo | Can you repeat the session twice with clean form? |
When to move up a level
Move up when you can complete every rep or hold with the body line intact, the shoulder blades staying wide, and the neck relaxed, across two sessions in a row. If the quality falls apart in the last reps, stay put. When you do progress, change only one variable: the push-up level, the plank length, or the resistance, not all three. Going back a level after a rough week is part of a sensible plan.
Common Mistakes and Quick Fixes
Most problems in this session trace back to a handful of habits, and each has a simple fix.
Shrugging, neck tension and flared ribs
The most common fault is letting the shoulders creep toward the ears while the neck tightens, often with the ribs flaring forward in a plank or press. The fix is to shorten the lever, with knees, an incline or shorter holds, then restore the cue of long neck, wide shoulder blades and ribs drawn gently down. Looking at a spot just ahead of the hands, not at the wall, keeps the neck neutral. If the cue disappears when the move gets harder, you have found your working level.
Rushing, skipping the warm-up and adding too much too fast
Tight schedules tempt people to skip the warm-up or to speed through reps, and both reduce the quality of the work. Keep the mobility block even on the 15-minute version, move slowly enough to feel each position, and resist adding weight or a harder level more often than once a week. Doing this session on consecutive days, or stacking it on top of a heavy gym chest day, is another way to turn mild soreness into a nagging shoulder.
Frequently Asked Questions
Is a 30-minute Pilates session enough to build upper-body strength?
For most people starting out, yes, as long as the work is challenging enough that the last reps are hard with clean form. Federal activity guidance recommends muscle-strengthening on at least two days a week that includes the chest, shoulders, arms and back. A short, focused session twice a week can meet that for the upper body. You will need to progress the push-up level, hold times or resistance over time to keep adding challenge, and you will still want lower-body and trunk work elsewhere in the week.
Do I need weights or a resistance band?
No, the whole session works with body weight on a mat. Hand weights and bands are optional ways to make the arm series harder once the empty-hands version feels easy. If you add them, start very light, and increase only when form stays clean through the last repetitions. Stay with body weight on days when your shoulders feel irritated.
How often should I do an upper-body Pilates session?
Two sessions a week with at least a day of rest between them is a good starting point. A third session can work if your shoulders and wrists feel fine the next day, but it is not required. If you are sore enough that daily tasks feel hard, take an extra day. Short 15 or 20 minute versions can fill in on busy days without breaking the pattern.
What if my wrists hurt in plank and push-up positions?
Try changing the angle and the surface before giving up on the moves. A rolled mat under the heel of the hand, loose fists or the forearm version of the plank all reduce wrist bend. Incline versions on a wall or counter also lighten the load. If the pain is sharp, if the hands tingle or go numb, or if it lingers after the session, stop and speak with a clinician.
Can I do this workout with shoulder pain or a past shoulder problem?
That depends on the problem, so check with your clinician or a qualified Pilates professional first. Some people with a past impingement diagnosis or surgery can do modified versions of many moves, while others need to avoid planks, push-ups or overhead work for a while. The American Academy of Orthopaedic Surgeons notes that early management often means avoiding the overhead activities that bring on symptoms. Do not push through pinching, night pain or new weakness.
Will this tone my arms or slim them down?
The session builds strength and endurance in the muscles of the arms, shoulders, chest and back, which can change how those muscles feel and work. It cannot choose where your body stores or loses fat, because the evidence does not support targeting fat loss to one body area. Changes in body composition depend on overall habits, not on one session. Judge progress by how many reps you can complete with good form, how long you can hold a plank, and how your shoulders feel.
Is this routine safe during pregnancy or after childbirth?
This sequence was not designed for pregnancy or the postpartum period, so speak with your obstetric provider before trying it. Front-support work, lying face down and long stretches on the back typically need adjusting as pregnancy progresses. After childbirth, planks and push-ups load the abdominal wall and pelvic floor, and the right timing depends on your delivery and recovery. A prenatal- or postnatal-trained Pilates instructor can build a safer version for you.
What if I cannot do a full push-up yet?
That is completely normal, and the incline and knee versions exist for exactly this reason. Start with the wall or a counter, then lower the incline gradually over the weeks. The goal is a straight body line and a controlled lowering phase, not the label on the exercise. Move up a level only when you can complete every rep cleanly across two sessions in a row.



Trackbacks/Pingbacks