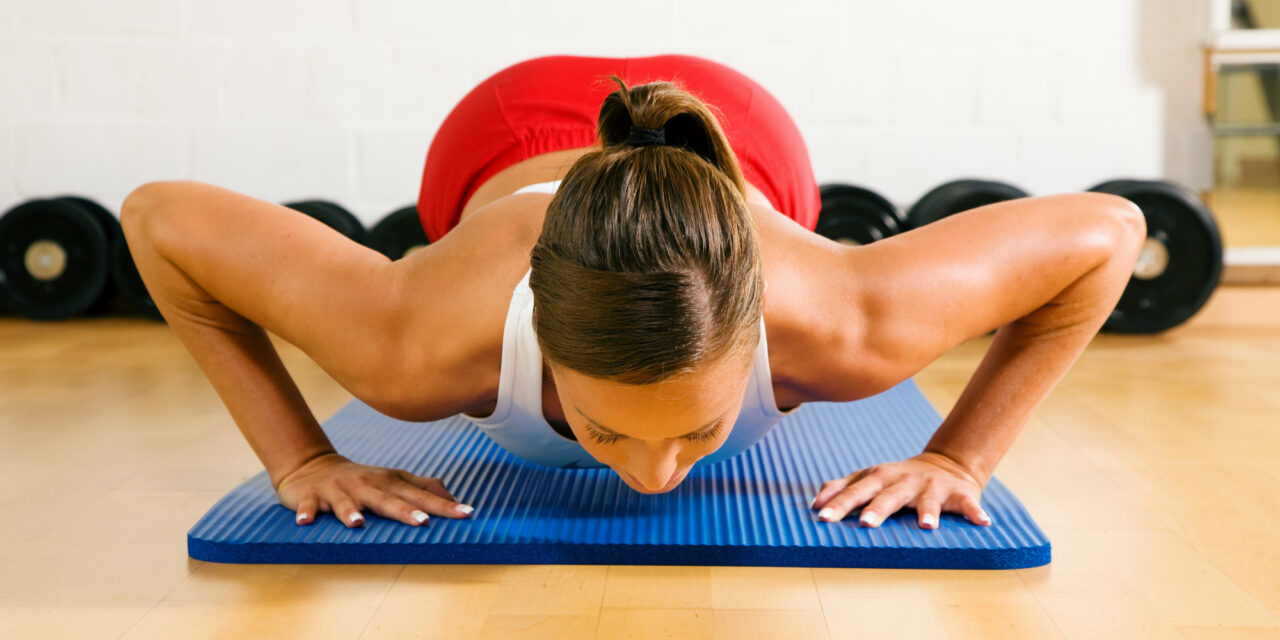
Direct answer: This 20 minute intermediate mat pilates upper body workout trains the shoulders, upper back, chest and arms with eleven short bodyweight moves, while your trunk works as a steady base. It runs 4.5 minutes of warm-up, 13 minutes of main work built around the Pilates push-up, front support, swan prep with swimming, triceps dips and the side bend, then 2.5 minutes of cool-down. You need a mat and a few feet of floor, nothing else. Move slowly, keep breathing, and stop any exercise that causes sharp pain.
This guide is for people who already know their way around a Mat Pilates class and want a compact session that leaves the legs alone for a day. It is a research-based, expert-informed routine built from published exercise descriptions and public health guidance; it was not run through hands-on testing, and it is general fitness education rather than individualized medical advice. If you are newer to the method, start with a beginner Mat Pilates workout and come back when front support feels steady.
What Intermediate Means for a 20-Minute Upper Body Session
“Intermediate” is one of those labels that every studio defines a little differently, like “medium” at a coffee shop. Before you commit twenty minutes, it helps to know what this routine assumes you can already do, and what it honestly can and cannot deliver.
What “intermediate” means on the mat
On the mat, intermediate is less about fancy shapes and more about control under load. The exercises here ask your shoulders to stay organized while your arms bear body weight, and they ask you to keep breathing while they do it.
The skills this routine assumes
You should be able to hold a straight-line front support (a plank on straight arms) for about thirty seconds without your lower back sagging or your shoulders creeping toward your ears. You should also be able to roll down from standing and back up with control, lie face down and lift your chest slightly without cranking your neck, and coordinate an inhale and an exhale with movement. If a classic hundred, a roll-up or a basic plank is still a work in progress, build those first; there is no prize for skipping ahead, and the shoulders are not a joint that rewards impatience.
Signs you are ready, and signs to wait
A good readiness test is a single slow front support with five breaths. If your ribs stay knit together, your wrists feel loaded but not pinched, and you could keep going for a few more breaths, you are in the right place. If your elbows lock hard, your neck tightens, or you are holding your breath to survive, treat that as useful information rather than a verdict. Practice the knee-supported versions in this guide for a few weeks, then test again. Many people spend a long time between “beginner” and “intermediate,” and that is a normal stretch of the road.
What an upper body session can and cannot do in 20 minutes
Twenty minutes is a short window, which is exactly why it works for a lot of schedules. It also means the routine has to be selective, so it helps to be clear about the target.
What “upper body” covers in Pilates
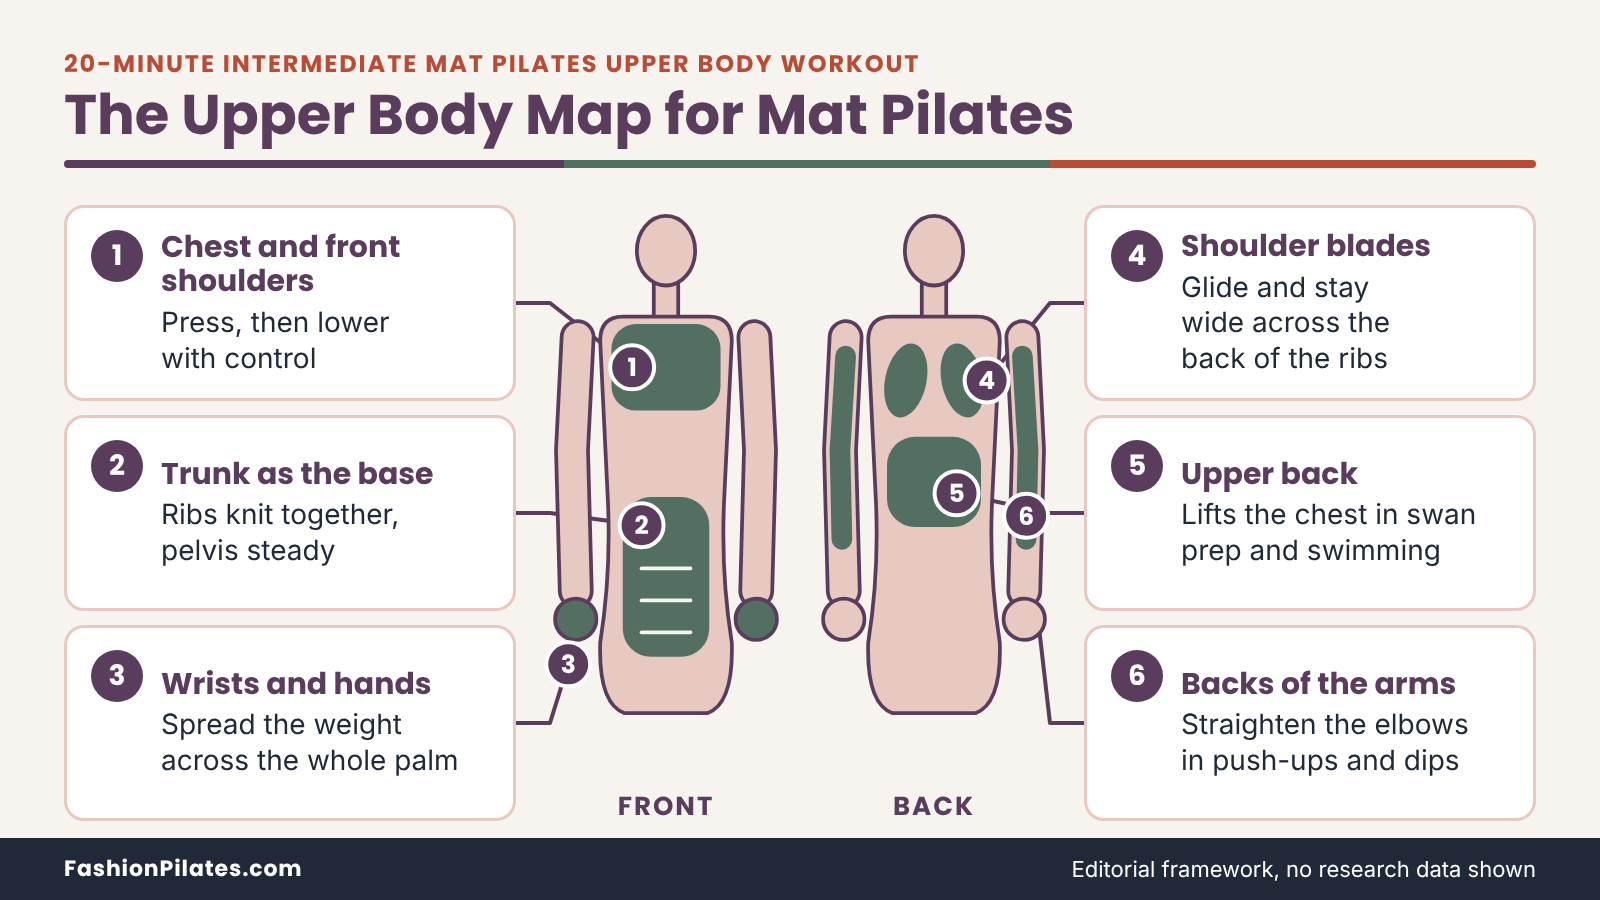
In Pilates, the upper body is more than the arms. The target area includes the muscles around the shoulder blades, the upper back, the chest and the backs of the arms, with the abdominals and hips working underneath as support. That is why a push-up in Pilates is also a trunk exercise, and why a side bend is as much about the waist and shoulder as the arm that holds you up. Nothing here isolates one muscle, and the routine does not claim to change one body area; it simply trains the whole shoulder girdle to share the work.
Realistic expectations
Public health guidance asks adults to do muscle-strengthening activity on two or more days a week that works all the major muscle groups, including the chest, shoulders, arms and back, according to the CDC’s adult activity guidelines. One focused upper body session fits neatly into that picture, but it is a piece of a week, not the whole week. Used consistently, it may support upper body strength and shoulder control. It will not do your legs’ work, and it is not a substitute for any plan your clinician has given you.
Safety and Setup Before You Start
This section is the least glamorous in the article and the one most worth reading. Weight-bearing on the hands and wrists, and extending the spine while prone, are comfortable for many people and unwelcome for others.
Who should check first, and when to stop
The routine is general fitness education. It cannot know your medical history, so the decision to begin sits with you and, where relevant, a qualified professional.
When to ask a clinician or Pilates professional first
Check with a physician, physical therapist or qualified Pilates professional before starting if you are pregnant or postpartum, recovering from surgery, living with osteoporosis, dealing with an acute injury or a current shoulder, wrist, neck or back problem, or managing a chronic condition. This echoes general advice from the Mayo Clinic’s strength training guidance, which recommends talking with a healthcare professional first if you have a chronic condition or safety concerns. Harvard Health likewise notes that a doctor may steer you away from certain Pilates exercises when back or spine issues are present. A professional can also tell you which of the prone and weight-bearing moves below are worth modifying for you.
Stop signals
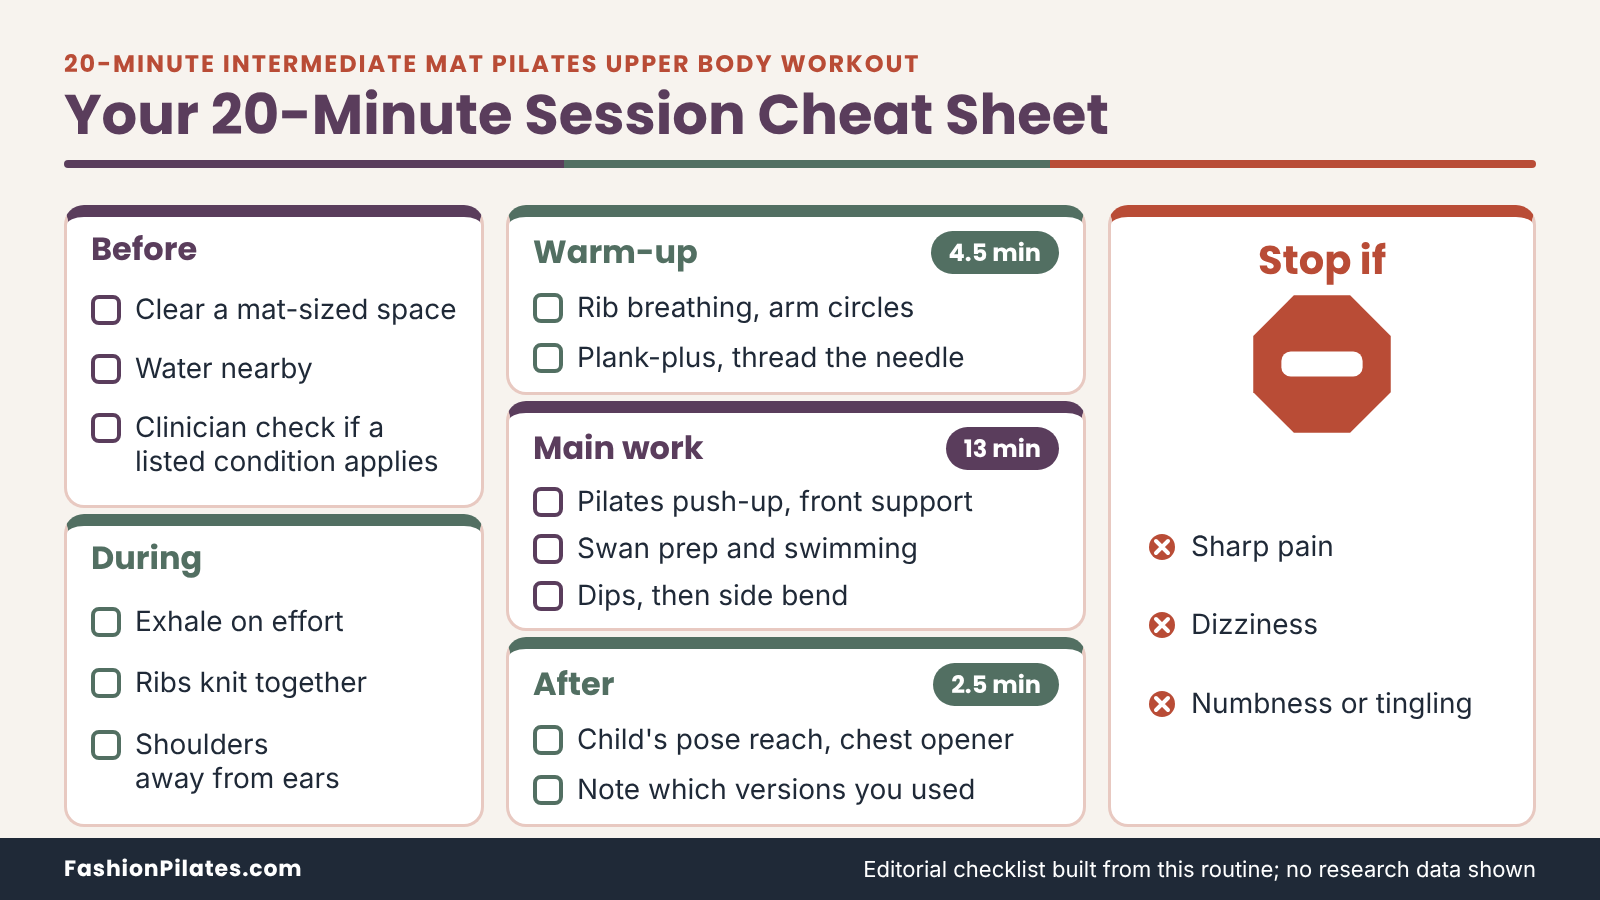
Stop an exercise if you feel sharp or pinching pain, dizziness, numbness or tingling in the hands, chest discomfort, or unusual shortness of breath. The Mayo Clinic advice is simple and worth adopting as a house rule: if an exercise causes pain, stop it. A muscle that is working hard feels warm, shaky and tired; a joint that is complaining feels sharp, pinched or hot. Learn the difference, rest, and if a symptom lingers after you stop, contact a clinician instead of testing it again tomorrow.
Space, mat and clothing
Getting the room right takes about two minutes and removes most of the reasons a short routine goes sideways.
Your mat and the floor under it
You need roughly the length of your mat plus an arm’s reach on each end, since the standing push-up walks your hands forward. Lay the mat on a firm, non-slip surface. A mat with enough cushion helps your knees, wrists and forearms, though a very soft surface can make front support wobbly, so firm and slightly padded tends to be the sweet spot. If you are shopping, our guide to how to choose a Pilates mat explains thickness, grip and length. A folded towel under the wrists or knees is a fine stand-in on a hard floor.
Clothing, hair and the room
Wear something that stays put when you hinge forward and lie face down, and that lets you see your elbows and ribs in a mirror or a quick phone check. Fitted tops make the shoulder line easier to read; anything that slides over your head during the push-up becomes a very unhelpful co-teacher. Tie back long hair, take off rings and bracelets that dig into the mat or wrist, and have water nearby. Silence the notifications, because a buzzing phone is the fastest way to hold your breath mid-plank.
The Pilates Principles That Shape Upper Body Work
The same handful of ideas that run through any good Mat Pilates class decide whether these twenty minutes feel crisp or sloppy. They are easy to name and surprisingly hard to practice while your arms are shaking, which is the whole point of practicing them.
Breath and rib control
Breath is the metronome of the session. It sets your pace, and it is the first thing to slip when an exercise gets hard.
Breathing with the effort
A common Pilates pattern is to inhale to prepare and exhale during the effort phase of a movement, as described in this overview of the six Pilates principles from Cooper Aerobics. In a push-up, that means breathing in as you set up and bend the elbows, then breathing out as you press away. The cues in this routine follow that pattern where it fits, and they never ask you to hold your breath. The Mayo Clinic’s strength training advice makes the same point in plain language: keep breathing throughout, and do not hold your breath during effort.
Keeping the ribs from flaring
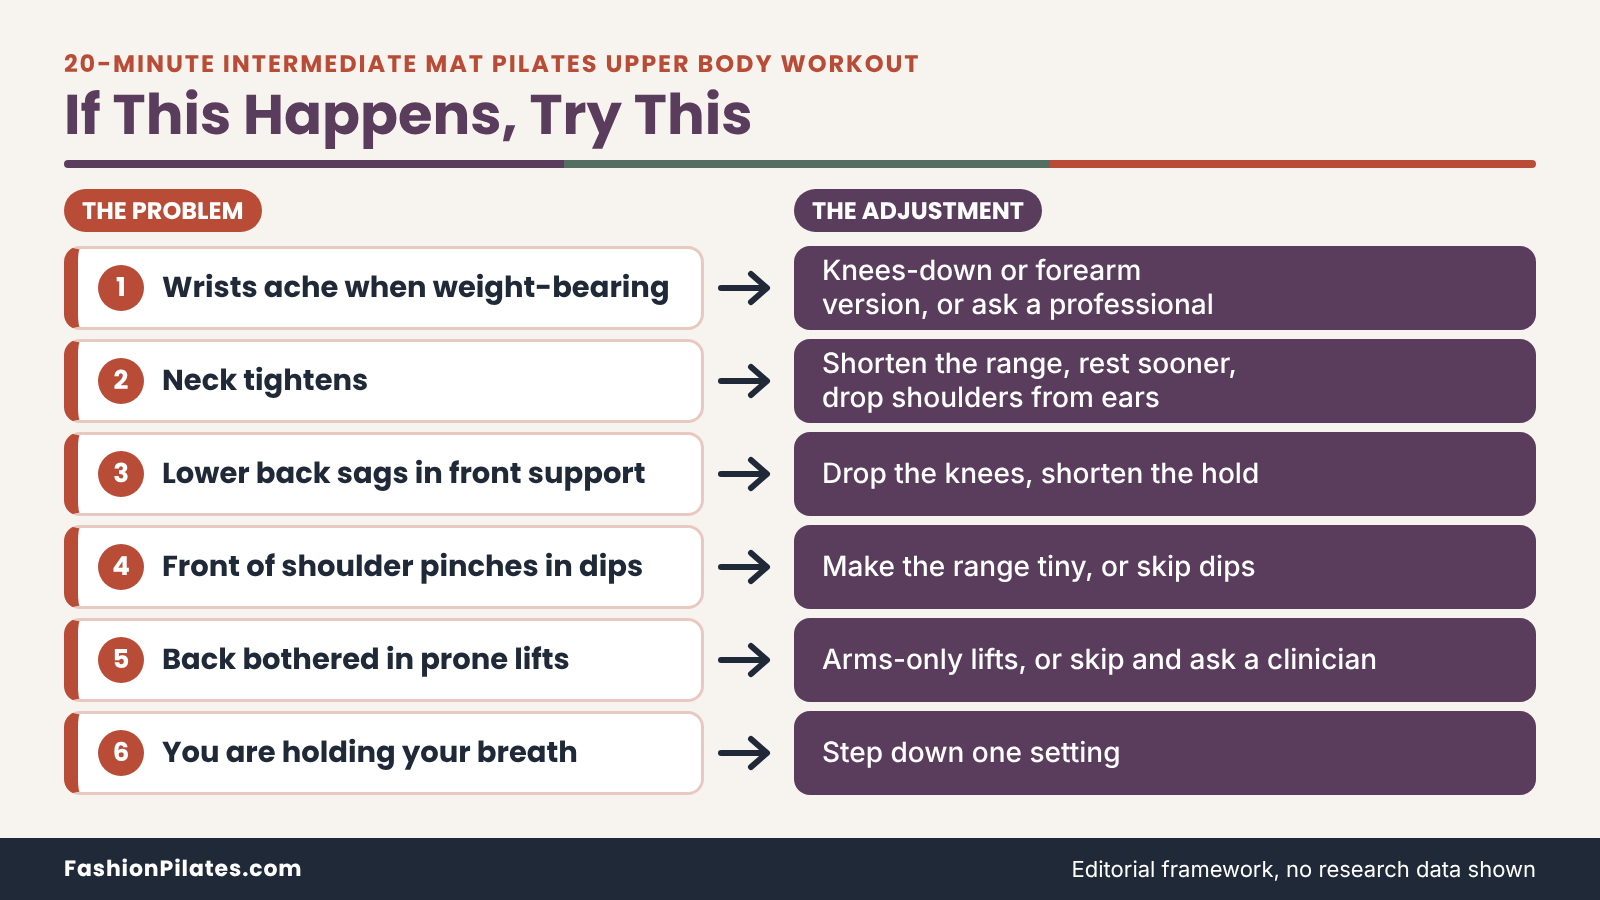
When people tire in a plank or a prone lift, the front ribs often pop forward and the lower back takes over. The fix is subtle: on each exhale, imagine the lowest ribs gliding down and in toward the hips, as if you were zipping a snug jacket from the bottom. You are not clenching or flattening anything; you are keeping the trunk working as one piece. If the cue does not land, a mirror from the side or a short phone video can show you whether your ribs and pelvis are traveling together.
Shoulder blade control
If this routine has a secret, it is the shoulder blade. Almost every exercise below is some version of “move the arm while the blade stays organized.”
What scapular stability means
The shoulder blade (scapula) is the flat bone on your upper back that your arm hangs from, and it needs to glide and rest in a steady spot on the ribcage. A University of Waterloo write-up on how to make the push-up work for you highlights the serratus anterior, a muscle along the side of the ribs that helps control the blade, and notes that weakness there can mean poor blade control. Pilates teachers often cue “wide collarbones” and “press the floor away” for the same reason. The goal is a shoulder that moves smoothly, not one that is pinned in place.
Keeping the neck quiet
Tension at the base of the neck is the most common sign that the arms are working without help from the shoulder blades. Before each hard set, let your shoulders drop slightly away from your ears and lengthen the back of the neck, without tucking your chin hard. Your gaze should follow the line of your spine: down to the mat in front support, slightly forward in swan prep. If the neck still grips, shorten the range, rest sooner, or move to an easier version; the neck is not supposed to be a prime mover in an arm workout.
Precision and tempo
Pilates favors quality over quantity, and a 20-minute window makes that rule easy to follow because there is no time to waste on sloppy reps.
Fewer, better repetitions
The Cooper Aerobics summary puts the precision principle this way: a few exercises done well beat many done carelessly. That matches the rep counts here, which are deliberately modest. Three or four push-ups with elbows tracking back along your ribs is a better investment than ten that drift outward and let the shoulders sink. When your form changes, the set is over, even if the number on the page says there are reps left.
A tempo that does the work
Slow beats fast for control, and control is the point. A useful default is a count of about three to lower and two to press, with no pause that turns into a collapse at the bottom. Slow tempo also keeps momentum from doing the job your muscles should be doing. If you find yourself racing toward the end of a set, you have probably gone past the useful range; stop, breathe, and begin the next set from a clean start.
The Workout at a Glance
Here is the whole session on one page, so you can read it once, glance at it while you move, and print or screenshot it if that suits you.
Your 20 minute intermediate mat pilates upper body workout, minute by minute
The timetable below assumes steady transitions and about ten seconds of reset between moves. Think of the times as a guide rather than a stopwatch you must beat.
| Clock | Move | Main focus | Work |
|---|---|---|---|
| 0:00 to 1:30 | Rib breathing and shoulder-blade glides | Breath, rib control, scapular glide | 6 to 8 breaths |
| 1:30 to 2:30 | Supine arm circles | Shoulder mobility with ribs anchored | 5 each direction |
| 2:30 to 3:30 | Plank-plus on knees | Serratus anterior, blade control | 8 to 10 reps |
| 3:30 to 4:30 | Thread the needle | Upper back rotation | 4 to 5 per side |
| 4:30 to 7:30 | Pilates push-up from standing | Triceps, chest, shoulders, trunk | 2 rounds of 3 to 4 |
| 7:30 to 10:00 | Front support with leg lifts | Shoulder girdle and trunk stability | 2 rounds: short hold, 4 to 5 lifts per side |
| 10:00 to 12:30 | Swan prep and swimming | Upper back extensors | 4 to 5 swan preps, 2 swimming sets |
| 12:30 to 14:30 | Triceps dips | Backs of arms, front of shoulders | 2 sets of 6 to 8 |
| 14:30 to 17:30 | Side bend | Side of the trunk, supporting shoulder | 2 sets of 4 to 5 per side |
| 17:30 to 18:30 | Child’s pose with side reach | Upper back, sides of the torso | 5 breaths each side |
| 18:30 to 20:00 | Chest opener and standing finish | Chest, front of shoulders, breath | 6 slow breaths |
How the clock is divided
The session splits into three parts: a warm-up of about 4.5 minutes, 13 minutes of main work, and 2.5 minutes of cool-down. The warm-up front-loads the shoulder-blade skills you will lean on later, which is why it includes a plank-plus before any weight-bearing set. The two main blocks pair a push or support exercise with a back extension or side-body exercise, so no single muscle group is asked to do everything in a row. Heavier shoulder demands come in the first half, when you are fresh, and the lighter mobility work comes last.
Transitions and rest
Rest is built into the clock but it is short, so plan for it. When you finish a set, drop your knees or sit back into child’s pose for a few breaths, and do not scroll your phone in the gap. The rhythm to aim for is work, reset, work, not work, wander off, come back. If you need a longer pause, take it and let the later moves run a little past twenty minutes; finishing in twenty-three with good form beats finishing in twenty with shaky elbows.
Choosing your version of each move
Every move has three settings: easier, as written, and harder. Treat the “easier” column as a legitimate version of the routine, not a consolation prize.
| Move | Easier | As written | Harder |
|---|---|---|---|
| Plank-plus | Hands on a wall, standing | On hands and knees | From full front support |
| Pilates push-up | Knees down, or hands on a sturdy raised surface | Toes down, elbows tracking back along the ribs | Slow lowering of five counts, or one leg floating |
| Front support with leg lifts | Knees down, small lifts | Straight-line support, alternating lifts | Longer hold with a pause at each lift |
| Swan prep and swimming | Arms-only lifts, forehead down | Small chest lift, then short swimming sets | Longer swimming sets with larger reach |
| Triceps dips | Hips on the floor, tiny elbow bends | Hips just off the mat, knees bent | One leg extended, slower tempo |
| Side bend | Bottom knee down, small lift | Legs stacked, hips lift into an arc | Longer hold at the top with steady breathing |
Scale each exercise on its own
You do not have to be at one level for the whole session. Plenty of people will do the push-up at the standard setting and the dips at the easier one, because wrists, shoulders and strength rarely line up neatly. Pick the version for each move that lets you keep breathing, keep your shoulders away from your ears and keep your trunk in one piece. When form slips within a set, step down a setting for the rest of that set instead of grinding through.
Choosing by the kind of day
Your energy changes, and so should your selection. On a stiff, tired or stressed day, go with the easier column and treat the session as maintenance. On a good day, pick one or two moves from the harder column rather than all of them, so that the quality of the standard moves stays high. A simple rule: if you have to change your breathing pattern to survive a move, it is too hard for today, and tomorrow’s version of you will thank you for stepping down.
Warm-Up: Minutes 0 to 4:30
The warm-up is not a polite formality. It rehearses the two skills the rest of the session depends on: breathing into the ribs and moving the shoulder blades on purpose. Four and a half minutes feels short until you notice how much better the push-up feels afterward.
Rib breathing and shoulder-blade glides (0:00 to 1:30)
Start standing, which saves you a transition and lets you check posture in a mirror if you have one nearby.
Setup and action
- Stand with your feet about hip-width apart, knees soft, and rest your hands lightly on your lower ribs.
- Inhale through your nose and feel the ribs widen sideways into your hands.
- Exhale through your mouth and let the ribs soften down and in, without collapsing your chest.
- After three breaths, lift your arms forward to shoulder height. Inhale and let your shoulder blades spread apart a little; exhale and draw them gently back and down.
- Continue for six to eight breaths in total.
Cues and common mistakes
The most common mistake is shrugging when the arms rise. If you feel your neck tighten, lower the arms a few inches and make the glide smaller. A second pitfall is turning “ribs soften” into a full slouch; the spine stays tall while the ribs move. The movement is tiny by design. It simply tells your shoulder blades that work is about to begin, and it gives your breathing a pattern to hold onto when the later exercises get warm.
Arm circles, plank-plus and thread the needle (1:30 to 4:30)
These three moves take the shoulder through a small range, then load it lightly, then add rotation through the upper back. Think of it as stretching your vocabulary before giving a speech.
Supine arm circles and plank-plus
For the circles, lie on your back with your knees bent and feet flat, and reach your arms straight up above your shoulders. Draw small circles, about the size of a dinner plate, five in each direction, keeping your ribs soft on the mat. Then roll onto hands and knees for the plank-plus: wrists under shoulders, arms straight. Inhale and let your chest sink slightly between the shoulder blades without bending the elbows; exhale and press the floor away so the upper back broadens. Do eight to ten slow repetitions, and keep your lower back long rather than sagging.
Thread the needle
From hands and knees, inhale and lift your right arm toward the ceiling, opening the chest to the right. Exhale and slide that arm under your left arm, palm up, letting the right shoulder and the side of your head rest on the mat. Pause for one breath, then inhale and unwind. Do four or five per side. If the resting shoulder feels pinched, keep the arm higher and the head off the mat, or skip the move and add three more plank-plus repetitions. Rotation should feel like an opening through the upper back, not a strain in the shoulder joint.
Main Work, Part One: Push-Up and Front Support
These two exercises are the heaviest shoulder-and-wrist demands in the session, so they come early. Both reward patience: a slow, clean repetition does more than a quick, fancy one.
Pilates push-up from standing (4:30 to 7:30)
The Pilates push-up is performed with the elbows tracking back along the ribs, which tends to shift more of the work to the backs of the arms and keeps the shoulder blades close to the ribcage. A push-up is a familiar example of muscle-strengthening activity on the CDC’s page on what counts toward activity guidelines, and in a Pilates class it doubles as a trunk exercise. Two rounds fit comfortably into three minutes, including the rolling transitions.
How to do it
- Stand tall with your feet hip-width apart and arms by your sides.
- Inhale to prepare. Exhale, nod your chin, and roll down one vertebra at a time, knees soft, until your hands reach the mat.
- Walk your hands forward until your body forms one long line from head to heels, wrists under shoulders.
- Inhale and bend your elbows straight back, brushing them along your ribs, lowering your chest about halfway to the mat.
- Exhale and press back to straight arms. Complete three or four repetitions.
- Walk your hands back toward your feet, roll up slowly, and repeat for a second round.
Mistakes, fixes and easier options
Watch for elbows flaring out to the sides, hips that pike up or sag, and a head that pokes forward. If the roll-down bothers your back, bend your knees more or start from hands and knees instead of standing. For a lighter load, drop your knees to the mat, or place your hands on a sturdy raised surface; both are reasonable ways to keep good alignment while the strength catches up. To progress, take five counts to lower, or float one foot a couple of inches off the mat on each repetition. Quit the set the moment your hips begin to drift, because that is the point where the exercise stops training the shoulders and starts training the habit of compensating.
Front support with leg lifts (7:30 to 10:00)
Front support is the gateway to nearly every advanced mat exercise that involves bearing weight on the hands, which is why teachers keep coming back to it. Here it also gets a gentle leg-lift challenge that is a cousin of the classical leg pull front.
Setup and action
A Human Kinetics excerpt on the front support Pilates exercise describes starting on hands and knees, extending one leg back and then the other to create a straight line from head to heels, and holding for thirty to sixty seconds. This routine uses a shorter hold, since you will repeat it. Set your wrists under your shoulders, exhale to extend one leg back, inhale to extend the other, and hold for three to five breaths. Next, exhale and lift one heel a few inches while the pelvis stays level; inhale and lower. Alternate four or five times per side, then drop to the knees and rest for a few breaths before round two.
What to watch and how to scale
The same source warns that when alignment and stabilization are lacking, the trunk and shoulder region collapse into inefficient and sometimes harmful positions. In practice, collapse looks like sagging hips, flared ribs, or shoulders that sink between the blades. Keep the floor pushed away, and shorten the hold before your form changes. If wrists complain, try a forearm version or ask a Pilates professional about wrist-friendly setups; if you cannot hold a straight line yet, keep the knees down and lift only one leg a small distance.
Main Work, Part Two: Swan Prep, Swimming, Dips and Side Bend
The second block shifts the emphasis: first the back of the body, then the backs of the arms, then the side of the trunk. By now the shoulders are warm, so quality of movement matters more than ever.
Swan prep and swimming (10:00 to 12:30)
Swan prep and swimming are prone exercises, meaning you lie face down. They train the muscles along the back of the spine and shoulder blades, which spend most of the day being stretched by desks, phones and steering wheels.
Swan prep
- Lie face down with your legs hip-width apart and your forehead on the mat. Place your hands under your shoulders, elbows close to your ribs.
- Inhale to prepare and lengthen through the crown of your head.
- Exhale, draw your belly gently away from the mat, and lift your head and chest only a few inches, using your back muscles. Keep your hands light.
- Inhale to hold, with your neck long and your gaze down and slightly forward.
- Exhale to lower with control. Do four or five repetitions.
Swimming
Stay face down and reach your arms long in front of you, legs long behind, forehead resting. Exhale to lengthen and lift your arms, chest and legs just slightly off the mat. Then flutter opposite arm and leg in small, controlled movements, breathing in for several counts and out for several counts; many teachers use five each. Do two sets of about ten flutters, resting in child’s pose between them. If lifting the legs makes your lower back uncomfortable, keep them down and lift only your arms. If any prone extension bothers your back, skip this pair and ask a clinician or Pilates professional for a different back exercise.
Triceps dips (12:30 to 14:30)
Dips are the move most likely to make your arms file a formal complaint. They are also the most demanding on the front of the shoulder, so this version keeps the range small on purpose.
Setup and action
- Sit with your knees bent and feet flat, hands on the mat behind your hips, fingers pointing toward your feet.
- Press into your hands and lift your hips a few inches, so your torso is angled back and your chest is open.
- Inhale and bend your elbows straight back a short distance, keeping them close to your body.
- Exhale and press back up. Complete six to eight repetitions, rest, and repeat once.
Protecting the shoulder
Keep your shoulders away from your ears and your chest open as you lower; if your shoulders roll forward or the front of the joint feels pinched, you have gone too far. Stay in a shallow range, much shallower than the dips you may have seen in a gym. If your hips sit on the floor and you press only a little through your hands, that is a legitimate easier option. Skip the move if you have a current shoulder problem or any pain here, and swap in three more plank-plus repetitions from the warm-up.
Side bend (14:30 to 17:30)
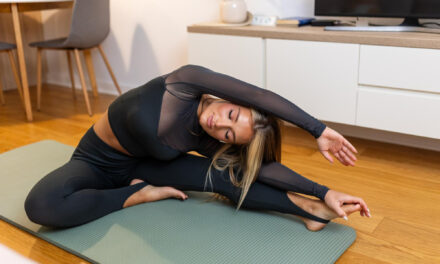
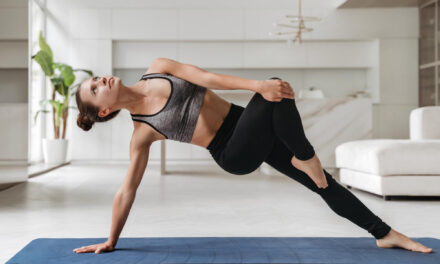
The side bend loads one arm and shoulder at a time and asks the whole side of the body to keep a long, even shape. It is among the most recognizable Mat Pilates exercises, and it is a handy test of how well your shoulder blade stays organized under load.
Setup and action
- Sit on your right hip with your knees bent and both legs stacked off to the left, and place your right hand on the mat under your shoulder, fingers pointing away from you.
- Inhale to prepare. Exhale and press into your hand and your feet to lift your hips into a long arc, reaching your left arm over your head.
- Inhale to hold, keeping your supporting shoulder away from your ear.
- Exhale to lower with control. Do four or five repetitions, then switch sides. Complete two sets per side.
Scaling and form checks
For an easier version, keep your bottom knee on the mat and lift only your hips and torso; this takes some of the load off the supporting shoulder and wrist. Watch for a sinking supporting shoulder, a collapsing chest, and a hip that rolls forward or back. Your reaching arm should travel along the line of your ear, not across your face. To progress, hold the top position for two or three steady breaths before lowering. If wrist pressure is the limiting factor, try the move on your forearm, or consult a teacher before adding the full version.
Cool-Down: Minutes 17:30 to 20:00
Two and a half minutes will not “reset” anything, but they let your breathing settle and your arms lower their voices. This section is optional in the sense that nothing breaks if you skip it, and worth keeping because it is the part that makes the whole session feel finished.
Child’s pose with side reach and a chest opener (17:30 to 20:00)
Both moves are gentle, and both should feel like a comfortable stretch rather than a strain.
Child’s pose with side reach
Kneel, sit your hips back toward your heels, and rest your arms forward on the mat. Walk both hands to the right, so you feel a wide stretch along the left side of your torso, and take five slow breaths, directing the inhale into the ribs on the left. Walk your hands back to center and then to the left for another five breaths. If sitting back on your heels is uncomfortable for your knees, place a folded towel behind the knees or lower your hips only part of the way. Stay within a range that feels like length, not pinching.
Chest opener and standing finish
Stand tall and clasp your hands behind your back, or hold the ends of a small towel if clasping is awkward. Straighten your arms gently, lift your chest a little, and keep your ribs from flaring as you breathe. Take six slow breaths, then release your hands, roll your shoulders a couple of times and shake out your wrists. Stretching can feel pleasant after work like this, but it is not a medical treatment; the goal is simply comfort and a calm end to the session.
After the session
What you notice in the hours after matters as much as what you did. Use that feedback to calibrate the next session.
What normal fatigue feels like
If upper body strength work is new for you, a day or two of general muscle tiredness in the arms, shoulders and upper back is common and usually fades. Treat it as a cue to choose the easier column next time, not as proof that you did the right amount. Pain that is sharp, one-sided, getting worse, or accompanied by numbness, tingling, swelling or loss of strength is a different category. In that case, stop the routine and speak with a qualified clinician.
A sensible next day
You do not need a special recovery routine. Drink water when you are thirsty, move around, and let the muscles that worked rest for a day before you load them again, which matches the Mayo Clinic’s advice to give each muscle group a full day between strength sessions. A relaxed walk or an easy lower body session is a good pairing, and our 30 minute upper body Pilates workout is a longer option for a day when you have more time and a larger appetite for shaking.
Weekly Plan and Progressions
A single session is a good start; a pattern is what builds strength over time. The trick is scheduling the routine so your shoulders get both work and rest, and then making it slightly harder only when it has become easy.
Fitting it into your week
Most adults can fit this routine in twice a week without rearranging their lives. Below is one example, not a prescription, and you can slide the days around.
| Day | Session | Purpose |
|---|---|---|
| Monday | This 20-minute upper body routine | First strength day for the shoulders and arms |
| Tuesday | Easy walk or lower body Mat Pilates | Different muscles, gentle aerobic work |
| Wednesday | Rest or light mobility | Recovery day |
| Thursday | This routine again, same or adjusted versions | Second upper body strength day |
| Friday | Core or lower body Mat Pilates | Balance the week |
| Saturday | Longer walk or a favorite activity | Aerobic activity and enjoyment |
| Sunday | Rest | Recovery day |
Spacing the sessions
Mayo Clinic strength training guidance suggests resting one full day between sessions that work the same muscle group, and the CDC asks adults to do muscle-strengthening work on at least two days a week. Putting the routine on Monday and Thursday satisfies both with room to spare. If you add a third session, keep it on a different day from the other two and consider using the easier versions. More days are not automatically better: tired shoulders produce sloppy form, and sloppy form is a poor use of an otherwise good plan.
Pairing it with other activity
The CDC also recommends 150 minutes of moderate-intensity aerobic activity a week, or an equivalent amount of vigorous activity, and notes that you can spread it out in smaller chunks. This routine is not aerobic exercise, so it sits alongside walking, cycling, swimming or dancing rather than replacing them. If you want more Mat Pilates, browse our Mat Pilates workouts hub for lower body, core and full-body sessions that complement this one. Matching the rest of your week to your actual life beats any perfect plan on a spreadsheet.
Progressing over four to eight weeks
Progress in Pilates is rarely dramatic. It looks like steadier elbows, a quieter neck, or a front support that no longer needs a mid-set pause.
Change one variable at a time
When a move feels controlled from the first rep to the last, nudge one thing: add a repetition, slow the lowering, hold the top for a breath, or move from the easier to the standard version. Changing several variables at once makes it hard to tell what helped and what hurt. A reasonable pace is to adjust one or two moves every two weeks, then reassess. The Mayo Clinic describes the same logic as progressive overload: when exercises become comfortably easy, you raise the challenge gradually.
Light resistance and longer sessions
Once bodyweight versions feel solid, you can add light hand weights or a resistance band to arm exercises such as overhead presses or rows, which are not part of the base routine. Start lighter than your ego suggests, because the point is control. Another path is a longer routine; our 30 minute upper body Pilates workout adds volume for days when you have the time, and a shoulder mobility Pilates routine can help on days when your shoulders feel stiff rather than strong.
Troubleshooting and What the Evidence Can Tell You
Even a well-designed routine runs into snags in a real body on a real floor. This section covers the common ones, then steps back to look at what research can and cannot say about a session like this.
Fixing common problems
If something feels off, adjust before you override. The adjustment is almost always smaller than you think.
Wrists and hands
Wrist discomfort in weight-bearing is common, because many people spend their days typing and then ask their wrists to hold body weight. Spread your fingers wide, press through the whole palm instead of the heel of the hand, and shorten the hold. Knees-down versions and forearm versions reduce load. If your wrists hurt during everyday tasks or the discomfort continues after you rest, speak with a clinician before continuing with weight-bearing exercise.
Shoulders and neck
A pinch at the front of the shoulder, a pulling sensation at the top of the shoulder or a tight neck are signals to reduce range and revisit the shoulder-blade cues. Keep the shoulders from creeping toward the ears and keep the elbows close to the body in pushing moves. If the sensation is sharp or does not go away with the easier version, stop and have a professional assess it. Exercise instructions can’t diagnose what is going on in a particular joint.
What the research does and does not say
The evidence base for Pilates is growing but modest, and it is worth being honest about the gaps.
Pilates compared with other strength exercise
A 2022 systematic review and meta-analysis of randomized trials asked whether Pilates is better than other exercise at increasing muscle strength. It pooled eleven studies with 689 participants whose average age was around sixty, and it found no statistically significant difference between Pilates and other exercise, though strength improved in both groups. The authors rated the certainty of evidence as very low to low, citing small studies and inconsistent methods. In plain English: Pilates appears to be one reasonable way to build strength, not a proven superior one, and these results do not tell us how a 20-minute upper body routine will work for any one person.
Older adults and mat Pilates
An alert from the National Institute for Health and Care Research summarized nine randomized trials of mat Pilates compared with no exercise in 415 healthy adults over sixty. It reported large improvements in lower limb strength, with caveats: the researchers knew who was in which group, which could favor Pilates, and the summary is more than five years old. Neither source tests an intermediate upper body routine in a general adult audience, so treat the research as encouraging but incomplete.
Finding qualified guidance
A routine on a screen cannot watch your elbows. A person can, and this is where an hour of in-person help pays for itself.
Where to look for a teacher
The Pilates Method Alliance is an international professional association for Pilates teachers, studios and educators, and it offers a membership directory you can use to find affiliated professionals. Credentials vary, so ask about a teacher’s training, how long they have taught mat classes and whether they have experience with shoulders or wrists if those are your concerns. A teacher who understands your history can modify this routine in ways an article cannot.
What to say in a first lesson
Harvard Health suggests arriving early to your first class and talking through any concerns with the instructor. Mention any injuries, surgeries or conditions, say which moves from this routine are worrying you, and ask the teacher to watch your front support and push-up. Ask for a modified version of any exercise that your body does not tolerate. A good teacher will welcome the questions, and a short list of them makes the lesson go further. If you are still building your foundations, our Pilates for beginners guide is a calm place to begin.
Frequently Asked Questions
Is a 20-minute Mat Pilates upper body workout enough to build strength?
It can be a useful part of a strength routine, but it works best as one piece of a full week. Public health guidance asks adults to do muscle-strengthening activity on at least two days a week that covers all the major muscle groups. A single upper body session leaves out the legs and hips, so pair it with other work. Strength gains depend on consistency, rest and gradually raising the challenge, and twenty focused minutes done twice a week is a realistic place to start.
How often should I do this routine each week?
Two sessions a week is a sensible starting point for most healthy adults. Leave at least one full day between sessions so the shoulders and arms can recover. If you want a third session, use the easier versions and keep it away from the other two days. Pay attention to how your wrists and shoulders feel, and cut back if tiredness turns into pain.
Do I need weights or any equipment?
No, this routine uses only your body weight and a mat. A folded towel is handy for cushioning the knees or wrists on a hard floor. Light hand weights or a resistance band can be added later to arm exercises once the bodyweight versions feel controlled. They are optional, and the routine works well without them.
What should I do if my wrists hurt in plank positions?
Start by spreading your fingers and pressing through the whole palm rather than the heel of the hand. Then move to the knees-down version or a forearm version, which places less load on the wrists. Shorten the holds and rest sooner as well. If the pain is sharp, continues after you rest, or shows up during everyday tasks, stop weight-bearing exercise and talk with a clinician.
Can I do this workout if I am new to Pilates?
This routine is written for people with some Mat Pilates experience, so it is better to build up first. Begin with a beginner mat session to learn breathing, rib control and a steady front support. After a few weeks, try the easier versions in this guide and see how they feel. A qualified teacher can watch your form and tell you when you are ready for the standard versions.
Should I do this before or after a lower body or core session?
Either order can work, but what matters is that your shoulders are not already tired when you start. If you plan to do both on one day, put the upper body routine first, since it relies on steady shoulders and wrists. Then do a lower body or core session afterward, using moves that do not load the arms heavily. On a busy day, it is perfectly fine to do them in separate parts of the day.
Will this workout change how my arms look?
Strength training may improve muscle strength and control over time, but appearance depends on many factors, including genetics, nutrition, sleep and overall activity. No exercise can target one body area for change. A better goal is to notice how the routine feels, such as steadier elbows, easier front support and smoother shoulders. Those are measurable signs of progress that do not depend on a mirror.
When should I stop an exercise during the workout?
Stop right away if you feel sharp or pinching pain, dizziness, numbness or tingling, chest discomfort, or unusual shortness of breath. Mild muscle burning and shaking from effort is different, and it usually settles when you rest. If a symptom lingers after you stop, contact a qualified clinician before you repeat the move. People who are pregnant or postpartum, recovering from surgery, or living with osteoporosis or a chronic condition should check with a professional before starting.