
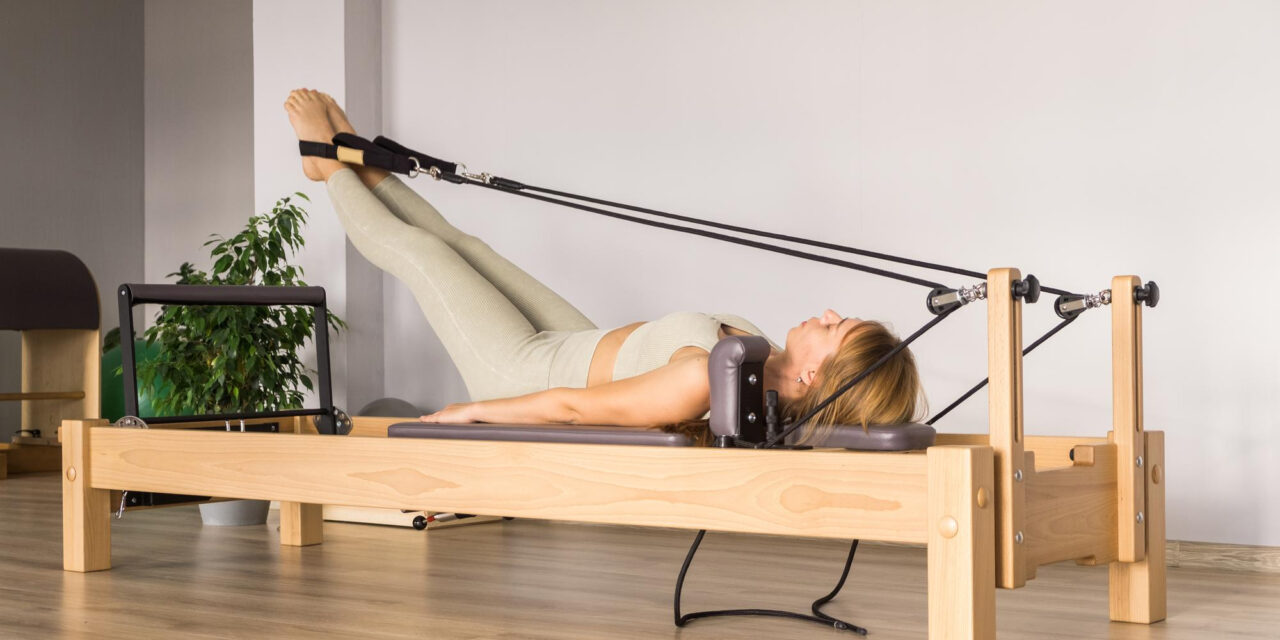
Direct answer: A Pilates footbar is the padded bar at the foot end of a reformer that you press against with your feet, or sometimes hold with your hands, while the carriage glides on its springs. Most machines let you set it to several heights, and a few slide along the frame as well. The setting that suits you depends on the exercise, your leg length and comfort, and what your machine’s manual says, and the bar should always be seated and locked before the carriage moves.
This guide is for anyone who has stared at the bar at the end of a reformer and wondered what it is called, why it has settings, and what to do with it. It covers the parts and vocabulary, typical positions across brands, a safe way to adjust the bar, foot placement, hand-on-bar work, common mistakes, and what to look for if you own a machine. It is general fitness education, not individualized medical advice. If you are still sorting out what the machine itself is, start with our explainer on what is a reformer and how does it work.
How this guide was built: it is a research-based explainer drawn from manufacturer manuals and product pages, published instructor materials, patent descriptions of footbar hardware, and general exercise-safety sources. We did not conduct hands-on testing, and every brand-specific detail below should be confirmed against the manual for your own machine.
What the Pilates Footbar Is and What It Does
Before settings and foot positions make sense, it helps to know what the bar is attached to and why it exists. The footbar is a small part with an outsized job, and the vocabulary around it is more confusing than the hardware.
Anatomy and vocabulary
Reformer parts get names that sound like they came from a garage, so a quick glossary saves a lot of squinting in your first class.
The footbar and the parts around it
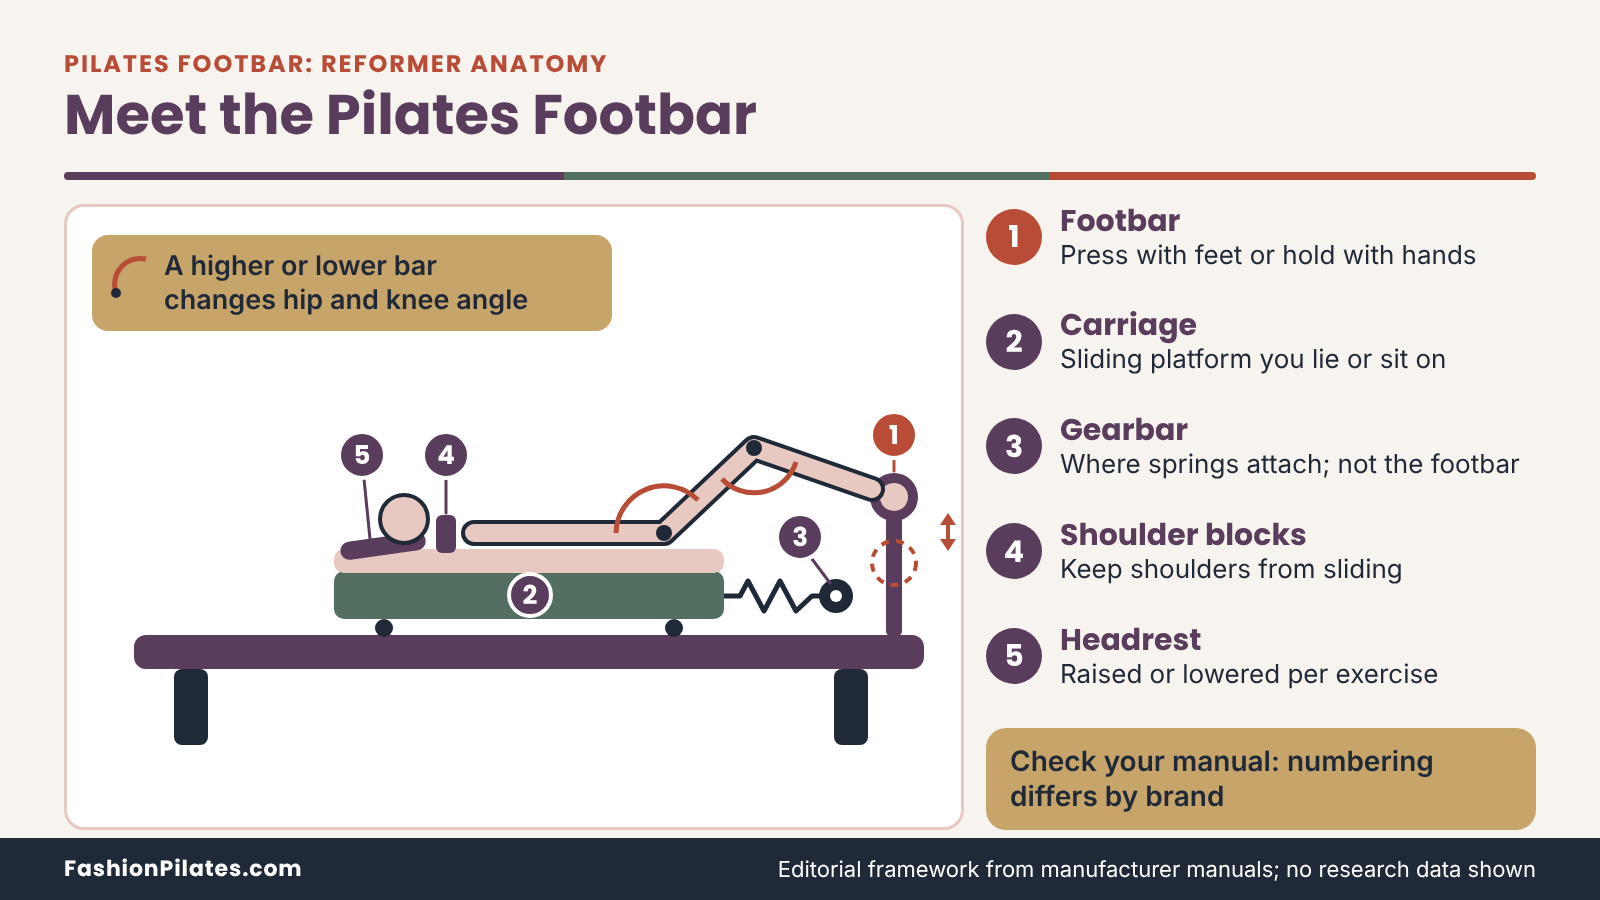
The footbar sits at one end of the frame and is usually covered in padding or a textured wrap, so feet and hands have something to grip. Behind the bar is the carriage, the padded platform you lie or sit on, which rolls along the rails. Beside the footbar, at the same end of the frame, sits the gearbar, where the springs attach. The shoulder blocks sit on the carriage and stop your shoulders from sliding as you press. Some studios say “foot bar,” others “footbar”; they mean the same thing.
Footbar, gearbar and footplate are different things
New reformer users often mix up the footbar and the gearbar, partly because they sit near each other on some machines. The footbar is what you push or hold. The gearbar is the hardware that holds the springs and, on many models, can be set to a few positions to change how far the carriage travels. A STOTT PILATES reformer page describes its gearbar and carriage-stopping system as regulating hip and knee flexion, which shows how closely the two pieces work together.
Why the footbar exists
The footbar looks like a simple handrail, yet it solves two real problems at once: it gives you something solid to push against, and it lets one machine suit many bodies and many exercises.
A fixed anchor for moving against springs
Springs only work if something stays put. Pushing the carriage away with your feet turns the footbar into that anchor, so your legs can move the carriage while the bar stays still. It is also why footwork is often the first exercise in a class: it teaches you how to press through the whole foot and to control the return, which one instructor tutorial describes as resisting the springs rather than letting the carriage snap back.
Adjustability makes one machine fit many people
Legs differ in length, ankles differ in flexibility, and exercises ask for different angles. A bar that can sit lower or higher, and on some models slide toward or away from the frame’s foot end, changes the angle between your feet and hips without anyone needing a different machine. A US patent describing a reformer footbar support explains the aim in plain terms: letting users reposition the bar to different heights for different exercises or preferences, with features that keep the bar from drifting out of its slot.
Footbar Positions and Height Settings
Ask how many positions a Pilates footbar has and the honest answer is “it depends on the brand.” Numbers, labels and even the direction of the numbering vary, so it pays to read the actual machine rather than rely on a universal rule.
How many positions to expect
Most modern reformers advertise somewhere around three to four height settings, with a few adding extra movement along the frame.
What manufacturers actually list
Public manufacturer materials show the range. One Balanced Body reformer page says its footbar adjusts vertically in four positions, including down, and slides along the frame to nine positions. The Merrithew at-home SPX manual describes four height settings, with position one closest to the gearbar and position four farthest away. A STOTT PILATES reformer page also lists four footbar positions. Listings change, so check the current listing or your own manual before relying on any figure.
Classical setups often use fewer settings
Classical-style reformers have traditionally had a simpler bar. In a classical setup tutorial on Pilates Anytime, the instructor says the classical footbar sits at a lower angle with a single setting, and that on modern machines with three options she prefers the lower one for footwork and stomach massage because it shifts the work toward the backs of the legs. That is one teacher’s preference, not a rule, but it shows why two studios can set the same bar differently.
What higher and lower settings tend to do
Think of the setting as an angle dial. The same push feels different when your feet are higher or lower relative to your hips, though the exact feel varies with your proportions and the machine.
Higher settings
A raised bar is the usual starting point in many contemporary classes. A Pilatesology encyclopedia entry for footwork lists the footbar up, along with the headpiece up, as its starting configuration. Raised settings place your feet higher above the carriage and generally ask for more hip and knee bend at the start. Many people find this a comfortable, easy-to-read position for learning alignment, though that depends on leg length.
Lower settings
A lower bar changes the angle at the hips and knees, and some teachers choose it deliberately to bias the work toward the back of the legs. Lower settings can also feel less cramped for people with longer legs or tight hips. Because lower bars change how close your knees come to your chest, they are not automatically easier. Treat the setting as a tool and follow your instructor’s choice for the exercise at hand.
| Source | What it says about the footbar | Why it matters |
|---|---|---|
| Balanced Body Allegro 2 product page | Four vertical positions including down; slides horizontally to nine positions along the frame | Shows a bar that moves in two directions, not only up and down |
| Merrithew At Home SPX manual | Four height settings; position one is nearest the gearbar, position four farthest away | Numbering direction is brand-specific, so do not assume “one” means lowest |
| STOTT PILATES reformer page | Four footbar positions listed | Confirms four settings is common on professional machines |
| Classical setup tutorial (Pilates Anytime) | Classical bar sits lower with one setting; modern machines often offer three | Explains why classical and contemporary studios set up differently |
If your machine is not one of these, the principle still holds: find the numbering in your manual, learn which direction is higher, and ask the instructor which setting a given exercise calls for.
How to Adjust the Footbar Safely
Changing the bar takes a few seconds, which is exactly why people rush it. In most studios the instructor handles adjustments between exercises, and that is a fine arrangement for a beginner. If you own a reformer or your studio expects you to do it, the sequence below keeps the process boring, which is the goal.
Before you touch the bar
A few checks come first, and they have nothing to do with the footbar itself. They concern the rest of the machine and the room around it.
Confirm the carriage is stopped and the springs are set
Manuals are blunt about this. The Merrithew at-home SPX manual says to make sure the carriage stopper is inserted and at least one spring is securely attached to the gearbar before use, and notes the stopper must be in one of its positions at all times. A carriage that can wander while your hands are near the bar is an easy way to pinch a finger. Settle the carriage at rest first, then work on the bar.
Clear the space and decide who adjusts
The same manual asks for at least two feet of clear space on both sides of the machine and tells users to keep body parts away from moving components. It also says inexperienced users should not exercise unsupervised. Practically, that means a beginner in a studio class should let the instructor change the bar, and a home user who is new to the machine should ask a qualified teacher to show them the routine once. The IDEA fitness industry article on Pilates safety lists improper spring tension and unsafe mounting or dismounting among the concerns when reformers are used without enough supervision.
Changing the setting, step by step
Mechanisms differ, but most footbars follow the same basic logic: lift slightly, move to a new slot or notch, and let the bar settle into place.
The general sequence
Start with the carriage at rest and your hands clear of the rails. Lift the bar enough to release it from its current slot; on the SPX this means pulling the footbar upward and lifting the chrome adjuster bar out of its cradle. Move to the new setting, lower the bar or adjuster into the new cradle, and let it seat fully. The manual says adjustment can happen while standing beside the carriage or sitting on it. A US patent describes similar bracket slots designed to hold the bar at several heights while limiting accidental movement. Keep a firm grip until the bar is fully seated.
Confirming it is locked before you move
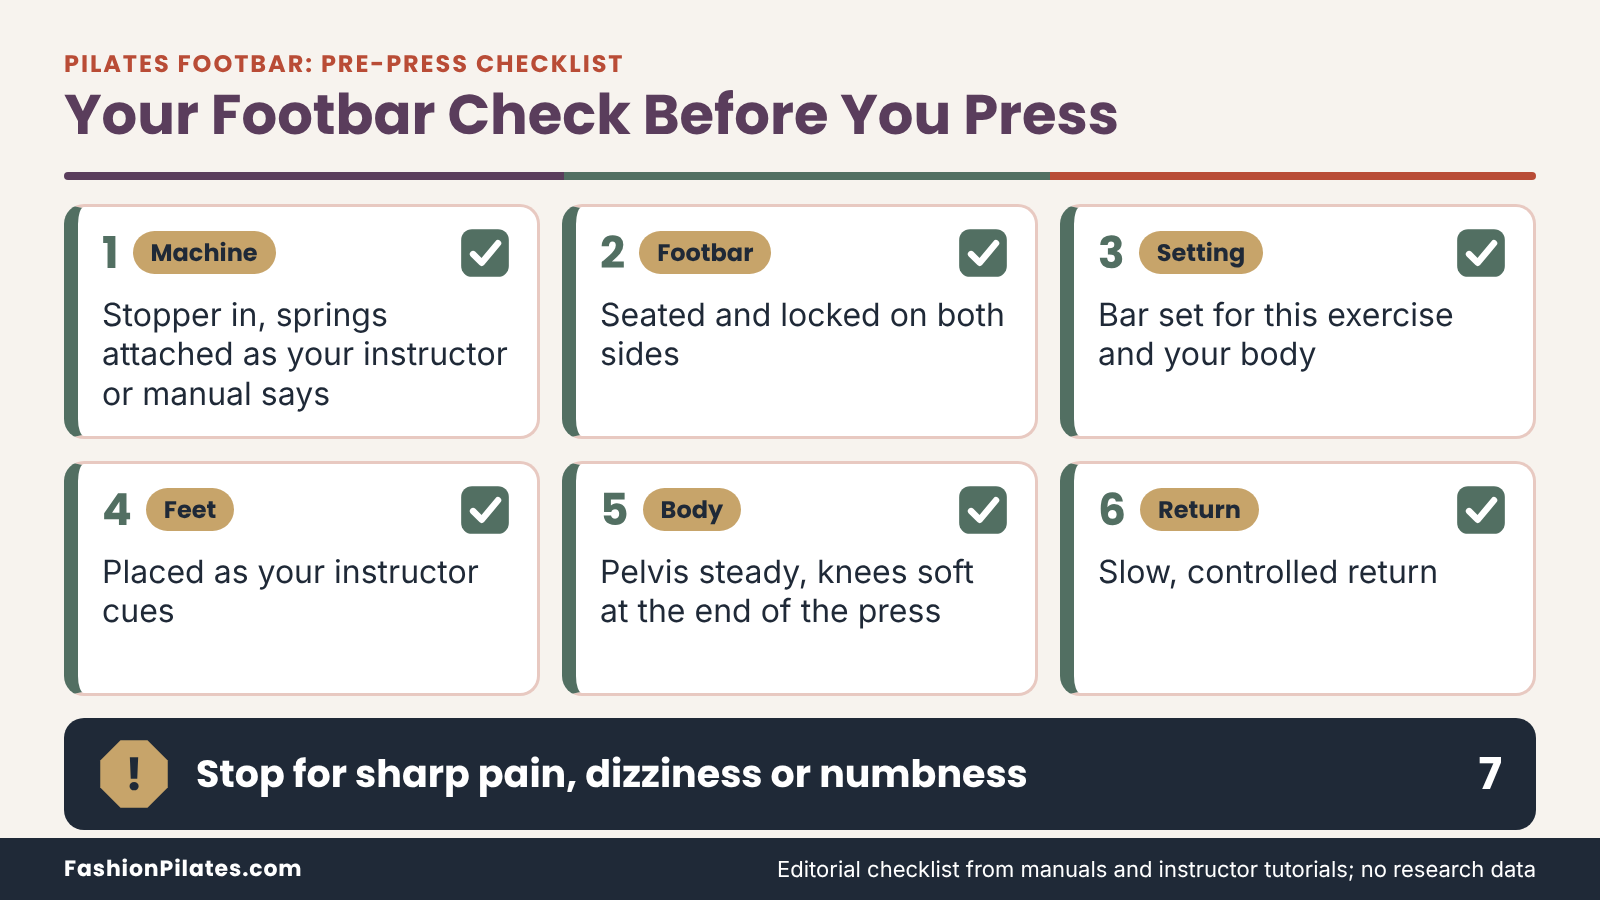
Seating is not the same as locking, and the difference matters when you are about to push your body weight against the bar. Look at both sides of the bar to see that it sits in the same slot or cradle. Then give it a gentle test: a light push or tug should produce no wobble and no clunk. The SPX manual asks for the adjuster bar to be securely placed in its cradle and lists the footbar as part of both daily and weekly inspections. If anything looks uneven, stop and ask for help.
Fitting the Footbar to Your Body
There is no single correct footbar height, only a sensible one for your body and the job at hand. Good fit means you can move comfortably, keep your trunk steady, and stay in control on the way back in. This section shows how to judge that without needing a degree in biomechanics.
Judging your starting position
Your start position tells you more about fit than any chart. If the setup is wrong, your body usually sends a quick message, long before you reach the end of the set.
What a good start looks like
Lying on the carriage with feet on the bar, you want your pelvis and ribs to rest in a steady, neutral position rather than tipping or gripping. The Complete Pilates footwork guide describes leaving a tiny gap between your lower back and the carriage rather than pressing the back flat. The Pilatesology footwork entry adds that body and feet should be centered, and that feet should be spaced hip distance apart when the knees would otherwise overlap. If you can hold that picture while you press and return, the setting is probably serving you.
Signs the bar is too high or too low for you
Watch for patterns rather than single sensations. If your knees come uncomfortably close to your chest at the start, if your lower back lifts or tucks as you bend, or if your ankles strain to reach the bar, mention it to your instructor. These are cues to consider a different setting, a different foot position or a smaller range of motion, not reasons to push through. Pain, numbness or a sharp pinch in a joint is a reason to stop and check in, not to keep adjusting.
The settings that work alongside the bar
The footbar is only one of several adjustments that combine to define how an exercise feels. Changing one often changes how the others behave.
Springs and gearbar position
Spring resistance is not standardized across brands, so a color or a count that feels moderate on one machine can feel quite different on another. That is why instructors talk about light, medium and heavier tension in general terms and tell you to follow the manufacturer’s manual and your teacher. Gearbar slots, where a model has them, change how far the carriage travels and so how deeply your hips and knees bend. Adjust the footbar and the carriage travel together, not in isolation.
Body size, ability and the manual
The SPX manual asks users to make sure the equipment is properly adjusted for size and ability level before they start, and it lists a maximum user weight for that specific model. Other brands publish their own limits and recommendations, which is why a manual is worth reading even when your studio’s staff seem relaxed about it. Taller or shorter people may need different footbar and gearbar combinations, and no chart can predict yours exactly. Your instructor can see your proportions; a web article cannot.
Foot Placement on the Footbar
Once the bar is set, the next question is where your feet go. Foot placement is the part of the Pilates footbar story that changes from set to set in a class, and instructors have names for each variation. Descriptions below come from published teaching materials, and individual teachers vary in how they cue them.
The common footwork placements
Footwork usually moves through a handful of placements, each asking the feet, hips and knees to line up a little differently. The press-and-return pattern stays the same while the foot position changes.
Pilates V and parallel positions
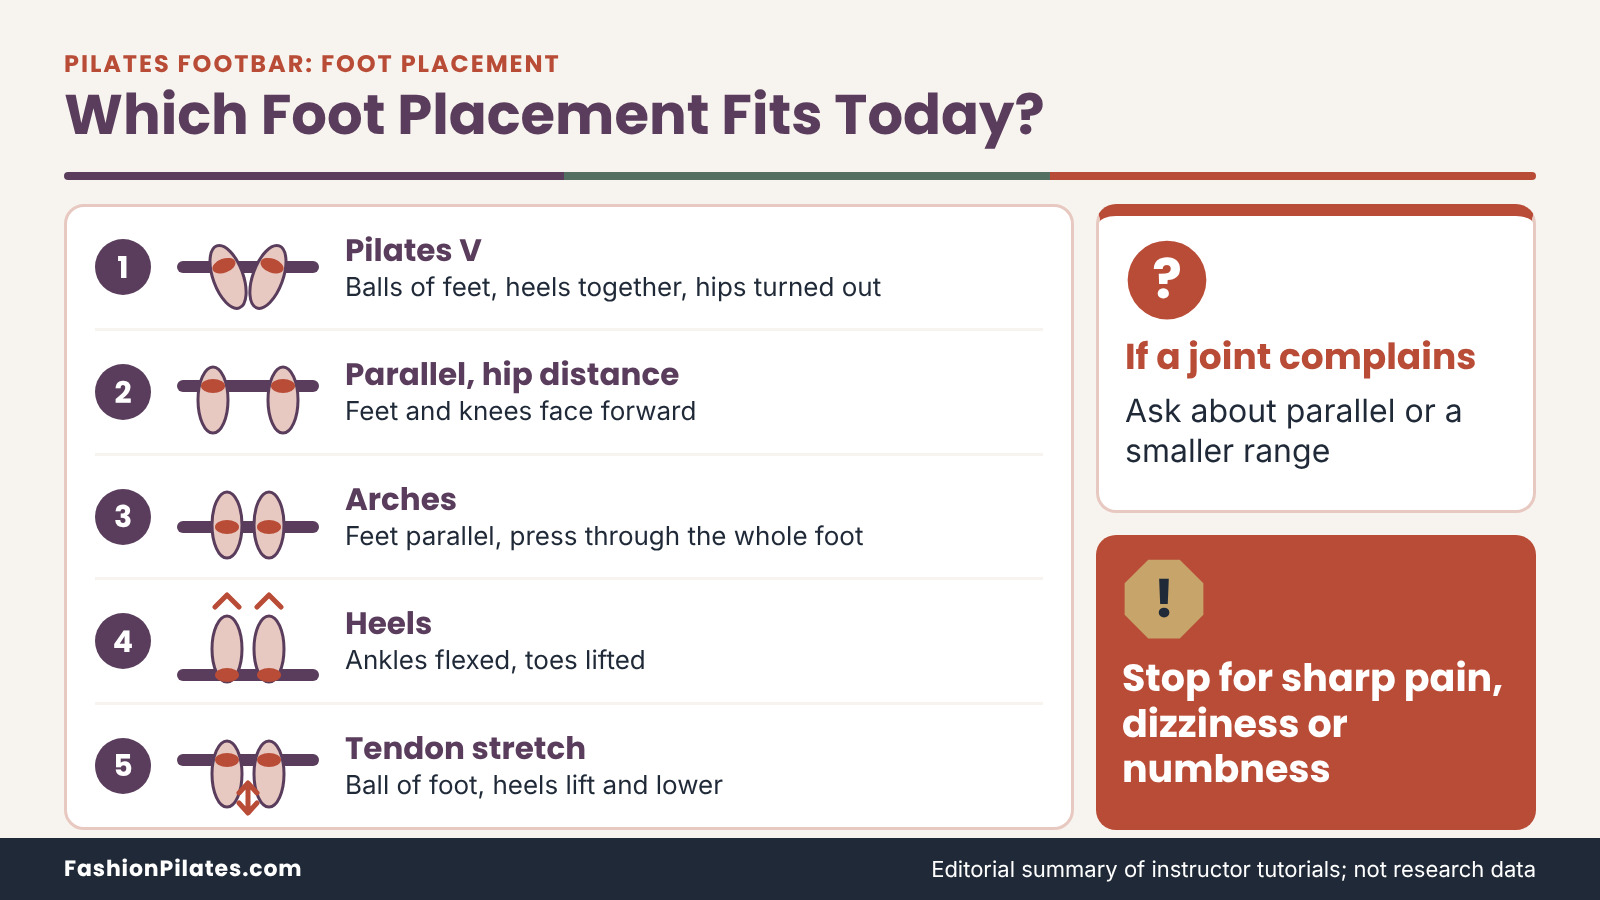
In the Pilates V, the balls of the feet rest on the bar with heels together and the hips gently rotating outward; one Pilates Anytime footwork tutorial opens with it. A second tutorial on footwork placement describes the classic version as heels together, toes apart, with weight spread evenly across the ball of the foot. Parallel placements keep the feet and knees facing forward, either together or hip distance apart, and are the usual option when a turned-out position does not feel right.
Arches, heels and tendon stretch
The same tutorial that opens with the V moves to the arches, with the feet parallel and the arches active, and then to the heels, where the ankles are flexed and the toes point up. The sequence usually closes with the tendon stretch, which returns to the ball of the foot while the heels lift. The Complete Pilates guide says ball-of-foot placement works the calves more, while heel placement leans on the glutes and back of the thighs and can be easier for people with foot pain.
| Placement | How it is usually described | Worth considering when |
|---|---|---|
| Pilates V (toes) | Balls of the feet on the bar, heels together, toes apart, hips gently rotated out | Your hips and knees feel comfortable with the turnout |
| Parallel, hip distance | Feet and knees face forward with space between the feet | Turnout feels awkward, or an instructor suggests it for a joint concern |
| Arches | Feet parallel, with the arches of the feet actively engaged on the bar | You are learning to press through the whole foot |
| Heels | Heels on the bar with ankles flexed and toes lifted | Foot placement on the ball of the foot feels uncomfortable |
| Tendon stretch | Ball of the foot on the bar with heels raised and lowered | You want to explore ankle and calf movement with instructor guidance |
| Wide, second-position stance | Feet apart, often described as emphasizing the glutes and back of the thighs | Your instructor chooses it, and your hips and knees stay comfortable |
Choosing placement for your body
No placement is the correct one for everybody. The purpose of footwork, as one instructor puts it, is anchoring and aligning from the foot through the spine, so the best placement is the one that lets that happen without strain.
Knees, ankles and feet
If a knee, hip, ankle or foot complains in the standard position, the usual teaching answer is to change the placement before changing anything else. The placement tutorial lists a parallel placement with the feet hip distance apart as an option for knee, hip, ankle or foot issues. Heels can be an easier option for some foot pain. None of this replaces advice from a clinician if the discomfort is persistent or sharp, so use these as questions to bring to your instructor.
Flexibility, hypermobility and locking out
Flexible knees can slide past straight without you noticing. The Pilatesology footwork entry advises avoiding hyperextension of the knees, so an instructor may cue you to stop just short of fully straightening. The placement tutorial also mentions wider turned-out positions as an option for people who are especially flexible or bowlegged, to help them find inner thigh engagement. These are teaching choices to discuss, not self-diagnoses.
Using the Footbar Beyond Footwork
Footwork gets the spotlight, but the bar earns its keep in other exercises too. Sometimes your hands hold it, and sometimes your feet stay on it while another part of your body does the interesting work.
Hands on the footbar
Placing hands on the bar turns it into a support for upper-body and trunk work. These exercises ask more of the shoulders, wrists and abdominal control than footwork does.
The Long Stretch series
In a Pilates Anytime tutorial on the Long Stretch series, the instructor keeps the footbar up and places the hands shoulder distance apart on the front of the bar, with straight wrists, and describes lighter tension as increasing the abdominal challenge. The series is a plank-style movement that moves the carriage, so it is usually taught after foundation work and with an instructor present. Treat it as a guided exercise, not something to attempt from a written description.
Wrist comfort and alternatives
Hands on a bar load the wrists, and wrists vary a lot. If your wrists object to a straight, weight-bearing position, say so before the exercise rather than during it. Instructors have options such as different bar heights, shorter holds or a different exercise altogether. A good teacher treats that message as useful information, not as a performance review. Discomfort that lingers after class deserves a conversation with a clinician.
Feet on the bar for other exercises
Footwork is not the only time feet rest on the bar, and the setting may change from one exercise to the next.
Pelvic lift and stomach massage
The classical setup tutorial mentioned earlier names footwork, pelvic lift and stomach massage among the exercises where feet work against the bar, and the instructor talks through different footbar and spring choices for them. Details vary by teacher and tradition, so this article does not prescribe a sequence. Know that the same bar can serve very different movements, and your instructor may change its height between them.
Why the setting can change mid-class
If an instructor adjusts the bar halfway through a class, nothing is wrong. Different exercises call for different angles, and a Balanced Body footbar support patent notes that the design lets users change the bar position without dismounting the carriage. Leave the adjustment to your teacher unless they have told you how to do it, and ask why if you are curious; most teachers enjoy that question.
A Short Footwork Practice to Learn the Settings
Reading about foot placements is one thing, and feeling them is another. The outline below shows how a short footwork sequence can be organized so you can follow it in a class or talk it over with a teacher. It is an illustration of structure, not a prescription, and your instructor’s setup and spring choices come first. For a full class built around the same movements, see reformer Pilates morning workout.
Setup checklist before the first press
Everything in this section happens before your feet touch the bar. It takes under a minute once it is routine.
Machine and bar checks
Confirm the carriage stopper is in, the springs are attached the way your instructor or manual specifies, and the footbar is seated at the setting for this exercise. The Pilatesology footwork entry starts with the footbar up and the headpiece up, though your studio may vary. Check that nothing is in the way on either side, and follow your manual’s mounting directions when you get on. Resistance is not standardized, so let your teacher pick the springs.
Your starting position
Lie back with your head and shoulders resting comfortably, shoulders relaxed against the blocks, and your pelvis steady in a neutral position. Place your feet on the bar in the first placement your instructor gives you, with knees tracking in line with the feet. Keep your hands by your sides or on the carriage, where the teacher shows you. Take a breath, and notice whether your ribs and lower back feel settled before anything moves.
An example sequence
The pattern below is one common shape for footwork, written so the structure is clear. Counts are a modest example, and a teacher may use more or fewer.
Press and return, one action at a time
From the starting position, press the carriage away by extending your legs, stopping just short of locking the knees. Pause for a beat, then bend the knees and return with control, resisting the springs instead of letting the carriage rush in. Breathing patterns vary by teacher; one tutorial presses on the inhale and returns on the exhale, so use the pattern your instructor teaches. Keep the pelvis still and the movement coming from the hips, knees and feet.
Order, counts and rests
A short example is six to eight smooth presses in each placement: Pilates V or parallel, arches, heels, then tendon stretch. Rest briefly between placements, with the carriage settled, and use fewer repetitions if anything feels strained. The whole round takes about eight to ten minutes at an easy pace. When you finish, bring the carriage fully back to rest before moving your feet off the bar, and stand up only after you are stable and the bar is not moving.
Common Footbar Mistakes and Fixes
Most footbar problems fall into two groups: things that go wrong before you move, and things that go wrong while you move. Both are usually easy to correct once you can name them, and neither says anything bad about you.
Setup mistakes
These are the mistakes that happen before the first press. They are also the easiest to prevent, because they only require a pause.
A bar that is not fully seated
A bar that sits half in its slot may feel fine until you push against it. This is the one mistake worth treating with real seriousness, because a bar that moves unexpectedly under your weight is a safety problem, not a technique problem. Before every exercise, look at both sides of the bar and do a gentle test. The manual’s inspection checklist exists for a reason. If you notice looseness, stop and tell the instructor or inspect the hardware before anyone uses the machine.
Using someone else’s setting
It is easy to stay with the setting the previous person left, or the one that felt right last week. Bodies and exercises change, and a bar that worked for another person’s legs may not fit yours. Ask the instructor to check the setting at the start of class, especially if you have a new injury, a different pair of shoes or a different machine. Taking ten seconds to ask is cheaper than finishing a set with knees that feel crowded.
Movement mistakes
Once you start moving, the common issues involve the knees, the pelvis and the return. Fixes are mostly about smaller, slower and more deliberate.
Locking out and letting the carriage crash
Pressing hard enough to snap the knees straight, then letting the springs yank the carriage home, is the classic footwork mistake. It puts load into the joints and skips the part that builds control. Press to a comfortable length, leave a soft micro-bend if you tend to hyperextend, and return slowly enough that you could stop at any point. A smaller range with control beats a bigger range without it.
Tucking, flaring and collapsing the feet
If your pelvis tucks under at the bottom, your ribs flare up as you press, or your ankles roll inward on the bar, the range is probably too big or the setting too demanding. Shorten the press, reset your pelvis, and keep weight even across the foot. If your toes grip the bar, soften them. Ask your instructor to check the foot position, and consider a different placement if the issue repeats.
| What you notice | Possible reason | What to try or ask |
|---|---|---|
| Knees feel crowded at the start | Bar setting or carriage position may not suit your leg length | Ask about a different footbar setting or gearbar position |
| Lower back lifts or tucks while bending | Range of motion is larger than you can control | Shorten the bend and reset your pelvis before each press |
| Knees snap straight on each press | Pressing too fast or too far | Stop short of locking and slow the return |
| Ankles or feet ache on the bar | Foot placement may not suit your feet today | Ask about heels or a parallel placement |
| Bar moves, clunks or sits unevenly | Bar is not fully seated or hardware needs checking | Stop and have the equipment checked before continuing |
| Wrists complain on a hands-on exercise | Weight-bearing wrist position is too demanding today | Tell the instructor and ask for an alternative |
Safety, Modifications and When to Ask for Help
Reformer work is low-impact, but low-impact is not the same as risk-free. Machines have springs and a moving carriage, and bodies arrive with their own histories. The sensible approach is to ask early, move in a range you can control, and treat unusual symptoms as information. For other machine terms you may meet along the way, see the Pilates FAQs and glossary hub.
Who should check in first
For most healthy adults, a beginner reformer class with a qualified instructor is a reasonable place to start. For others, a conversation beforehand is the smarter first step.
Questions for a clinician
Harvard Health’s guidance on Pilates for older adults says it is generally wise to check with your doctor before starting any new kind of exercise, and notes that physicians may advise avoiding certain exercises if you have back pain or spine issues. Medical News Today names osteoporosis, recent injuries and joint instability as reasons to seek guidance. Pregnancy, the postpartum period, recent surgery and chronic conditions belong on that list as well; ask a qualified clinician or Pilates professional before starting.
What to tell your instructor
The Harvard Health article suggests arriving early to a first class so you can share concerns with the instructor, who can then introduce the movements and show how to practice safely for your needs. Mention injuries, surgeries, joint issues, pregnancy or anything that limits your range, plus anything you were told to avoid. You do not need to share your whole medical history, and a good teacher will not ask for it. A short, specific note is enough.
Modifications and stop signals
Modifying an exercise is a normal part of reformer work, not a downgrade. Teachers adapt the bar, the range and the placement all the time.
Ways to modify footbar work
Common modifications include a different foot placement such as parallel or heels, a smaller range of motion, fewer repetitions, a different bar height, and a longer rest between sets. The placement tutorial mentioned earlier reminds teachers that most students are not textbook bodies, which is a polite way of saying the goal is to adapt the exercise to the person. If something feels off, ask what could change rather than pushing through.
When to stop
Stop and tell your instructor if you feel sharp pain, dizziness, numbness, tingling or unusual shortness of breath. Do not wait for the end of the set to find out whether it settles. If symptoms continue after class, see a qualified healthcare professional. This guide is general fitness education and cannot assess your health, so use it to prepare better questions, not to replace professional advice.
Footbar Features, Care and Buying Considerations
If you are thinking about a home machine, the footbar is a feature worth comparing, though it is rarely the headline. This section keeps to criteria and published manufacturer facts, since a full machine comparison belongs elsewhere on the site, such as our guide to best Pilates reformer with tower.
What to compare on a home reformer
Spec sheets run long and rarely read like page-turners, but a handful of footbar details tell you most of what matters for everyday use.
Positions, travel and locking
Start with how many positions the bar offers and whether it also slides along the frame. One Balanced Body listing, for example, describes four vertical positions plus nine along the frame, while other manufacturers list four positions without sliding. Then ask how the bar locks. The patent descriptions mention slots that keep the bar in place and optional lock blocks for firm immobilization in certain exercises. A bar that is easy to move but hard to lose is the combination you want. Check the current listing for the model you are considering.
Padding, texture and materials
The Balanced Body Allegro 2 page describes a textured cover for stronger hand and foot positioning with soft padding for comfort, and its variant names refer to a steel footbar. Texture matters if you practice barefoot or in grip socks, and padding matters for hand-on-bar work. Material choices vary by manufacturer and model, so compare the listing for the exact machine rather than assuming a general rule.
| Feature | Why it matters | Question to ask |
|---|---|---|
| Number of vertical positions | More settings give more ways to change the hip and knee angle | How many positions are there, and how are they numbered? |
| Sliding along the frame | Changes how far the bar sits from the carriage | Does the bar slide, and how is it locked? |
| Locking mechanism | A secure bar is the foundation of safe footwork | How do I confirm it is seated, and what does the manual say? |
| Cover and padding | Affects grip and comfort for feet and hands | Is the cover replaceable and easy to clean? |
| Weight and size limits | Manuals publish user limits that vary by model | What are the stated limits for this exact model? |
Care and inspection
A footbar needs very little maintenance, and what it does need is quick. The easiest habit is a short inspection before you start.
Routine checks
The Merrithew SPX manual lists the footbar and its adjuster bar in daily and weekly inspection checks, asking that both be securely fastened. Other manufacturers publish their own routines. Wipe down the cover per the manual, look for loose hardware and cracking padding, and stop using the machine if anything seems loose or damaged. A short checklist taped near the reformer is cheaper than an afternoon of troubleshooting.
Storage and moving
Some reformers fold or stand upright for storage, and the footbar may need to be in a specific position first. The SPX manual, for instance, says to set the footbar to its lowest position before standing the machine upright. That instruction is specific to that model. If you are setting up a space for a machine, our home Pilates studio setup guide covers room size, flooring and storage in more detail.
Frequently Asked Questions
What is the footbar on a Pilates reformer?
The footbar is the padded bar at the foot end of the reformer that gives your feet or hands something solid to push against or hold. It stays in place while the carriage moves on its springs. You will most often meet it in footwork, which is commonly the first exercise in a class. Some exercises also use it for hand support. It is a separate part from the gearbar, which holds the springs.
How many positions does a reformer footbar have?
It depends on the brand and model. Public manufacturer pages and manuals describe four height settings on several professional and at-home machines, and one model also slides along the frame. Classical-style machines often have a simpler bar with fewer settings. Numbering also varies, so position one is not always the lowest. Your manual or instructor can tell you how your machine is set up.
Should a beginner use a high or low footbar?
There is no universal answer, because it depends on your leg length, your flexibility and the exercise. Many contemporary classes start footwork with the bar raised, while some teachers prefer a lower setting to shift the work toward the back of the legs. A beginner is best served by letting the instructor choose and then mentioning any discomfort at the start. If your knees feel crowded or your lower back lifts, that is useful feedback. Ask whether a different setting or foot placement would help.
Can I change the footbar position by myself during class?
In most studios the instructor makes the adjustments, and that is the safest arrangement while you are learning. Manuals generally ask people to confirm that the equipment is set for their size and ability before use. If you do adjust it, keep the carriage still, seat the bar fully and check both sides before you press. When in doubt, wave the instructor over. Nobody has ever been judged for asking.
Why does the footbar setting change between exercises?
Different exercises need different angles between your feet, hips and knees. A bar that suits footwork may not suit an exercise where your hands hold it, or one where your feet work against it in a different position. Instructors choose settings to match the movement and the person doing it. Some bars are designed so they can be changed without you leaving the carriage. If the change seems unexplained, ask your teacher why.
What is the difference between the footbar and the gearbar?
The footbar is the part you push against or hold, and the gearbar is the hardware where the springs attach. On some machines the gearbar can sit in more than one position to change how far the carriage travels. Both influence how deeply your hips and knees bend, so teachers often adjust them together. They sit near each other, which is why people confuse them. Your manual will label each one.
What should I do if my knees or ankles hurt on the footbar?
Stop the movement and tell your instructor right away rather than finishing the set. Sharp pain, numbness or tingling is a reason to pause, and it may be a reason to see a healthcare professional if it continues. Teachers can often suggest a different foot placement, a smaller range or a different bar setting. A placement that keeps the feet parallel and hip distance apart is one option instructors discuss for joint concerns. This is general education, so a clinician should guide anything persistent.
Do all reformers have a footbar?
Most reformers do, because it is a core part of how the machine works. The design varies widely, from a simple fixed bar to one that adjusts in height and slides along the frame. Portable and folding models may build the bar differently, so check the specifications for the model you are considering. The listing or manual should describe how many positions it has and how it locks. Prices and features change, so check the current listing before you buy.




Trackbacks/Pingbacks