
Direct answer: A 15 minute beginner mat pilates mobility workout is nine slow, low-impact floor exercises done in a fixed order: ribcage breathing, pelvic tilts, knee folds, a pelvic curl (bridge), hip openers, cat-cow, thread the needle, side-lying arm arcs, and a resting stretch. Each one gets about 1.5 to 2 minutes, and you move at a pace where you could chat in short sentences. It needs a mat, a little floor space, and no equipment.
This guide is for adults who are new to Pilates, or returning after a long break, and who want a routine they can actually follow at home without a video playing. It covers the exact minute-by-minute plan, how to do every move (starting position, action, breathing, reps, an easier option, a progression, and the usual mistakes), who should modify or skip, and how to fit the session into a real week. It is general fitness education, not individualized medical advice.
What Mobility Means, and How It Differs from Flexibility and Stability
Before the routine makes sense, three words need pinning down, because wellness writing tends to use them as if they were synonyms. They are related, but they are not the same thing, and the difference changes what you should feel while you exercise.
Mobility, flexibility, and stability in plain English
Three words that get used interchangeably
Mobility is your ability to actively move a joint through its available range using your own muscles. Hinge Health, a digital physical therapy company, describes mobility as depending on flexibility plus strength, stability, balance, and coordination. Flexibility is narrower: how far a muscle or tendon can be passively lengthened, such as when you sit in a hamstring stretch and let gravity or a strap do the work. Stability is control, meaning your ability to keep a joint or body segment from moving where you do not want it to move. That last definition is ours, offered as a working description, because the source above does not define it formally.
Why this routine blends all three
A mat Pilates mobility session asks you to move a body part through a range while the rest of you stays quiet. In a pelvic curl, for example, your spine moves one segment at a time (mobility) while your hips stay level and your knees stay parallel (stability), and your hamstrings and glutes lengthen and shorten under control (a little flexibility and strength). That is why the pace is slow. Moving fast lets momentum do the work, and momentum hides exactly the joints you are trying to wake up.
The four areas this routine targets
Spine and ribcage
Your spine has three main regions: the neck, the mid-back, and the low back. The mid-back (the thoracic spine, where your ribs attach) is generally described as better suited to rotation than the low back, which is shaped mainly for bending forward and back. That is why the twisting in this routine is aimed at the mid-back, with the hips anchored so the low back is not asked to do a job it is not suited for. The ribcage also moves with every breath, and the first exercise trains that expansion on purpose, because a ribcage that moves well gives the mid-back and shoulders more room to work.
Hips and shoulders
The hip is a deep ball-and-socket joint that can swing forward, back, and side to side and can rotate, yet many people who sit most of the day mainly use one narrow slice of that range. The shoulder is shallower and relies on muscles and the shoulder blade gliding over the back of the ribcage. Both joints do better when the pelvis and ribcage underneath them are organized, which is why the hip and shoulder work in this routine comes after the breathing and pelvic control, not before it.
The 15 Minute Beginner Mat Pilates Mobility Workout at a Glance
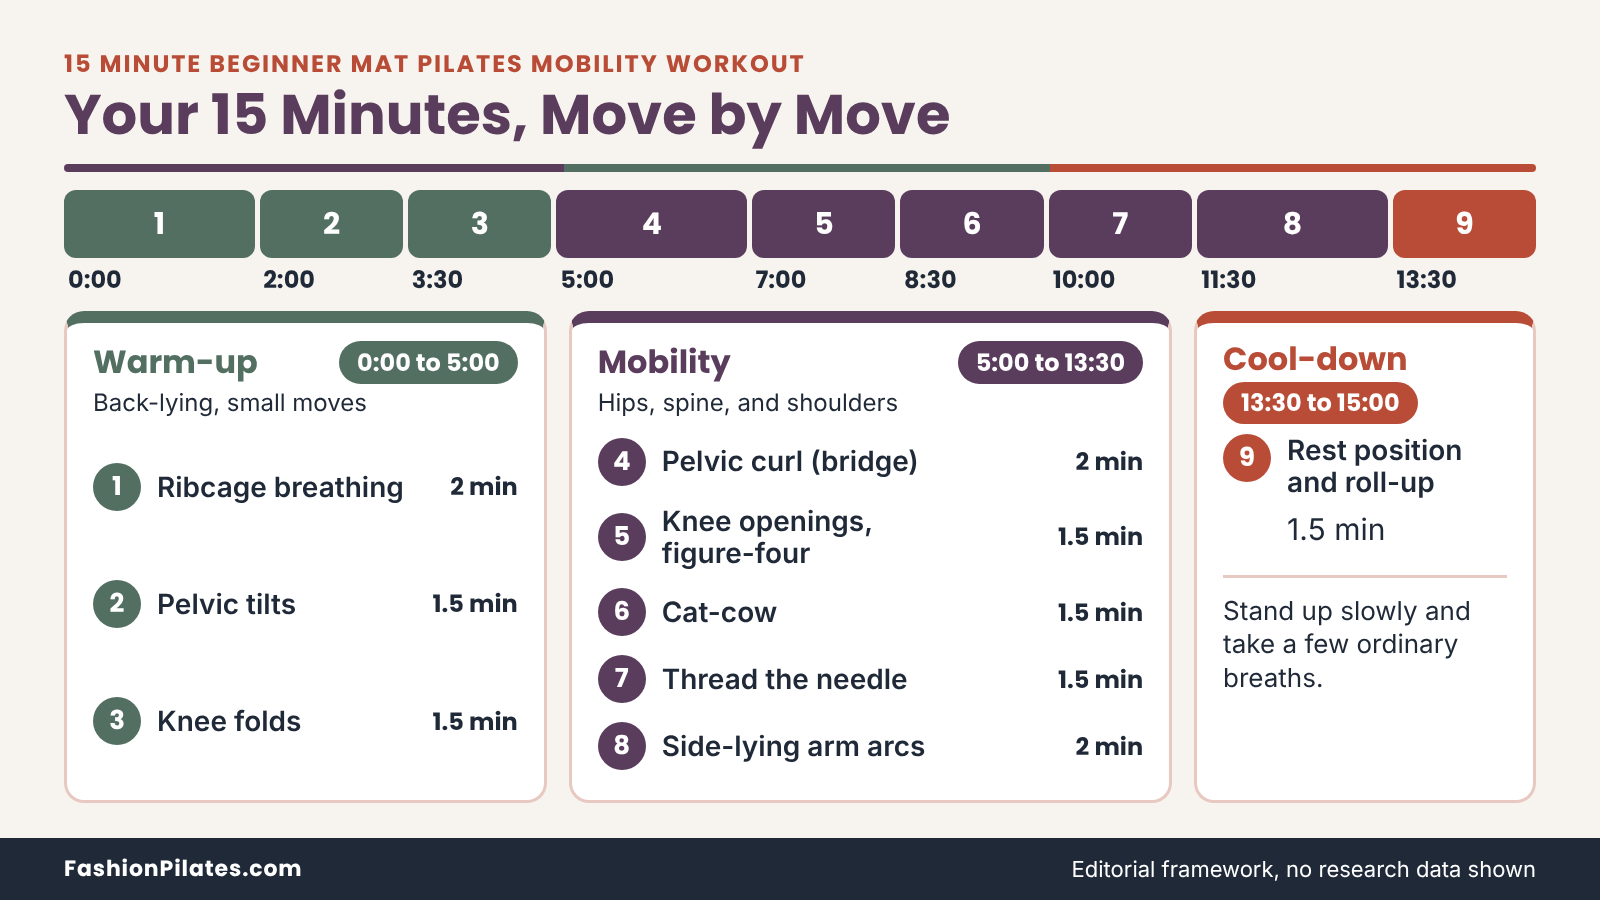
Here is the whole session on one page. Read it once, glance at it again on the floor, and use the detailed sections later in this article for the finer points of each move. The clock includes the few seconds it takes to reposition between exercises, so you do not need to add anything.
The minute-by-minute table
How to read the table
The table lists nine exercises in the order you do them, with a target clock and a rep count. Treat the reps as a guide: the goal is the time block, and slower is fine. If a move feels awkward on a given day, take fewer reps and keep the order. Finishing 12 careful repetitions of the plan beats rushing through 20 poor ones, and you can always repeat a block next time.
| Clock | Exercise | Target | Main focus |
|---|---|---|---|
| 0:00 to 2:00 | Ribcage breathing (on your back) | 10 to 12 slow breaths | Ribcage expansion, settling in |
| 2:00 to 3:30 | Pelvic tilts | 8 to 10 small tilts | Low back and pelvis awareness |
| 3:30 to 5:00 | Knee folds | 5 to 6 per side, alternating | Hip control with a still pelvis |
| 5:00 to 7:00 | Pelvic curl (bridge) | 5 to 6 slow rolls | Spinal articulation, hamstrings, glutes |
| 7:00 to 8:30 | Knee openings and figure-four | 6 per side, then 15 seconds per side | Hip rotation and outer hip |
| 8:30 to 10:00 | Cat-cow | 6 to 8 rounds | Whole-spine movement on all fours |
| 10:00 to 11:30 | Thread the needle | 4 to 5 per side | Mid-back rotation, shoulder blade |
| 11:30 to 13:30 | Side-lying arm arcs | 5 to 6 per side | Shoulder range with a quiet ribcage |
| 13:30 to 15:00 | Rest position and slow roll-up | 60 seconds, then 30 seconds | Settling, gentle lengthening |
What you need and how to time it
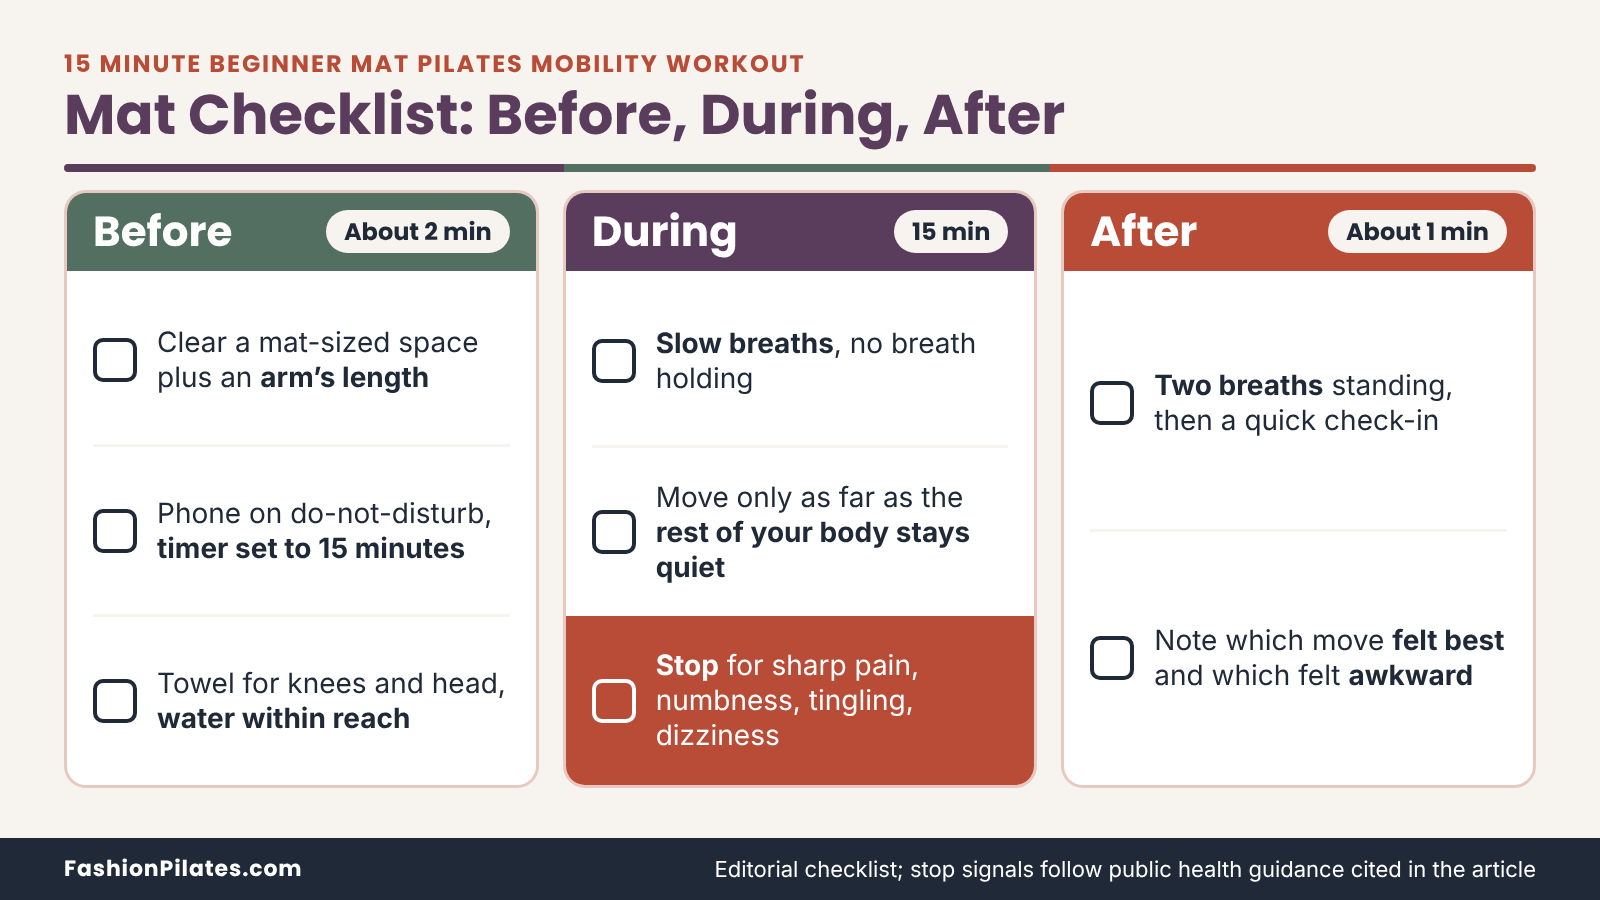
You need a mat with some cushioning, a clear space about the size of your mat plus an arm’s length on each side, and a way to watch the clock. A phone timer propped against a water bottle is a perfectly respectable system, though the notifications that arrive in the middle of a rib-breathing set are less respectable. Put the phone in do-not-disturb mode first. A folded towel is the only optional extra: you will use it as padding under the knees or head if you need it.
Warm-up and cool-down logic
Why this order works
The sequence moves from supported to less supported, and from small to larger movements. You start lying on your back because the floor holds up your spine, which lets you tune in to breathing and the pelvis without balancing. Knee folds and the pelvic curl then add a little load to the hips and legs. On all fours, the spine moves against gravity in cat-cow and thread the needle, and in side-lying work the shoulder moves through a bigger arc.
The session ends with a rest position, so your breathing and heart rate settle before you stand up. The first five minutes act as the warm-up, the middle block is the mobility work, and the last ninety seconds are the cool-down.
Pace and effort
This is a gentle session. As an editorial rule of thumb, aim for about a 2 to 3 out of 10 effort, where 10 is the hardest you could work: you should feel muscles switching on, not strain, and you should be able to talk in short sentences throughout. If you reach a stretch that makes you hold your breath, you have gone past the useful range, so back off a little. Mobility is about the range you can control, not the deepest position you can reach, and nothing in this routine should be pushed to the very end of a range.
Setting Up: Space, Mat, and What to Wear
Set-up takes about two minutes and removes most of the small irritations that make people abandon short routines. It is also the part where beginners are most likely to overbuy, so here is what actually matters.
Space and surface
Choosing a mat thickness
You will be on your back, on all fours, and on your side, so your tailbone, spine, hips, and knees all meet the surface. Healthline’s beginner guide says a typical yoga mat is too thin for most Pilates work and recommends a thicker, softer one. Manufacturers list thickness in millimeters on their product pages, so compare those listings, and prefer a mat that stays put on your floor and does not pinch your kneecaps. If you are shopping, the separate buying guide, how to choose a Pilates mat, covers thickness, density, and grip in detail; this article concentrates on the workout itself. Until your mat arrives, a folded blanket on a carpeted floor works for one session.
Floor, room, and distractions
Choose a floor that does not slide: carpet or a mat on hardwood both work, but a mat on polished tile can creep during side-lying work. Clear about an arm’s length around the mat, because the arm arcs and thread the needle both reach sideways. Keep a towel and a glass of water within reach. Silence notifications before you start, and tell the people you live with that the next fifteen minutes are spoken for. The routine is short enough to protect, and that is a large part of why it is realistic.
What to wear
Clothing that lets you move
The only real requirement is clothing that stretches in the directions you will move and stays where you put it. Look for a waistband that does not dig into your belly when you breathe into your ribs, a top that stays secure on all fours and in side-lying, and leggings or shorts with enough give for the knee openings. You do not need a matching set, and a plain T-shirt with sweat shorts is fine. For deeper comparisons of fabrics and fits, see what to wear to a beginner Pilates class.
Feet, hair, and small details
Go barefoot if your mat has decent grip, or wear grip socks if it feels slick or your floor is cold. Pull long hair back so it does not fall in your face during thread the needle, and take off necklaces that dangle toward your chin or swing into your eyes. Wipe your hands before cat-cow, since damp palms slide on some mats. These details are small, but a routine that runs smoothly the first few times is far more likely to become a habit.
Safety First: Who Should Modify, Skip, or Stop
A routine this gentle is still exercise, and a few groups of readers should get individual guidance before starting. This section is deliberately placed before the exercises. Read it once, decide which category you fall into, and then use the rest of the article accordingly.
Who should check with a professional first
Injury, surgery, and ongoing conditions
If you are recovering from an injury, had surgery recently, live with a diagnosed spine, hip, or shoulder condition, or have a heart, balance, or other chronic health condition, talk with your own clinician before starting, and ask them which of the nine moves suit you. Healthline’s beginner Pilates overview gives the same general advice: check with a health professional first if you are new to exercise, pregnant, recovering from an injury, or have limited mobility, and stop and reassess if a movement hurts. A certified Pilates instructor who works with clients one on one can then adapt the order, ranges, and positions to what your clinician approves.
Pregnancy and postpartum
The Centers for Disease Control and Prevention (CDC) advises that people who are pregnant be under a doctor’s care and ask that doctor whether and how to adjust physical activity during and after pregnancy. It also notes that after the first trimester, exercises that require lying flat on your back are best avoided. Five of the nine moves here are done lying on your back, so this routine as written is not suited to the second and third trimesters without changes from a clinician or an instructor trained in prenatal modifications. After birth, ask your clinician when to start and whether anything about your abdominal wall or pelvic floor changes how you should move.
Osteoporosis and low bone density
What major organizations say
People with osteoporosis (a condition where bones become weaker and break more easily) get specific advice about the spine. The Bone Health and Osteoporosis Foundation’s moving safely guide says to avoid bending forward from the waist and to avoid forward-flexion exercises such as toe touches, crunches, and sit-ups. It also warns against forceful twisting of the torso. The Mayo Clinic’s osteoporosis exercise page lists forward bending and twisting among the movements that raise spinal fracture risk, and the National Institute of Arthritis and Musculoskeletal and Skin Diseases tells readers with low bone density to talk to a health care provider before starting an exercise program.
What this means for this routine
Three parts of the routine move the spine in the ways those sources flag: the rounding half of cat-cow, the rotation in thread the needle, and the gentle sway of the knee openings. Pelvic tilts and the pelvic curl also involve small spinal movements. That does not make the routine off limits to everyone with bone concerns, but it does mean your clinician should decide. Take the table below to the appointment, ask which rows apply to you, and follow what you are told over anything printed here.
| Move | Why it may need care | Question to ask |
|---|---|---|
| Pelvic tilts and pelvic curl | Small spinal flexion and extension movements while lying down | Is a small, neutral range acceptable for me? |
| Knee openings | Knees tipping can add slight spinal rotation if pushed | Should I keep my knees in a small range? |
| Cat-cow | The cat half rounds the spine forward | Should I skip the rounding and keep the spine neutral? |
| Thread the needle | Rotates the mid-back under the weight of your body | Is any rotation safe, and how far? |
| Rest position and roll-up | Rounding forward into child’s pose and rolling up through the spine | Is an upright or on-the-back rest position better? |
Pain versus sensation
Sensations that are normal
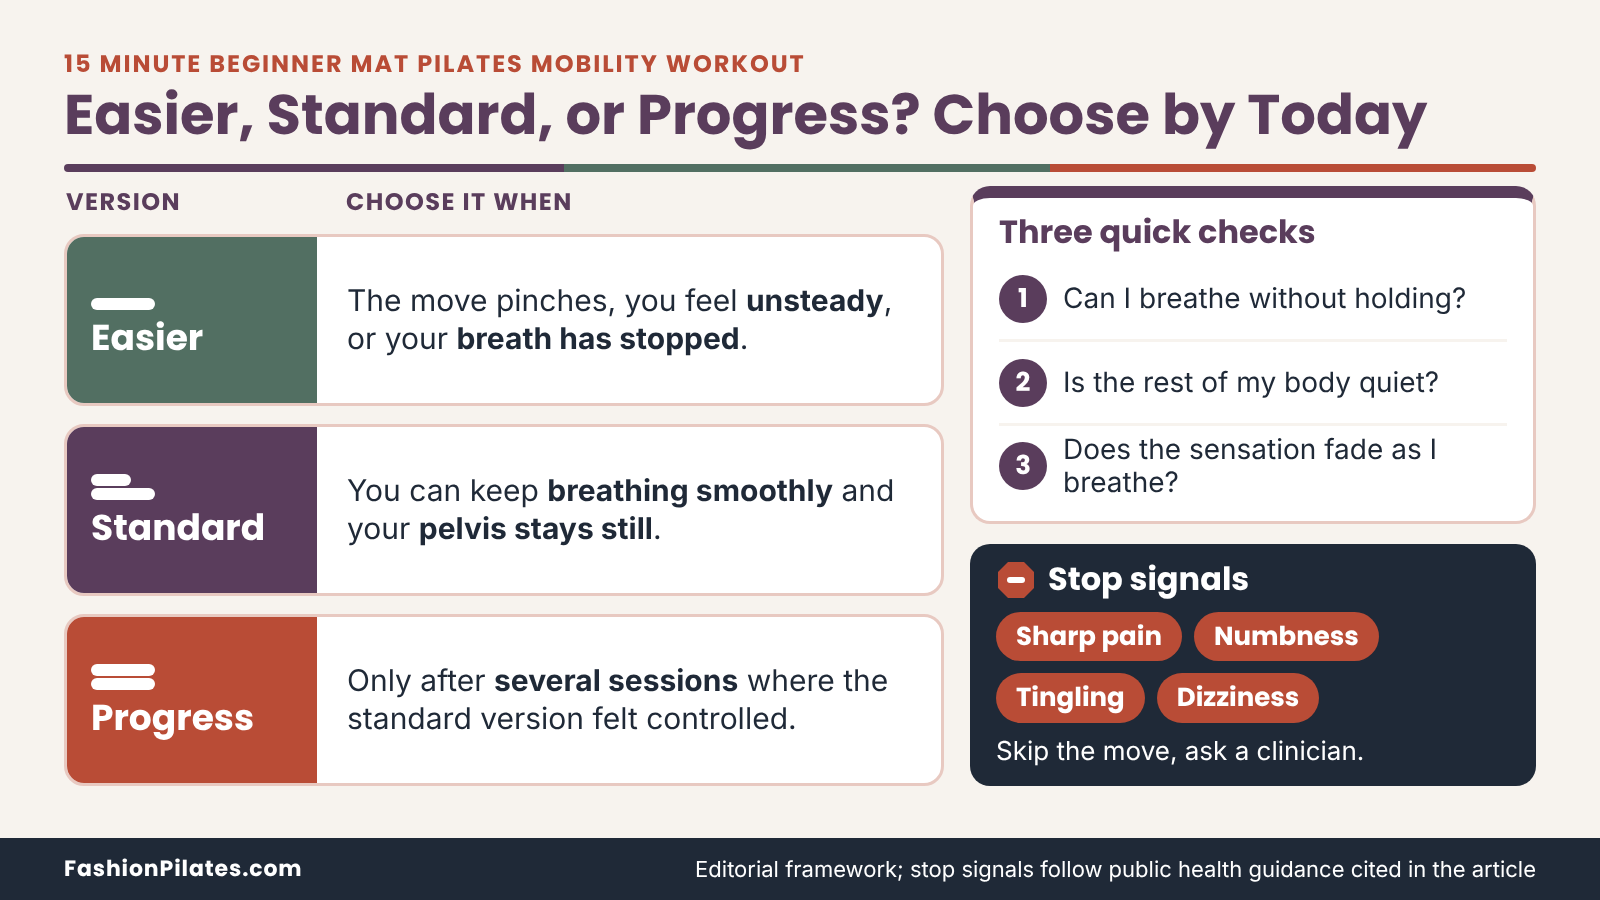
Beginners often worry that any feeling means something is wrong. In reality, several sensations are expected in a mobility session: a mild pulling in the hip or mid-back as you reach a new range, a working feeling in the glutes and hamstrings during the bridge, a light effort in the abdominals as you lift a knee, and a slight tiredness in the shoulders during side-lying arcs. Mass General Brigham notes that ordinary workout soreness starts soon after exercise and may last a few days. A good test is whether the sensation stays steady or fades as you breathe and settle into the move.
Signals to stop
Stop the move, and skip it for the rest of the session, if you feel sudden sharp pain, burning or tingling that travels into an arm or leg, numbness, dizziness, or chest discomfort. The same Mass General Brigham guidance lists pain that prevents a movement, visible swelling or bruising, pain that lasts more than three days and limits what you can do, and pain that wakes you at night among the reasons to see a clinician. Pain at the site of an earlier injury or recent surgery belongs on that list too. A simple personal rule works well: if you would not want to repeat the move at the same intensity tomorrow, it was too much today.
Minutes 0 to 5: Breath, Pelvis, and Hip Control
The first five minutes are the warm-up, and all three exercises are done lying on your back with your knees bent and your feet flat. One term shows up repeatedly: neutral spine. It simply means your spine rests in its natural gentle curves, so there is a small space under your low back (enough to slide a few fingers in) and your pelvis is neither tucked nor tipped. You will leave neutral on purpose in the pelvic tilts, then return to it. In each section below, the first part tells you how to do the move, and the second covers the easier option, a progression, and the mistakes to watch for.
Exercise 1: Ribcage breathing (0:00 to 2:00)
Starting position, action, and breathing
Start on your back with your knees bent, your feet flat and hip-width apart, and your head resting on the mat (add a thin folded towel if your chin lifts toward the ceiling). Rest your hands on the sides of your lower ribs, fingertips pointing toward each other.
Action: inhale slowly through your nose for about four counts and aim the breath sideways and a little toward the mat, so your ribs widen under your hands. Then exhale through softly pursed lips for four to five counts, letting the ribs glide back together and the lower abdomen gently draw in. This three-dimensional breathing, through the ribcage and diaphragm, is one of the core Pilates principles, as Healthline describes it. Do 10 to 12 slow breaths in about two minutes.
Easier option, progression, and common mistakes
Easier: put one hand on your chest and one on your belly and simply breathe naturally for the first minute, with no counting, then move your hands to your ribs. If lying with bent knees bothers your back, rest your calves on a couch cushion or the seat of a chair. Progression: once the side-to-side widening feels clear, inhale while you slide your arms overhead only as far as your ribs stay soft and down, then exhale as the arms return. Mistakes: lifting the shoulders toward the ears, breathing only into the upper chest, squeezing the belly in so hard that you cannot inhale, and holding the exhale until you feel empty. If you feel lightheaded, return to natural breathing and rest.
Exercise 2: Pelvic tilts (2:00 to 3:30)
Starting position, action, and breathing
Start in the same position as the breathing exercise, with your hands resting on the front of your hip bones so you can feel the pelvis move.
Action: exhale and gently tilt the top of your pelvis toward your ribs, as though tipping a bowl of water toward your belly button; your low back softens toward the mat and your tailbone lifts a hair. Inhale and let the pelvis rock back through neutral, optionally allowing a very small arch to appear in the low back. Keep the whole thing small, about half the range you think you can do, and move at a pace of roughly six seconds per tilt. Aim for 8 to 10 repetitions in 90 seconds.
Easier option, progression, and common mistakes
Easier: only do the exhale half, tilting and returning to neutral without going past it, and keep your hands on your hips to check that the movement comes from the pelvis and not the ribs. Progression: hold the tilted position for two seconds before returning, or tilt and then lift the hips just an inch off the mat, which is the beginning of the pelvic curl that comes later. Mistakes: pushing hard through the feet so the whole body slides, squeezing your buttocks to force the tilt, gripping the inner thighs, and arching the low back sharply on the inhale. If your lower back feels pinchy at the arch, stay in the first half of the movement.
Exercise 3: Knee folds (3:30 to 5:00)
Starting position, action, and breathing
Start on your back in neutral spine, feet flat, with your arms long by your sides and your palms pressing lightly into the mat.
Action: inhale to prepare, then exhale and slowly lift one foot off the floor, bending the knee until it sits roughly over the hip and the shin runs parallel to the floor. Inhale and pause for a moment, noticing whether your pelvis tilts or rocks. Exhale and lower the foot to the mat with control, then switch sides. Complete 5 to 6 repetitions per side, about six to eight seconds each, alternating legs. The point is not the leg; it is that the pelvis stays still while the leg moves.
Easier option, progression, and common mistakes
Easier: slide the heel along the mat toward your hips instead of lifting the foot, or lift the foot only an inch or two and tap it back down. Progression: hold the lifted position for two full breaths before lowering, or let the lowering leg hover a half-inch above the mat for a second before it lands. Mistakes: letting the pelvis tip as the leg lowers, arching the low back, gripping your neck or jaw, pulling the knee in past the hip, and rushing the lowering phase. If the front of the hip pinches as the leg lifts, reduce the height.
Minutes 5 to 8.5: Bridging and Hip Openers
With the pelvis warmed up and your breathing set, these next two exercises add range at the spine and hips while you are still fully supported by the mat. They are the longest stretch of back-lying work, so keep the effort low and the pace slow.
Exercise 4: Pelvic curl, also called a bridge (5:00 to 7:00)
Starting position, action, and breathing
Start on your back in neutral spine with your feet flat, hip-width apart, and parallel. Place them close enough that your fingertips can just graze your heels when your arms rest by your sides.
Action: inhale to prepare. Exhale, tilt the pelvis as in the earlier exercise, then peel the tailbone, low back, and mid-back off the mat one segment at a time until you have a long diagonal line from your knees to your shoulders. A PilatesAnytime exercise demonstration describes the same sequence, with the knees pointing straight ahead and the spine rolling up and down in order. Inhale at the top for one breath, then exhale and roll down from the upper back to the tailbone, setting each segment down slowly. Do 5 to 6 rolls, about 20 seconds each.
Easier option, progression, and common mistakes
Easier: lift only through the low back, to a height where you can still feel the ribs resting heavy, then roll down; many beginners need two or three sessions before the mid-back peels off the mat. Progression: hold the top for three breaths, or reach your arms overhead on the inhale while the ribs stay down, which adds shoulder mobility. Mistakes: lifting so high that the ribs flare and the low back arches hard, squeezing the buttocks to the point where the hamstrings cramp, letting the knees splay apart, turning the head to look around, and dropping down in a single piece. A cramp in the back of the thigh means the feet are too far from the hips, so slide them a little closer.
Exercise 5: Knee openings and figure-four (7:00 to 8:30)
Starting position, action, and breathing
Start on your back with your feet flat, hip-width apart, and arms resting by your sides.
Action, part one: exhale and let your right knee fall slowly outward, like a door hinging open at the hip, going only as far as your pelvis stays level on the mat. Inhale and bring it back to center, then repeat on the left. Do 6 per side. Part two: cross your right ankle over your left thigh just above the knee, keeping both knees bent and both feet flexed gently. Rest here for about 15 seconds while you breathe slowly into your ribs, then switch sides. A static stretch like this is a flexibility exercise; Hinge Health’s mobility versus flexibility guide lists the figure-four among its examples.
Easier option, progression, and common mistakes
Easier: make the knee openings smaller, and in the figure-four keep the lower foot on the floor and do not pull the legs toward you. Progression: in the figure-four, hold the back of the lower thigh with both hands and draw it gently toward you until the stretch moves into the outer hip, and in the openings add a two-breath pause at the open position. Mistakes: letting the opposite hip roll off the mat, forcing the knee down for extra range, pulling on the front of the shin rather than behind the thigh, and holding the breath in the stretch. If you feel any pinching at the front of the hip, reduce the range.
Minutes 8.5 to 13.5: Spine and Shoulders
Now you move to all fours and then to your side. These three exercises ask your spine and shoulders to work against gravity, so they feel more active than the first five minutes. Put a folded towel under your knees if the floor is hard, and use the same slow breathing rhythm you practiced earlier.
Exercise 6: Cat-cow, or spinal articulation on all fours (8:30 to 10:00)
Starting position, action, and breathing
Start on hands and knees, with your hands under your shoulders and your knees under your hips, fingers spread, and a long neck so your gaze falls between your hands.
Action: the Cleveland Clinic’s cat-cow guide pairs the movement with breath, with an inhale for the cow position (tailbone lifts, belly softens down, chest opens, gaze forward) and an exhale for the cat (spine rounds like a rainbow, tailbone tucks, chin moves toward the chest). In Pilates, teachers usually ask you to sequence it: start each phase at the tailbone and let the movement travel up one segment at a time to the head. Do 6 to 8 slow rounds in 90 seconds.
Easier option, progression, and common mistakes
Easier: do it seated in a chair with your hands on your knees, which the Cleveland Clinic also lists as a variation, or make the movement smaller on the floor. If your wrists complain, rest on your forearms or make loose fists. Progression: lengthen each phase to a full six-second breath, or pause for one breath in the neutral flat-back position between every round. Mistakes: flinging the head back, which the same guide warns against, collapsing into the shoulders, sinking the low back into a deep sway, moving only the neck, and locking the elbows. Keep your shoulder blades gliding across your ribs, not jammed.
Exercise 7: Thread the needle (10:00 to 11:30)
Starting position, action, and breathing
Start on all fours as in cat-cow.
Action: inhale to prepare, then exhale and slide your right hand, palm up, along the mat under your chest toward your left side. As your arm travels, let your right shoulder lower toward the mat while your chest and head rotate to follow it. Hinge Health’s thread the needle guide describes the same path: reaching an arm under the stomach, lowering the shoulder, and twisting only as far as is comfortable. Inhale and stay for a breath, feeling the mid-back rotate. Exhale and press into your left hand to return. Do 4 to 5 per side, and keep your hips over your knees throughout.
Easier option, progression, and common mistakes
Easier: the same guide suggests resting the forearm on the floor instead of reaching it under the stomach, and holding that shape. A cushion under the lowering shoulder also reduces the range. Progression: rest the side of your head and shoulder on the mat to deepen the rotation, or follow the threading arm by sweeping it back up toward the ceiling and turning your chest to meet it. Mistakes: letting your hips drift back toward your heels, dumping weight into the neck, forcing the shoulder to the mat, holding your breath in the twist, and straining your wrist on the supporting hand. Reduce the range if the shoulder or neck pinches.
Exercise 8: Side-lying arm arcs (11:30 to 13:30)
Starting position, action, and breathing
Start by lying on your right side on the mat with your head on a small folded towel (not your arm), your hips and shoulders stacked, and both knees bent in front of you at about a right angle. Extend your right arm along the mat at shoulder height with the palm up, and rest your left hand on your left hip.
Action: inhale and lift your left arm forward, then sweep it in a wide, slow arc overhead, as far as your ribcage stays quiet. Exhale and bring the arm back along the same curve to the hip. Do 5 to 6 arcs, about eight seconds each, then roll over and repeat on the other side. Teachers use different names for this, such as arm arcs, shoulder drawings, or side-lying arm circles.
Easier option, progression, and common mistakes
Easier: keep the working hand on the mat and slide it forward and back along the floor in a small arc, or stop the lift at shoulder height. A thicker towel under the head helps if your neck feels stretched. Progression: at the end of the arc, add a gentle rotation of the chest toward the ceiling and follow the hand with your eyes, as a mini version of an open book, but only if thread the needle felt comfortable. Mistakes: letting the top shoulder shrug up to the ear, rolling the pelvis backward, letting the ribcage pop open as the arm lifts, flinging the arm, and collapsing the bottom waist into the mat. Slow and quiet beats big and wobbly here.
Minutes 13.5 to 15: Closing the Session
The last ninety seconds are easy to skip when a timer is running and the day is waiting. Please do not skip them. This is where your breathing and heart rate settle, and where you notice how the session felt, which tells you how to approach the next one.
Exercise 9: Rest position and slow roll-up (13:30 to 15:00)
Starting position, action, and breathing
Start kneeling on the mat with your big toes together and your knees hip-width or wider.
Action: sit your hips back toward your heels and fold forward, resting your forearms on the mat with your forehead on a folded towel or stacked hands, which is a version of child’s pose. Inhale and feel the back ribs widen as if you were breathing into your shoulder blades. Exhale and let your weight sink, with no effort left. Stay for about 60 seconds, or five to six slow breaths. Then walk your hands back toward your knees and slowly press yourself up to sitting or kneeling over about 30 seconds, letting your head come up last.
Easier option, progression, and common mistakes
Easier: if your knees or ankles dislike deep bending, place a rolled towel or a cushion between your hips and heels, or skip the folded position and rest on your back with your feet flat and your arms by your sides. That back-lying version is also the better starting point for readers whose clinician has asked them to avoid forward rounding. Progression: walk both hands slightly to the right for three breaths and then to the left, to feel the side of the ribs open. Mistakes: forcing the hips down to the heels, bouncing, holding the breath, rolling up quickly, and straining the neck. If you feel lightheaded when you rise, stay on your knees for a few more breaths.
Standing up and re-entering your day
The first minute after the routine
Take a minute before you pick up the phone. Stand up slowly, let your arms hang, and take a few ordinary breaths. Notice whether your ribs move more easily and whether your hips and shoulders feel looser or only different. Drink some water if you want to. Gentle mobility work rarely leaves you drained, but a deliberate pause helps you register what the session actually did rather than judging it by the next email.
A two-question check-in
Keep it simple and use the same two questions each time: “Which move felt best today?” and “Which move felt awkward, and why?” Write the answers in a notes app or on a sticky note by the mat. Over two or three weeks, the pattern tells you what to progress and what to leave alone, and it makes the conversation with an instructor much easier. If any sensation lingered beyond a day or two, record that too, and follow the guidance from earlier in this article on when to see a clinician.
How Often to Practice and How to Scale the Routine
A short routine only works if you can repeat it, and a 15 minute beginner mat pilates mobility workout is short enough to repeat. This section helps you decide how many days to aim for, how to shrink or stretch the session when life changes, and where it fits in a week.
How often is enough
What guidelines say, and what they do not
The CDC’s adult activity recommendations call for at least 150 minutes of moderate-intensity aerobic activity a week plus at least two days of muscle-strengthening activity, and they stress that some activity is better than none and can be broken into small chunks. This routine is a gentle mobility session. It is movement worth doing, but at a 2 to 3 out of 10 effort it should not be treated as a replacement for brisk walking, cycling, or strength work. Think of it as the part of your week devoted to range of motion and body awareness, alongside those other activities.
A sensible starting frequency
No study gives an exact number of weekly sessions for a 15-minute mobility routine, so this is a judgment call. For the first two weeks, aim for three non-consecutive days, which leaves time to notice how you respond. Then add a fourth or fifth day if you feel good. Hinge Health’s guide suggests mobility practice three to five times a week, spread across the day instead of crammed into one session, which is consistent with starting at three. Soreness that lingers for a few days is a sign to back off, not push on.
Scaling to 10 or 20 minutes
The 10-minute version
On a day when you cannot find fifteen minutes, drop the knee folds and shorten the others, because the knee folds mainly train hip control rather than mobility. Keep the order the same and the pace slow. This version covers all four areas of the body, which makes it a decent default for busy weeks. The shortened clock is below, and you can use it as is, without changing the technique for any move.
| Exercise | 10 minutes | 15 minutes | 20 minutes |
|---|---|---|---|
| Ribcage breathing | 1:00 | 2:00 | 2:00 |
| Pelvic tilts | 1:00 | 1:30 | 1:30 |
| Knee folds | Skipped | 1:30 | 1:30 |
| Pelvic curl | 1:30 | 2:00 | 3:00 (two sets) |
| Knee openings and figure-four | 1:00 | 1:30 | 1:30 |
| Side-lying clams | Skipped | Skipped | 1:30 |
| Cat-cow | 1:30 | 1:30 | 1:30 |
| Thread the needle | 1:30 | 1:30 | 1:30 |
| Side-lying arm arcs | 1:30 | 2:00 | 2:00 |
| Side-lying open book | Skipped | Skipped | 1:30 |
| Rest position and roll-up | 1:00 | 1:30 | 2:30 |
| Total | 10:00 | 15:00 | 20:00 |
The 20-minute version
When you have five more minutes and the 15-minute version feels easy, add two side-lying moves and a little extra time. Side-lying clams: lie on your side with your hips stacked and your knees bent, feet together; exhale and lift the top knee like a clamshell opening, without letting the pelvis roll back, then inhale and lower; do 8 to 10 per side. Open book: in the same side-lying position with both arms forward and palms together, exhale and open the top arm in an arc toward the other side while your chest rotates, following the hand with your eyes; inhale and return; do 5 to 6 per side. Then repeat the pelvic curl for a second set and add an extra minute to the rest position.
Fitting it into a real day
Choosing an anchor
The easiest way to make a short routine stick is to attach it to something you already do each day, such as right after you brush your teeth, before your first coffee, or when you get home and change.
That cue, rather than motivation, decides whether the mat comes out. If you want to practice later in the day, avoid doing the floor work right after a large meal, since lying flat and folding forward can be uncomfortable on a full stomach. A routine that works at 6:30 a.m. in pajamas and at 8 p.m. in leggings is more useful than a perfect-time plan that only works on weekends.
The 7-day starter plan
This table gives a realistic first week for someone who has never done the routine, with three full sessions, two lighter days, and two off days. Swap the days around to match your schedule, but keep the full sessions separated by at least one lighter day or rest day so you can see how your body responds.
| Day | What to do | Time | Focus for the day |
|---|---|---|---|
| Day 1 | Full 15-minute routine | 15 minutes | Learn the order and the breathing |
| Day 2 | First five minutes only (breathing, tilts, knee folds) | 5 minutes | Keep the pelvis still |
| Day 3 | Full 15-minute routine | 15 minutes | Slower pelvic curl, smaller ranges |
| Day 4 | Rest or an easy walk | Optional | Notice any lingering soreness |
| Day 5 | 10-minute version | 10 minutes | Cat-cow and thread the needle |
| Day 6 | Full 15-minute routine | 15 minutes | Use the check-in questions |
| Day 7 | Rest | None | Decide what to adjust next week |
What the Research Supports and Where to Go Next
It is worth being straightforward about how much science stands behind a specific 15-minute routine. The honest answer is: less than the confident tone of most workout content implies. This section sets the evidence, the method behind this article, and the next steps.
What the evidence does and does not show
Pilates and low back pain: the Cochrane review
The most useful rigorous evidence about Pilates comes from a Cochrane systematic review of Pilates for chronic, non-specific low back pain. That review pooled 10 randomized trials with 510 participants and found low to moderate quality evidence that Pilates was better for pain and disability than minimal intervention. It found no conclusive evidence that Pilates beats other forms of exercise, and the follow-up extended only to six months. The review studied back pain, not mobility, and not this routine. Its practical message is helpful anyway: choose the exercise you will keep doing.
How this routine was built
This guide is a research-based, expert-informed routine. The safety guidance comes from the public health and medical sources linked above, and the exercise cues follow widely taught Pilates mat conventions, checked against the published descriptions of cat-cow, thread the needle, and the pelvic curl wherever they exist. We did not run hands-on testing, trials, or client sessions, and the timing and rep counts are editorial judgments, not research findings. Treat the routine as a starting template, and ask a certified Pilates instructor to check your form in person.
Where to go from here
When 15 minutes starts to feel easy
After three or four weeks of regular practice, you may notice that the moves feel smoother and that you reach for the progression options without thinking about it. At that point you have three paths. You can use the 20-minute version above, you can try a fuller class-style session such as beginner Mat Pilates workout, or you can add strength-focused sessions to complement the mobility work. Our wider Mat Pilates category hub collects these options in one place, and Pilates for beginners complete guide explains the principles behind them.
Working with an instructor
A single one-on-one session with a certified Pilates instructor is a quick way to check that your pelvis is really staying still in the knee folds, that your ribs are not flaring in the bridge, and that your thread the needle is rotating the mid-back and not the neck. Ask about their training with beginners and with any condition you have, such as osteoporosis or a past injury. Bring this article, mention which moves felt awkward, and let them adapt it. For the breathing pattern in particular, see Pilates breathing technique for beginners for a deeper look at the ribcage approach used in Exercise 1.
Frequently Asked Questions
Is 15 minutes of mat Pilates enough to improve mobility?
Fifteen minutes can be enough to make movement feel easier, but no study has tested this exact routine, so nobody can promise a specific result. What helps most is repetition, because joints respond to being moved through their range regularly. Pair the routine with walking or other general activity so your overall week stays balanced. If you notice no change after a month of steady practice, a one-on-one session with an instructor can show you what to adjust.
Can I do this 15 minute beginner mat pilates mobility workout every day?
Some people do gentle mobility work most days, but a sensible start is three non-consecutive days a week. This lets you see how your body responds before you add more. If you wake up with lingering soreness or a pinchy joint, take a rest day or do only the first five minutes. Daily practice makes the most sense once the moves feel easy and nothing from the previous session is still bothering you. Anyone with a medical condition should ask their own clinician how often is appropriate.
Do I need special equipment for this routine?
You need a cushioned mat, a clear patch of floor, and a timer, and nothing else is required. Healthline notes that a standard yoga mat can be too thin for many Pilates exercises, so a thicker one is easier on the spine and knees. Until you buy one, a folded blanket or large towel on a carpeted floor works for a trial session. A folded towel is also useful for padding under the knees and for propping your head. Gadgets such as bands and balls are optional extras that this routine does not use.
Will this routine fix my stiff back or tight hips?
No exercise routine can promise to fix stiffness, and this article does not claim that it will. The routine may support comfortable movement in the spine, hips, and shoulders for people who have no medical reason to avoid it. A Cochrane review found some evidence that Pilates helps chronic low back pain compared with minimal treatment, though it did not show Pilates to be better than other exercise. If stiffness comes with pain that persists, numbness, or weakness, see a clinician before continuing. A professional can tell you whether movement, rest, or other care is the right next step.
Is this routine safe during pregnancy?
Not as written, because five of the nine exercises are done lying flat on your back. The CDC advises people who are pregnant to stay under a doctor’s care and to ask whether and how to adjust their activity. It also suggests avoiding exercises that require lying flat on the back after the first trimester. Ask your clinician which moves are acceptable at your stage of pregnancy. An instructor trained in prenatal modifications can then adapt the sequence safely.
Is it normal to feel sore after the first few sessions?
Mild muscle soreness that begins soon after a workout and lasts a few days is common when you start something new. Mass General Brigham describes this kind of soreness as a normal response to exercise. It should ease with light movement, and it should not stop you from doing everyday tasks. Sharp pain, numbness, tingling that spreads, or pain that wakes you at night is different and deserves a clinician’s attention. If you are unsure which one you have, skip the move that caused it and check with a professional.
What if I cannot get down to the floor or back up?
Ask your clinician first, and then consider a chair-based alternative while you build confidence. The Cleveland Clinic describes a seated version of cat-cow that you can do on the edge of a chair with your hands on your knees. You can also practice ribcage breathing seated, with your hands on your lower ribs. Rotation can be done seated by turning your chest while your hips stay facing forward, within a comfortable range. An instructor experienced with beginners can design a chair-based routine that covers the same four body areas.
How is mobility different from stretching?
Mobility is your ability to move a joint through its range under your own muscle control. Stretching, often called flexibility work, lengthens a muscle passively, often by holding a position. Hinge Health describes mobility as depending on flexibility along with strength, stability, balance, and coordination. This routine includes a short figure-four hold, but most of the session is active movement with breathing. That is why it feels more like a flowing practice than a series of long holds.


Trackbacks/Pingbacks